 optionOS
Field GuideAlan Rehberi
Answers to the big questions: what is in the app, how it is used, how I work, and where AI is going.Büyük soruların cevapları: uygulamada ne var, nasıl kullanılır, nasıl çalışıyorum ve AI nereye gidiyor.
Cockpit ajan kartı veri akışı
FEATUREUygulamada görünen yetenek.EVIDENCE-UIGörsel kanıtla anlaşılır.
Bu sayfa, What's New içindeki ajan kartı görselini çıplak resim olarak değil, aynı image-card soy ağacı olarak gösterir. Caption ve 1–15 indeks legend'ı What's New source entry'sinden gelir; Guide sadece kalıcı açıklamayı taşır.
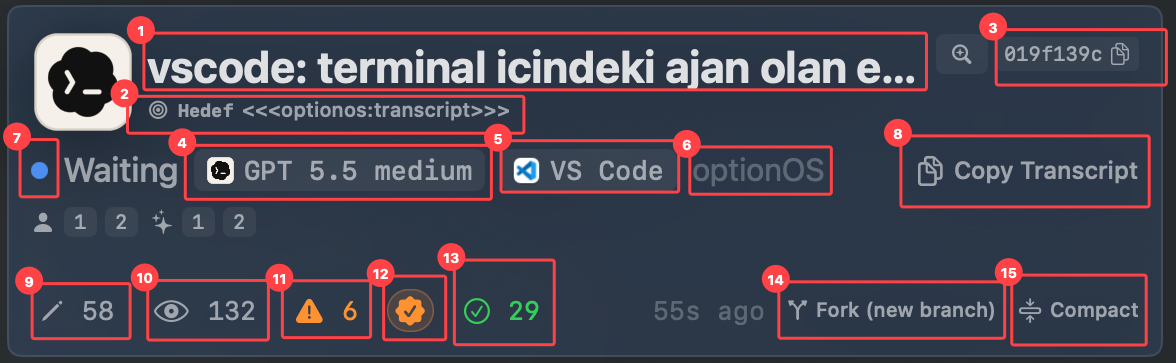
- 1Başlık — oturumun neye ait olduğunu gösterir
- 2Hedef — konuşmanın veya transcript'in bağlandığı hedef bağlam
- 3Session ID — oturum kimliği ve kopyalama aksiyonu
- 4Agent/provider kimliği — kartın hangi agent yüzeyinden geldiğini gösterir
- 5Agent modeli — model ve çalışma seviyesi
- 6Host uygulama — VS Code veya Ghostty gibi oturumun koştuğu yer
- 7Agent durumu — bekleme, çalışma veya ilgili canlı durum sinyali
- 8Copy Transcript — in-process transcript'i kopyalama aksiyonu
- 9Düzenlenen dosyalar — agent'ın değiştirdiği dosya sayısı
- 10Görülen dosyalar — agent'ın baktığı veya okuduğu dosya sayısı
- 11Commit edilmemiş dosyalar — henüz commit'e girmeyen değişiklik sayısı
- 12Otomatik commit aksiyonu — commit akışıyla ilgili hızlı işlem
- 13Commit edilmiş değişiklikler — tamamlanmış commit/değişiklik sayısı
- 14Fork — VS Code'da terminal, Ghostty'de fork terminali açarak oturumu ayırma aksiyonu
- 15Compact — transcript/prompt'u yeni agent terminaline hazır koyar; terminal açılır ve kullanıcı Enter ile başlatır
Cockpit agent card data flow
FEATUREVisible app capability.EVIDENCE-UIUnderstood through visual evidence.
This page shows the agent-card screenshot from What's New as the same image-card lineage, not as a bare image. The caption and the 1–15 indexed legend come from the What's New source entry; the Guide only carries the permanent explanation.
- 1Title — shows what the session belongs to
- 2Target — the target context attached to the conversation or transcript
- 3Session ID — the session identifier and copy action
- 4Agent/provider identity — shows which agent surface the card came from
- 5Agent model — the model and working level
- 6Host app — where the session is running, such as VS Code or Ghostty
- 7Agent state — waiting, running, or the relevant live state signal
- 8Copy Transcript — copies the in-process transcript
- 9Edited files — the number of files the agent changed
- 10Seen files — the number of files the agent viewed or read
- 11Uncommitted files — changes that have not entered a commit yet
- 12Auto-commit action — a quick action for the commit flow
- 13Committed changes — completed commit/change count
- 14Fork — opens a terminal in VS Code or a fork terminal in Ghostty to split the session
- 15Compact — places the transcript/prompt into a new agent terminal ready to run; the terminal opens and the user starts it with Enter
Cockpit'i VS Code'a kur
FEATUREUygulamada görünen yetenek.SETUPKurulum veya bağlama aksiyonu.
optionOS — Cockpit iki yüzeylidir: Mac uygulaması tek başına açılır; canlı agent oturumları için VS Code extension'ı ile yerel köprüden konuşur.
Çalışınca tüm agent oturumların tek panelde, canlı görünür — çalışan, bekleyen, cevabını bekleyen hepsi bir arada.
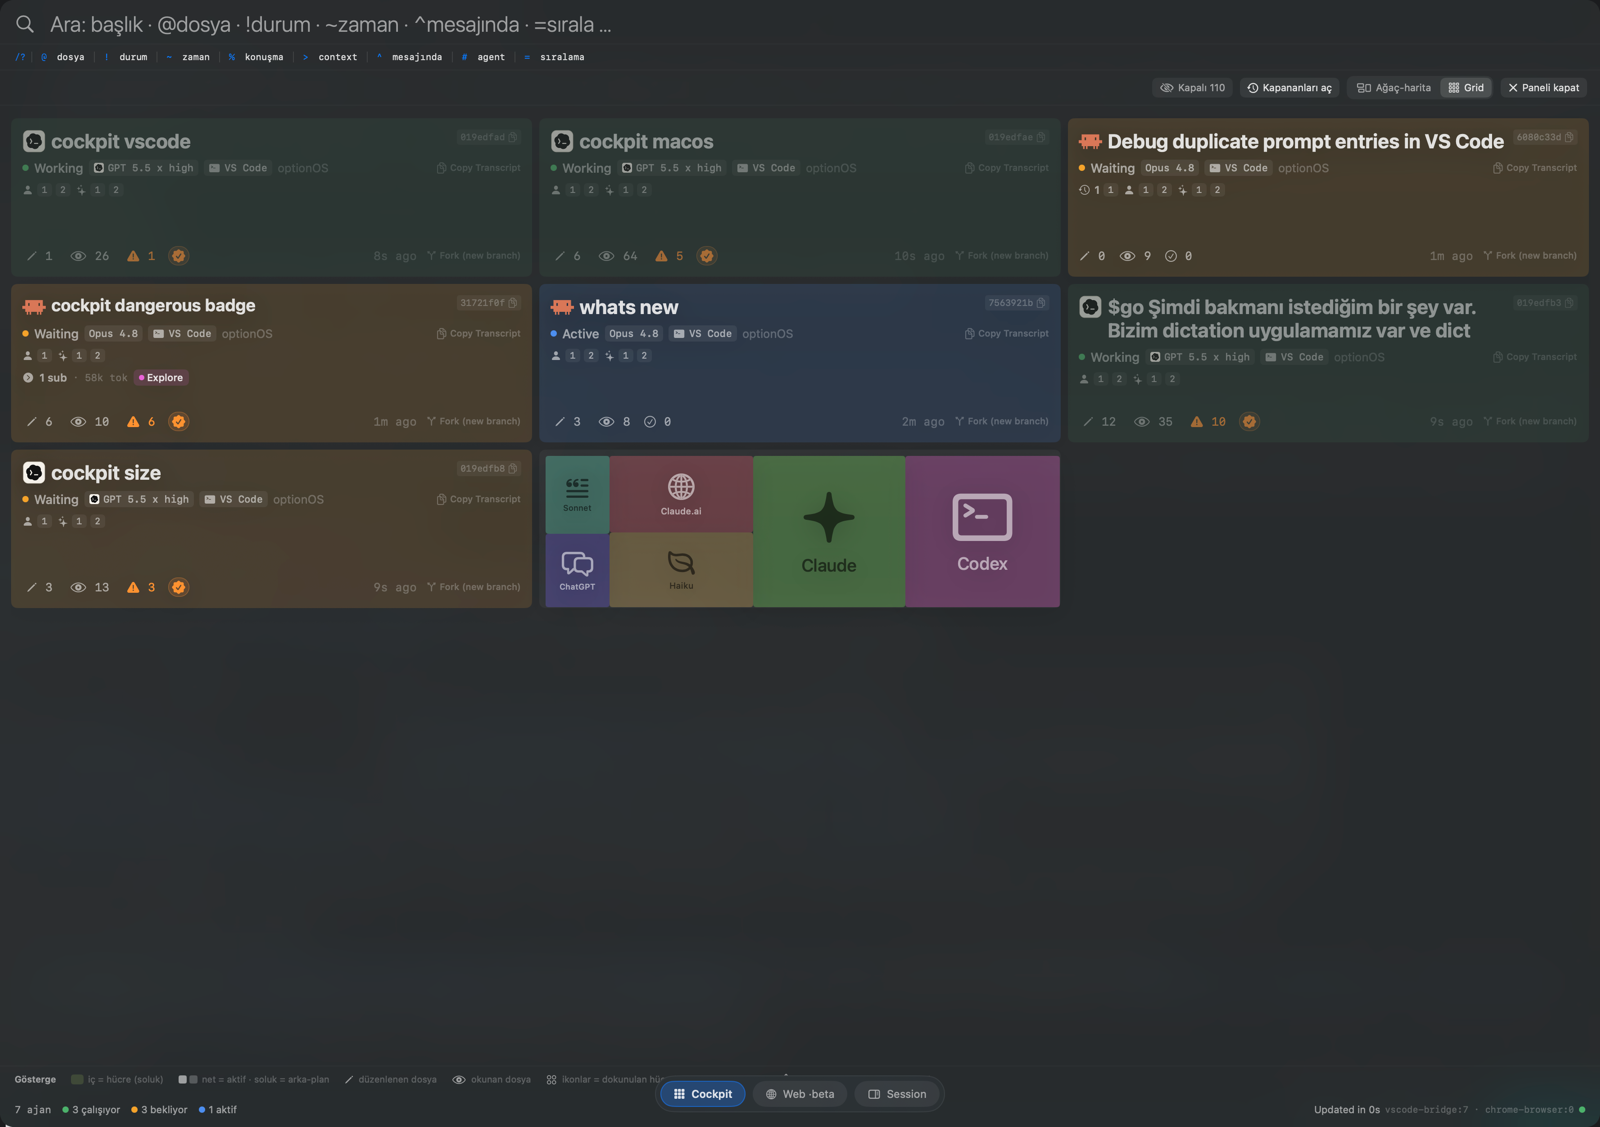
Her oturum bir kart: adı, durumu, modeli, kaç alt-agent çalıştırdığı, harcadığı token, düzenlediği dosya, yaşı ve hangi branch'e fork olduğu — hepsi tek kartta.
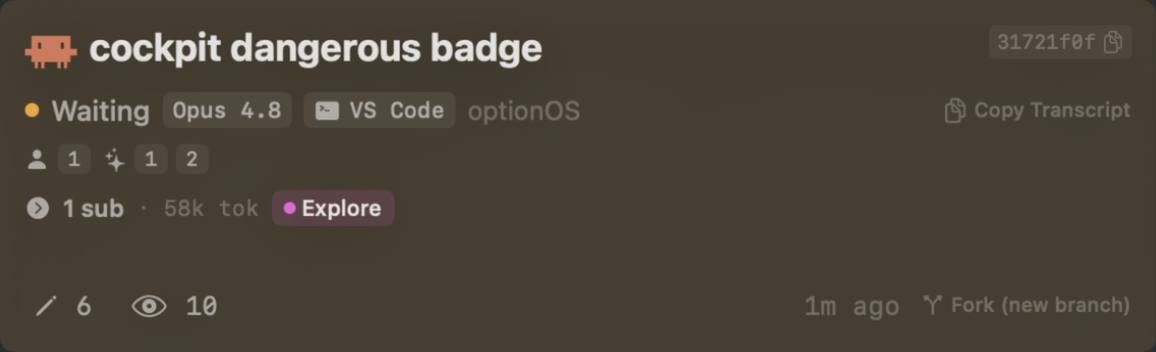
Kurulum dört adım:
1 — Extension'ı kur. Canlı agent oturumları için VS Code'da optionOS - Cockpit extension'ını yükle. Mac uygulaması ayrı kurulabilir ve kullanıcı nereye koyduysa oradan çalışır.
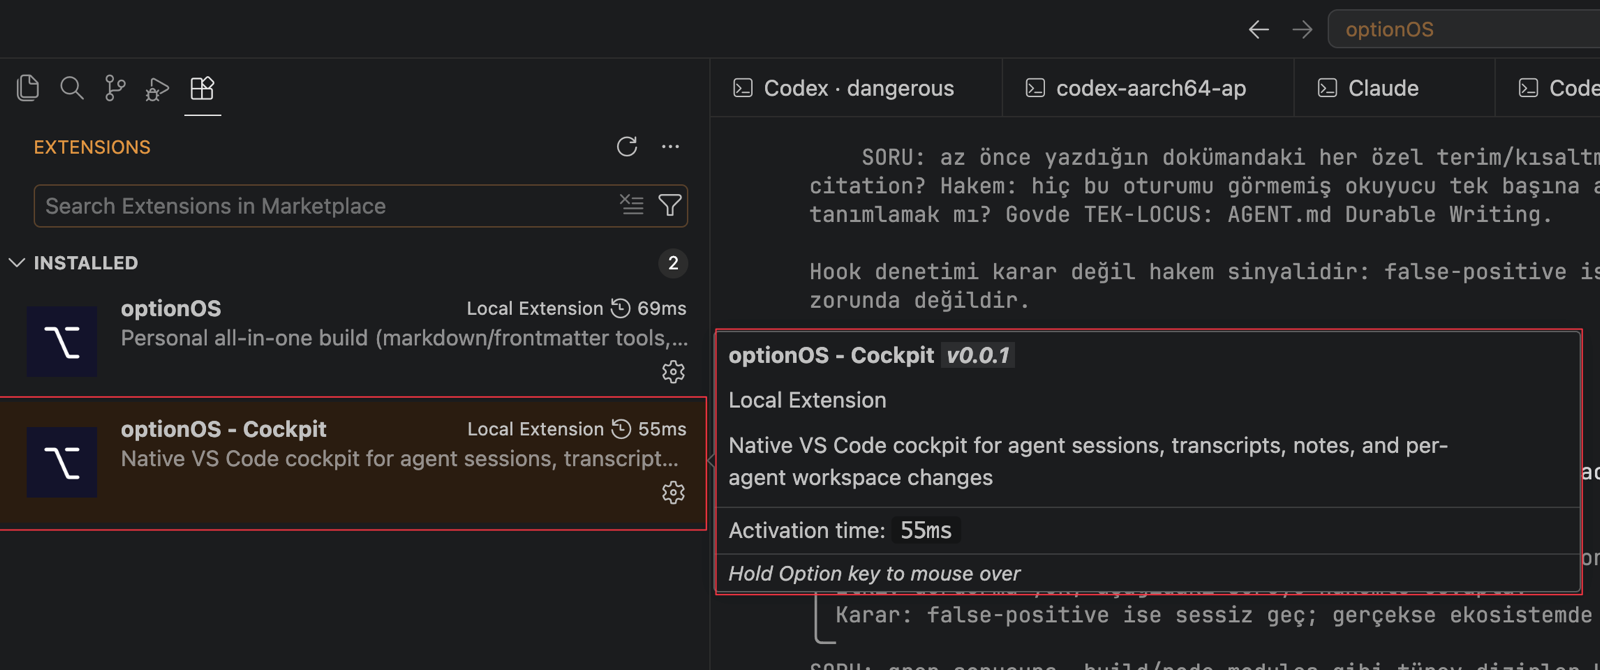
2 — Workspace'i aç. Cockpit kurulumu workspace'e özeldir; önce projeni VS Code'da bir workspace olarak aç.
3 — Kurulumu çalıştır. Command Palette'i aç (⌘⇧P) ve optionOS - Cockpit: Install komutunu çalıştır. Bu, Claude Code ve Codex hook'larını, VS Code workspace ayarlarını ve Mac↔VS Code köprüsünü otomatik bağlar.
4 — Doğrula. optionOS - Cockpit: Doctor komutu her parçayı GREEN/RED olarak listeler. Hepsi GREEN ise oturumların hem VS Code kenar çubuğunda hem Mac panelinde canlı görünmeye başlar.
Bir şey kırılırsa optionOS - Cockpit: Repair, geri almak için optionOS - Cockpit: Uninstall.
Set up Cockpit in VS Code
FEATUREVisible app capability.SETUPSetup or connection action.
optionOS — Cockpit has two surfaces: the Mac app opens on its own; live agent sessions require the VS Code extension over a local bridge.
Once running, every agent session shows up in one live panel — working, waiting, awaiting your answer, all together.
Every session is a card: its name, state, model, how many sub-agents it ran, tokens spent, files edited, age, and which branch it forked onto — all on one card.
Setup is four steps:
1 — Install the extension. For live agent sessions, install the optionOS - Cockpit extension in VS Code. The Mac app is installed separately and can run from the location chosen by the user.
2 — Open a workspace. Cockpit setup is per-workspace; open your project as a VS Code workspace first.
3 — Run setup. Open the Command Palette (⌘⇧P) and run optionOS - Cockpit: Install. This wires your Claude Code and Codex hooks, VS Code workspace settings, and the Mac↔VS Code bridge automatically.
4 — Verify. The optionOS - Cockpit: Doctor command lists every piece as GREEN/RED. When all are GREEN, your sessions start showing live in both the VS Code sidebar and the Mac panel.
If something breaks, run optionOS - Cockpit: Repair; to undo everything, optionOS - Cockpit: Uninstall.
Soy ağacı grafikleri
LINEAGEParent/child/relation soy ağacı gerekiyor.EVIDENCE-UIGörsel kanıtla anlaşılır.
Soy ağacı grafiği, arayüzde görünen bir parçayı tek başına resim olarak bırakmaz. Resim, resmin üzerindeki indeksler, indekslerin anlamı, o parçanın ait olduğu component/source-map izi ve kullanıcının konuşarak verdiği niyet birlikte okunur.
Bu yüzden burada her kart dört katman taşır: görsel kanıt, indeksler, indeks açıklaması ve kartlar arası akış metni. Kartlar arası metin en az görsel kadar önemlidir; çünkü “bu örnek neden var, bir sonrakine nasıl bağlanıyor?” sorusunu o cevaplar.
Temel amaç şu: kod tarafını anlatmak yerine, gördüğün çıktıyı işaretlemek. İnsan UI üzerinde konuşur ve işaretler; agent, o işaretli yüzeyden component'i, source dosyasını ve yapılacak değişikliği bulur. Böylece çalışma, “hangi kodu değiştir?” sorusundan “hangi gözlenen sonucu istiyoruz?” sorusuna döner.
İlk kapalı set, What's New entry'si için kuruldu. Buradaki önemli ders şu: ortaklaştırılacak en küçük parça resim değildir; ortaklaştırılacak en büyük güvenli parça image-card soy ağacıdır. Yani resim, caption ve indeks legend'ı tek aile olarak taşınır.
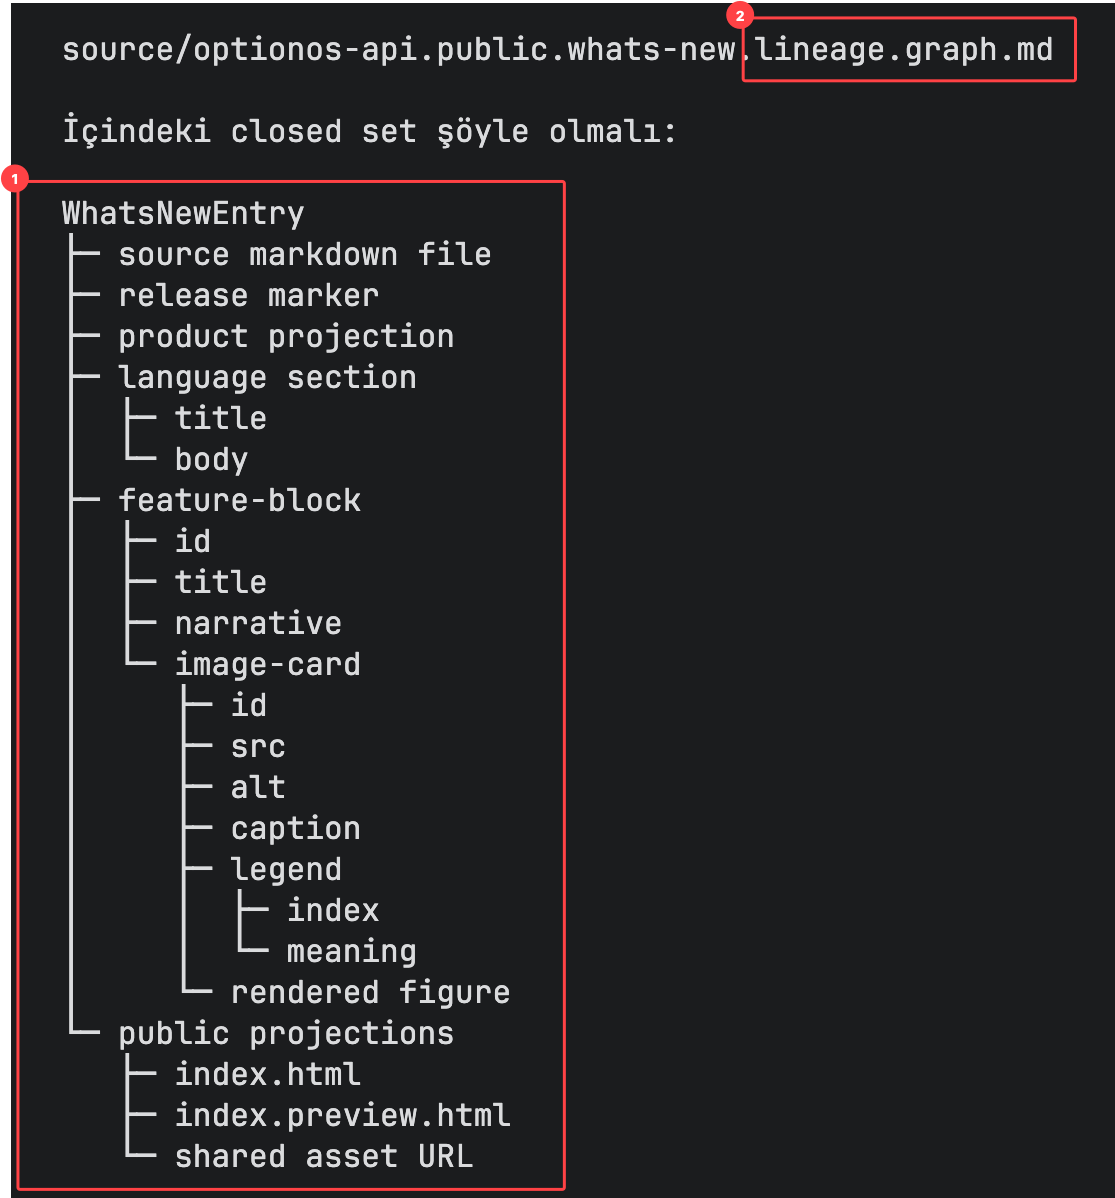
Bu resim bir ürün ekranı değil; What’s New içeriğinin hangi atomlardan oluştuğunu ve Guide gibi başka yüzeylere hangi parçanın projekte edileceğini anlatan sözleşme çizimidir.
- 1Closed set — source markdown'dan shared asset URL'ye kadar bütün aile
- 2Authority dosyası — bu soy ağacı sözleşmesinin kalıcı evi
Bu kapalı setin pratik sonucu şudur: Guide, What's New içindeki 15 indeksli Cockpit kartını kullanacaksa sadece PNG'ye link vermez. Source entry'deki feature-block ve image-card'ı çağırır. Böylece caption ve 1–15 indeks açıklamaları ikinci kez yazılmaz, ama Guide'da da görünür kalır.
Aynı mantık doküman içinde de çalışır. Bir ekran görüntüsünü dokümana koyduğunda, görüntünün etrafındaki source-map veya component satırı da soy ağacının parçasıdır. Agent yalnız resmi değil, “bu resimde hangi component/source ipucu seçilmiş?” bilgisini de görür.
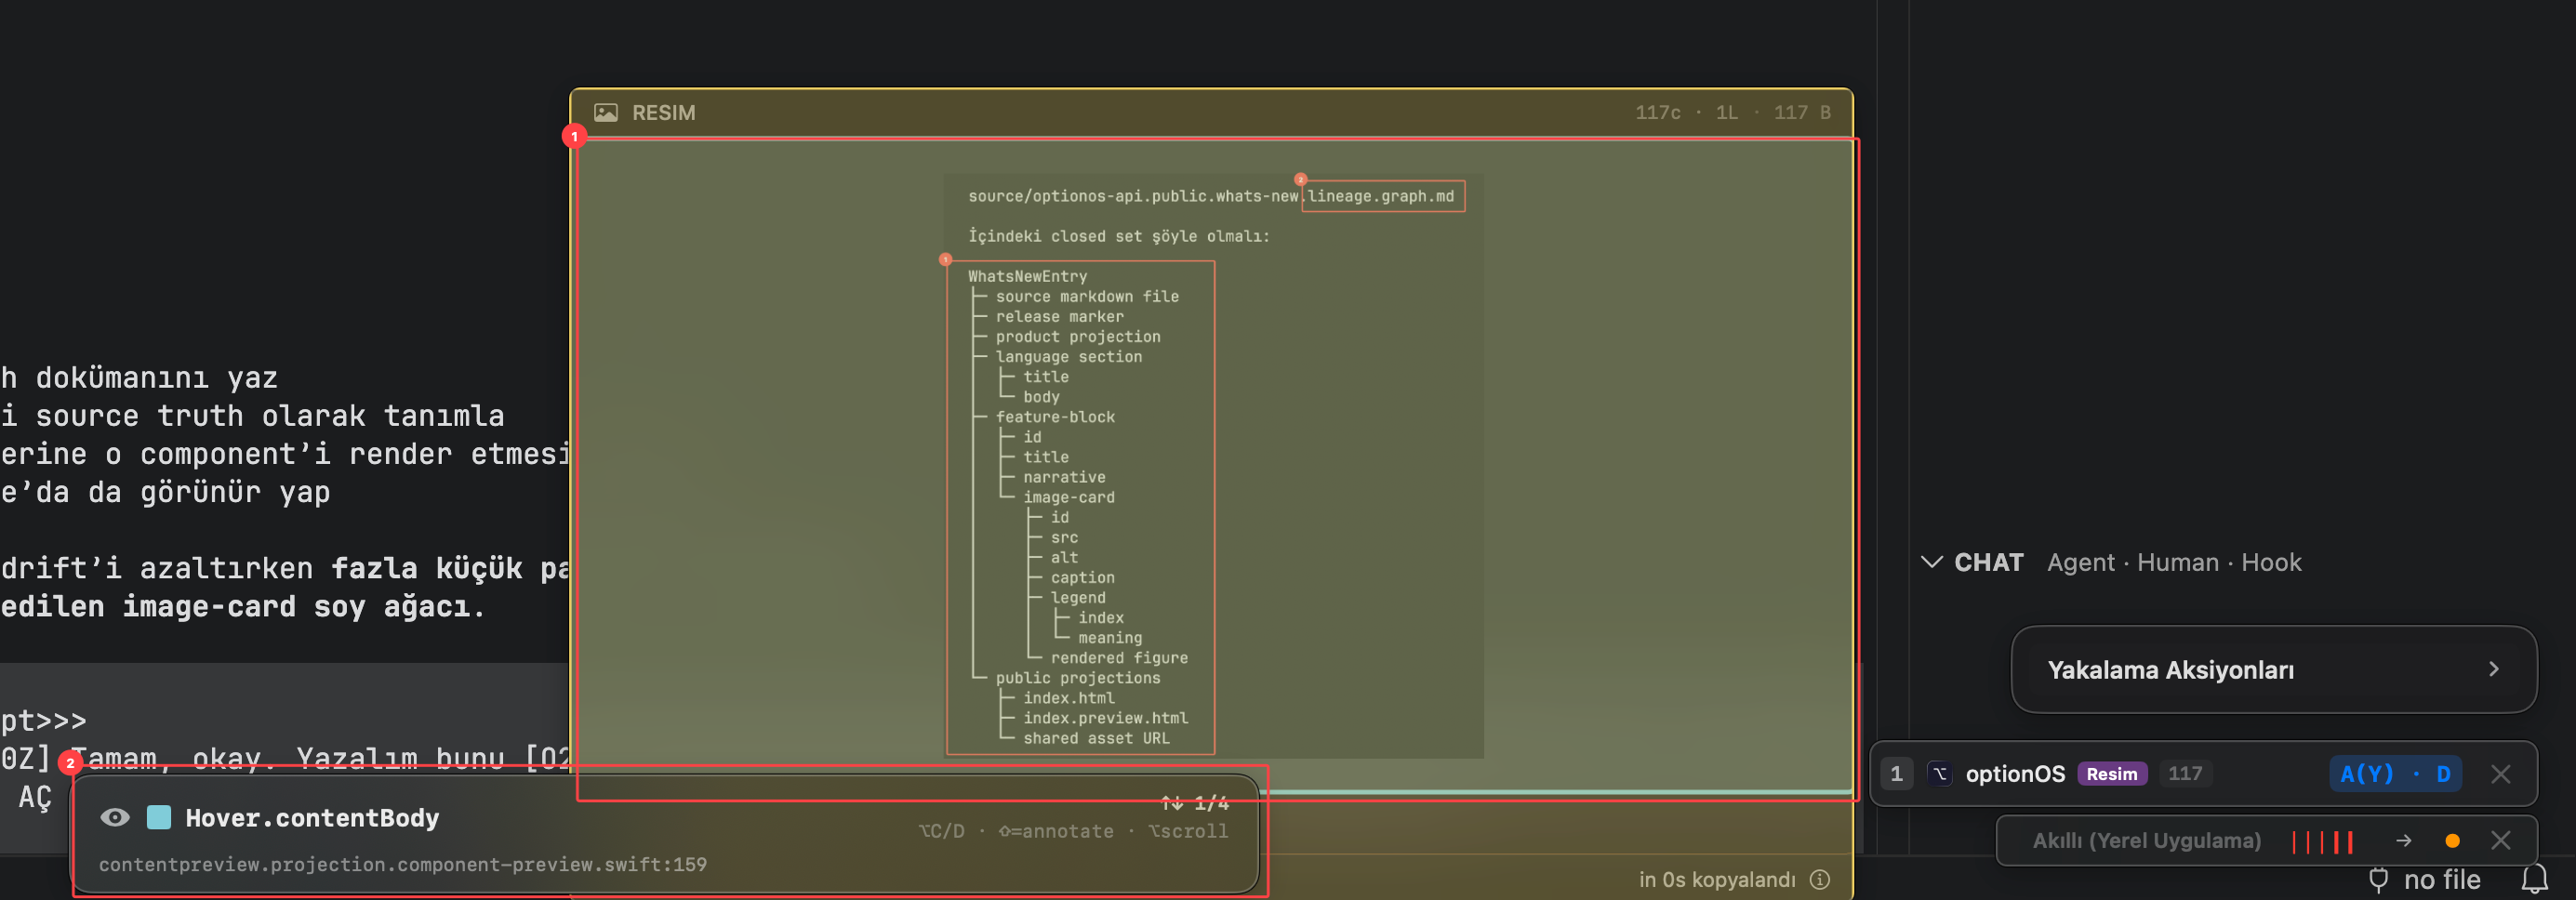
Bu resim, doküman içindeki yakalanmış ekran görüntüsü ile alttaki source-map/component satırının aynı kanıt paketinde nasıl birlikte durduğunu gösterir.
- 1Yakalanan görselin tamamı — konuşmada kullanılan kanıt paketi
- 2Seçilen component/source-map alanı — kod tarafındaki sahiplik ipucu
Bu örnekte doküman, hızlı bir açıklama yüzeyi gibi çalışır. Kullanıcı resmi koyar, index çizer, konuşarak neye baktığını söyler. Resmin altında source-map görünür olduğu için agent “bu UI parçası hangi dosya/component ile ilişkili?” sorusunu tahminle değil, görünür kanıtla yanıtlar.
Bir sonraki örnekte aynı işlem daha dar bir seçime iner. Burada bütün ekran değil, seçilen node/component satırı önemlidir. Geliştirme sırasında çoğu karar böyle daralır: önce geniş görüntü, sonra seçili component, sonra source path.
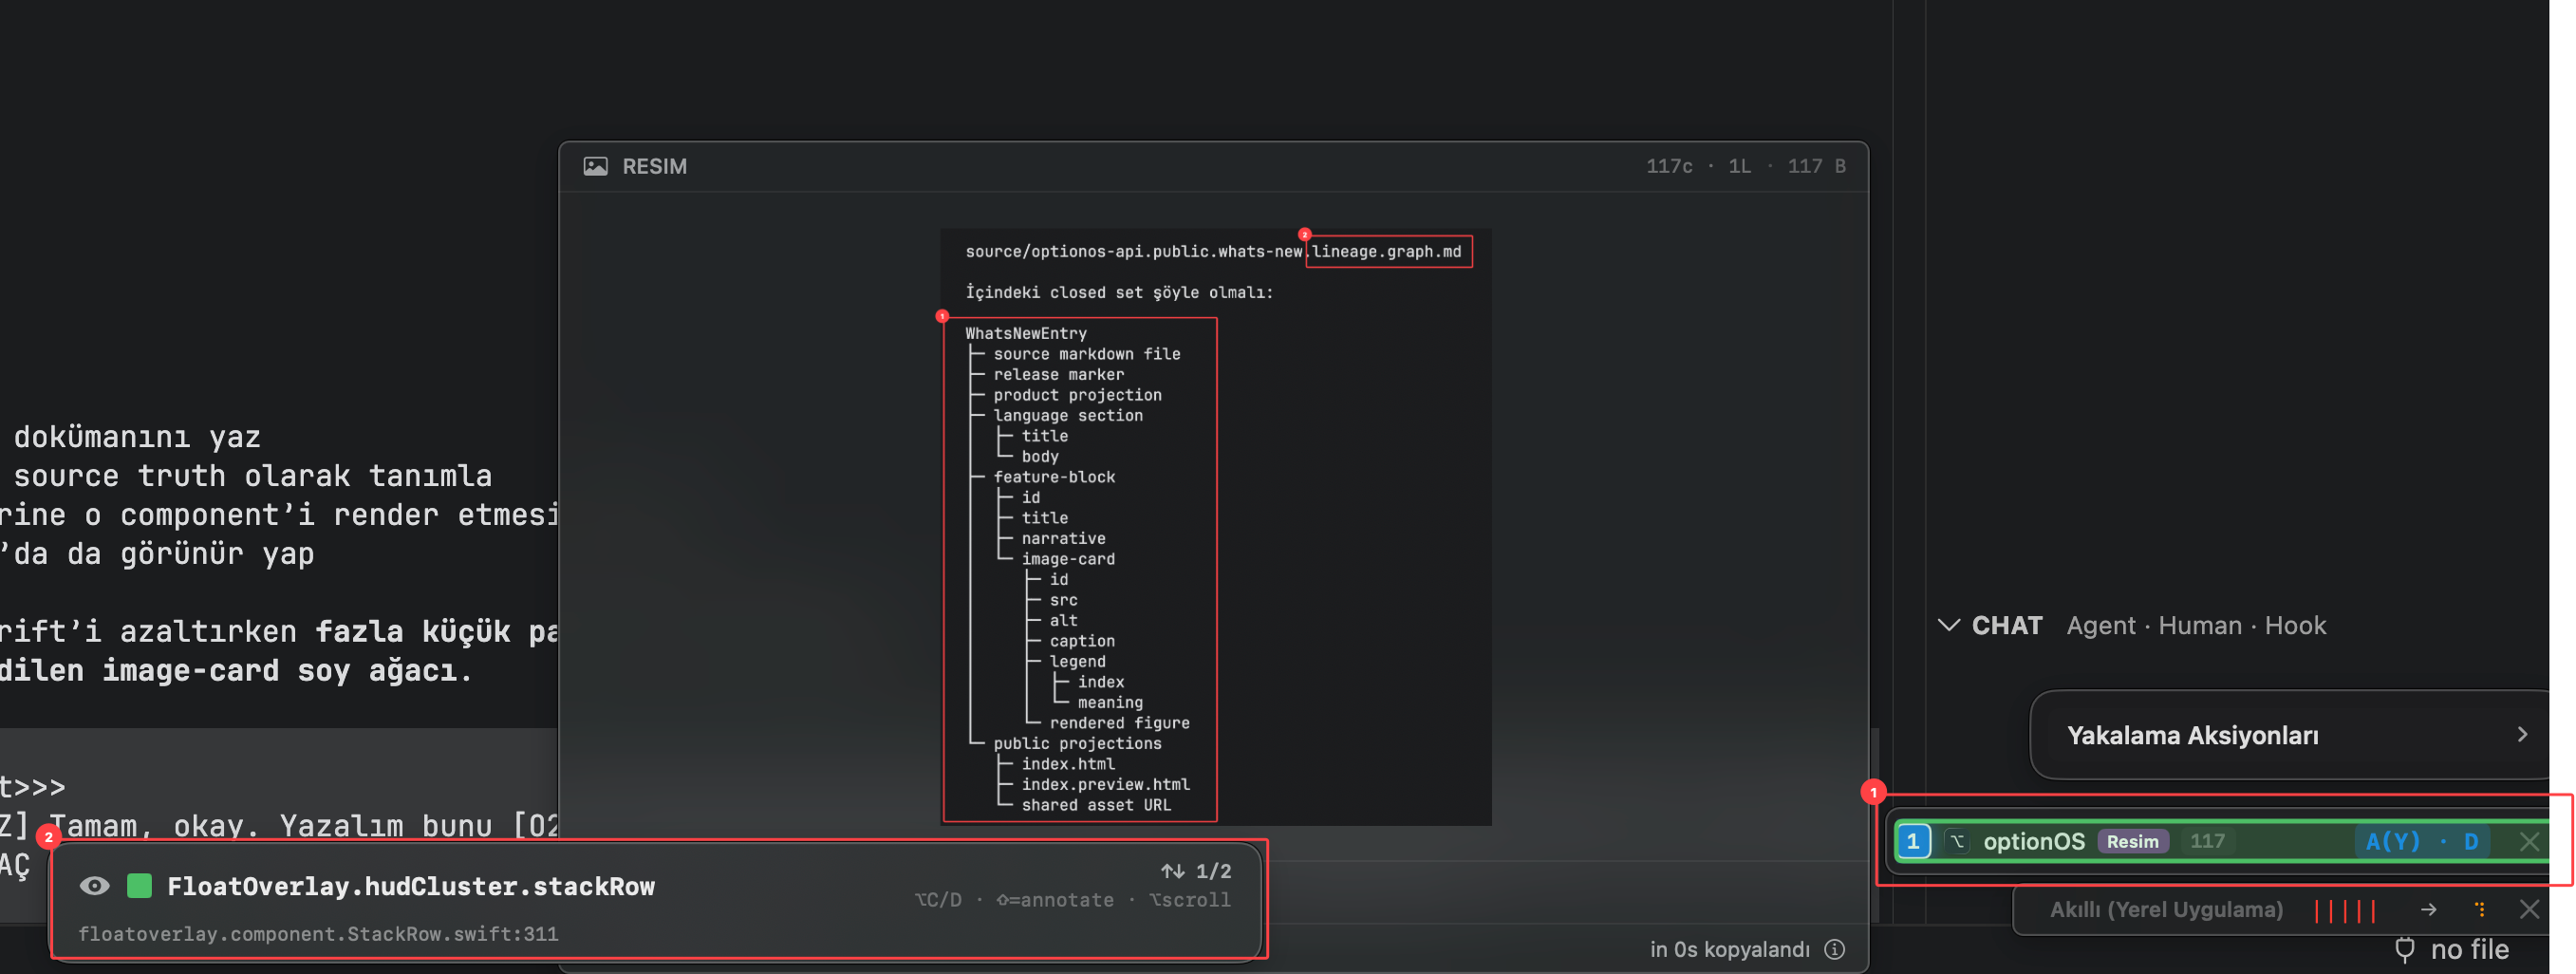
Bu resim, geniş ekran görüntüsünden belirli component satırına daralmayı gösterir; amaç hangi UI parçasının hangi source path ile ilişkili olduğunu görünür yapmaktır.
- 1Component satırı — konuşulan arayüz parçasının source-map karşılığı
- 2Yakalama listesi — aynı kanıtın konuşma ve dosya bağlamında saklandığı yer
Bu iki doküman örneği, soy ağacının sadece UI süsü olmadığını gösterir. Soy ağacı, node ve edge ilişkisini görünür yapan çalışma protokolüdür: görünen yüzey → seçili component → source map → konuşma niyeti → agent aksiyonu.
Bu protokolün asıl değeri, çalışma ekranının tamamında görünür olur. Geliştirme düzeninde ürün yüzeyi, VS Code Cockpit paneli, agent terminalleri, terminal içeriği ve Source Control aynı anda görünür. Böylece kullanıcı kodu açıp tarif etmek yerine, çıktılar arasında swap atarak konuşur.
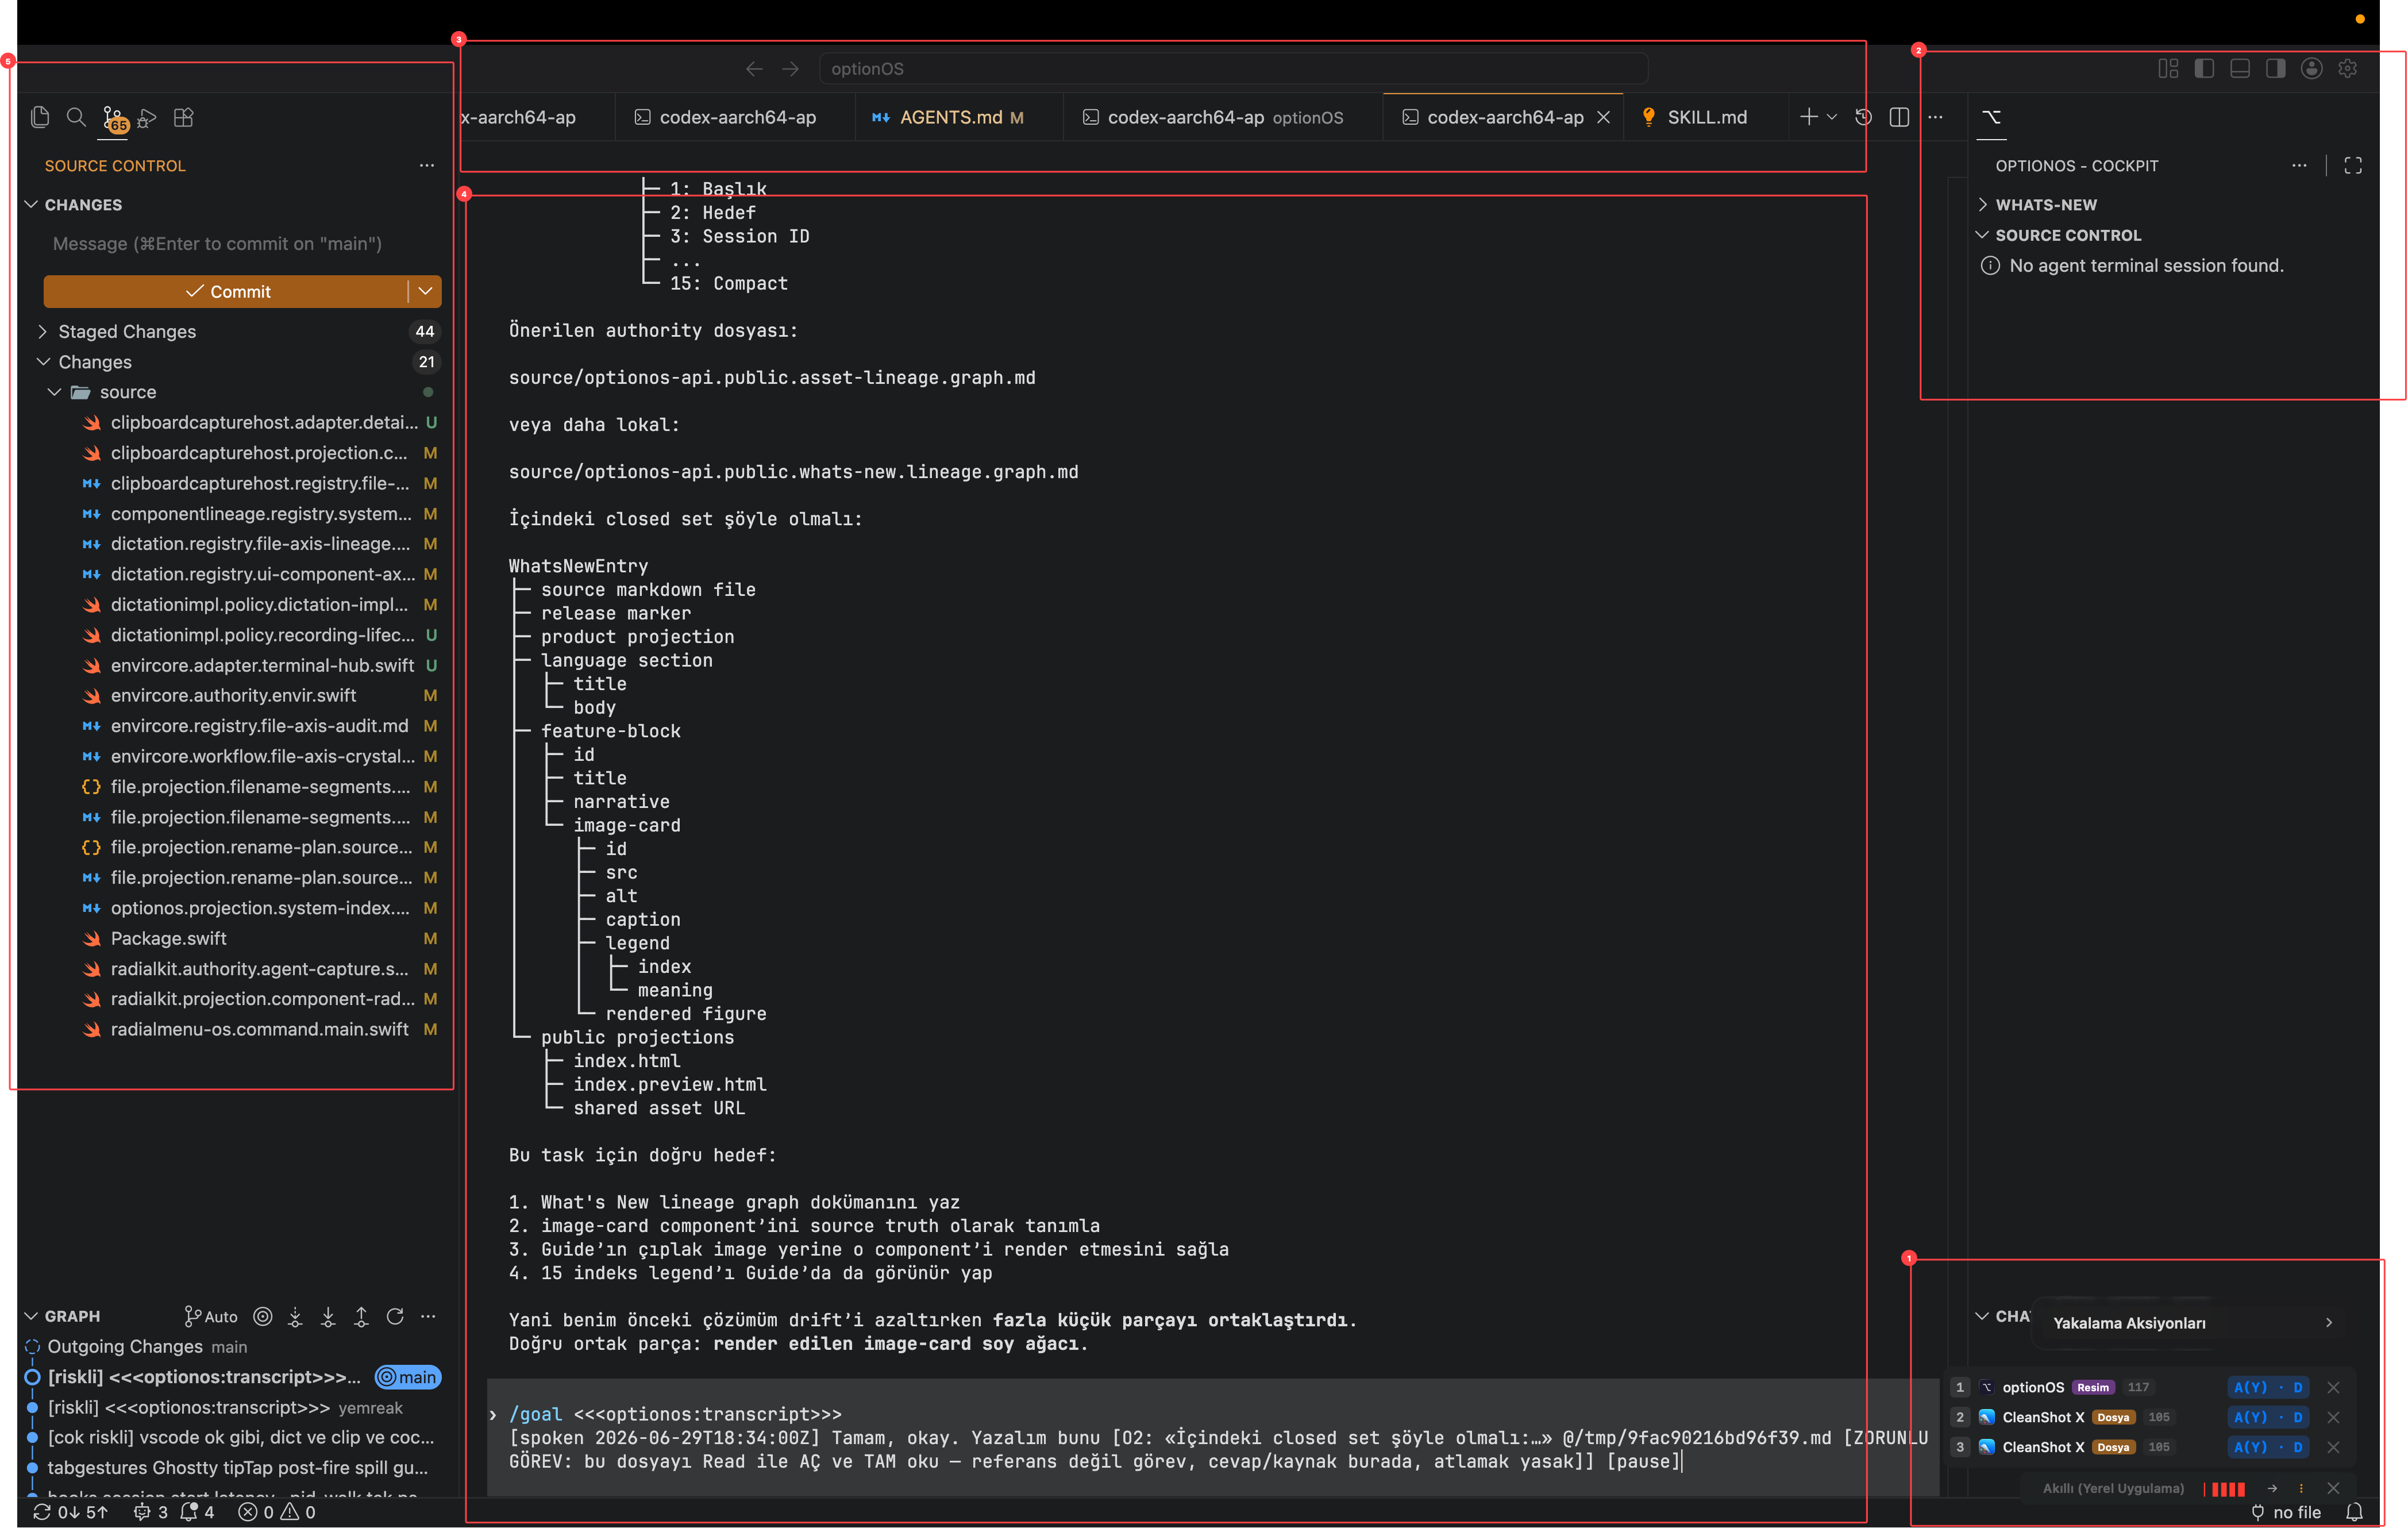
Bu resim, tek bir feature ekranı değil; ürün yüzeyi, Cockpit paneli, agent terminalleri ve Source Control’un aynı anda açık tutulduğu çalışma düzenidir.
- 1Üzerinde çalışılan component veya ürün yüzeyi
- 2VS Code içindeki Cockpit paneli
- 3Açık agent/terminal sekmeleri
- 4Terminal içeriği — custom UI yerine gerçek agent çıktısı
- 5Source Control — değişen dosyaların canlı görünümü
Bu düzenin glue layer'ı şudur: kullanıcı kendi uygulaması üzerinde ses kaydını açar, gördüğü sonucu konuşarak işaretler, agent ise terminalde gerçek işi yapar. Source Control tarafı da sonuç judge'ı gibi kalır; hangi dosyalar değişti, ne staged, ne unstaged görünür olur.
Terminal ve agentlar çoğalınca bir üst kontrol yüzeyi gerekir. Cockpit burada devreye girer. Cockpit, agent oturumlarını kartlara çevirir: bekleyenleri, çalışanları, host uygulamayı, modeli ve hızlı aksiyonları tek grid içinde gösterir.
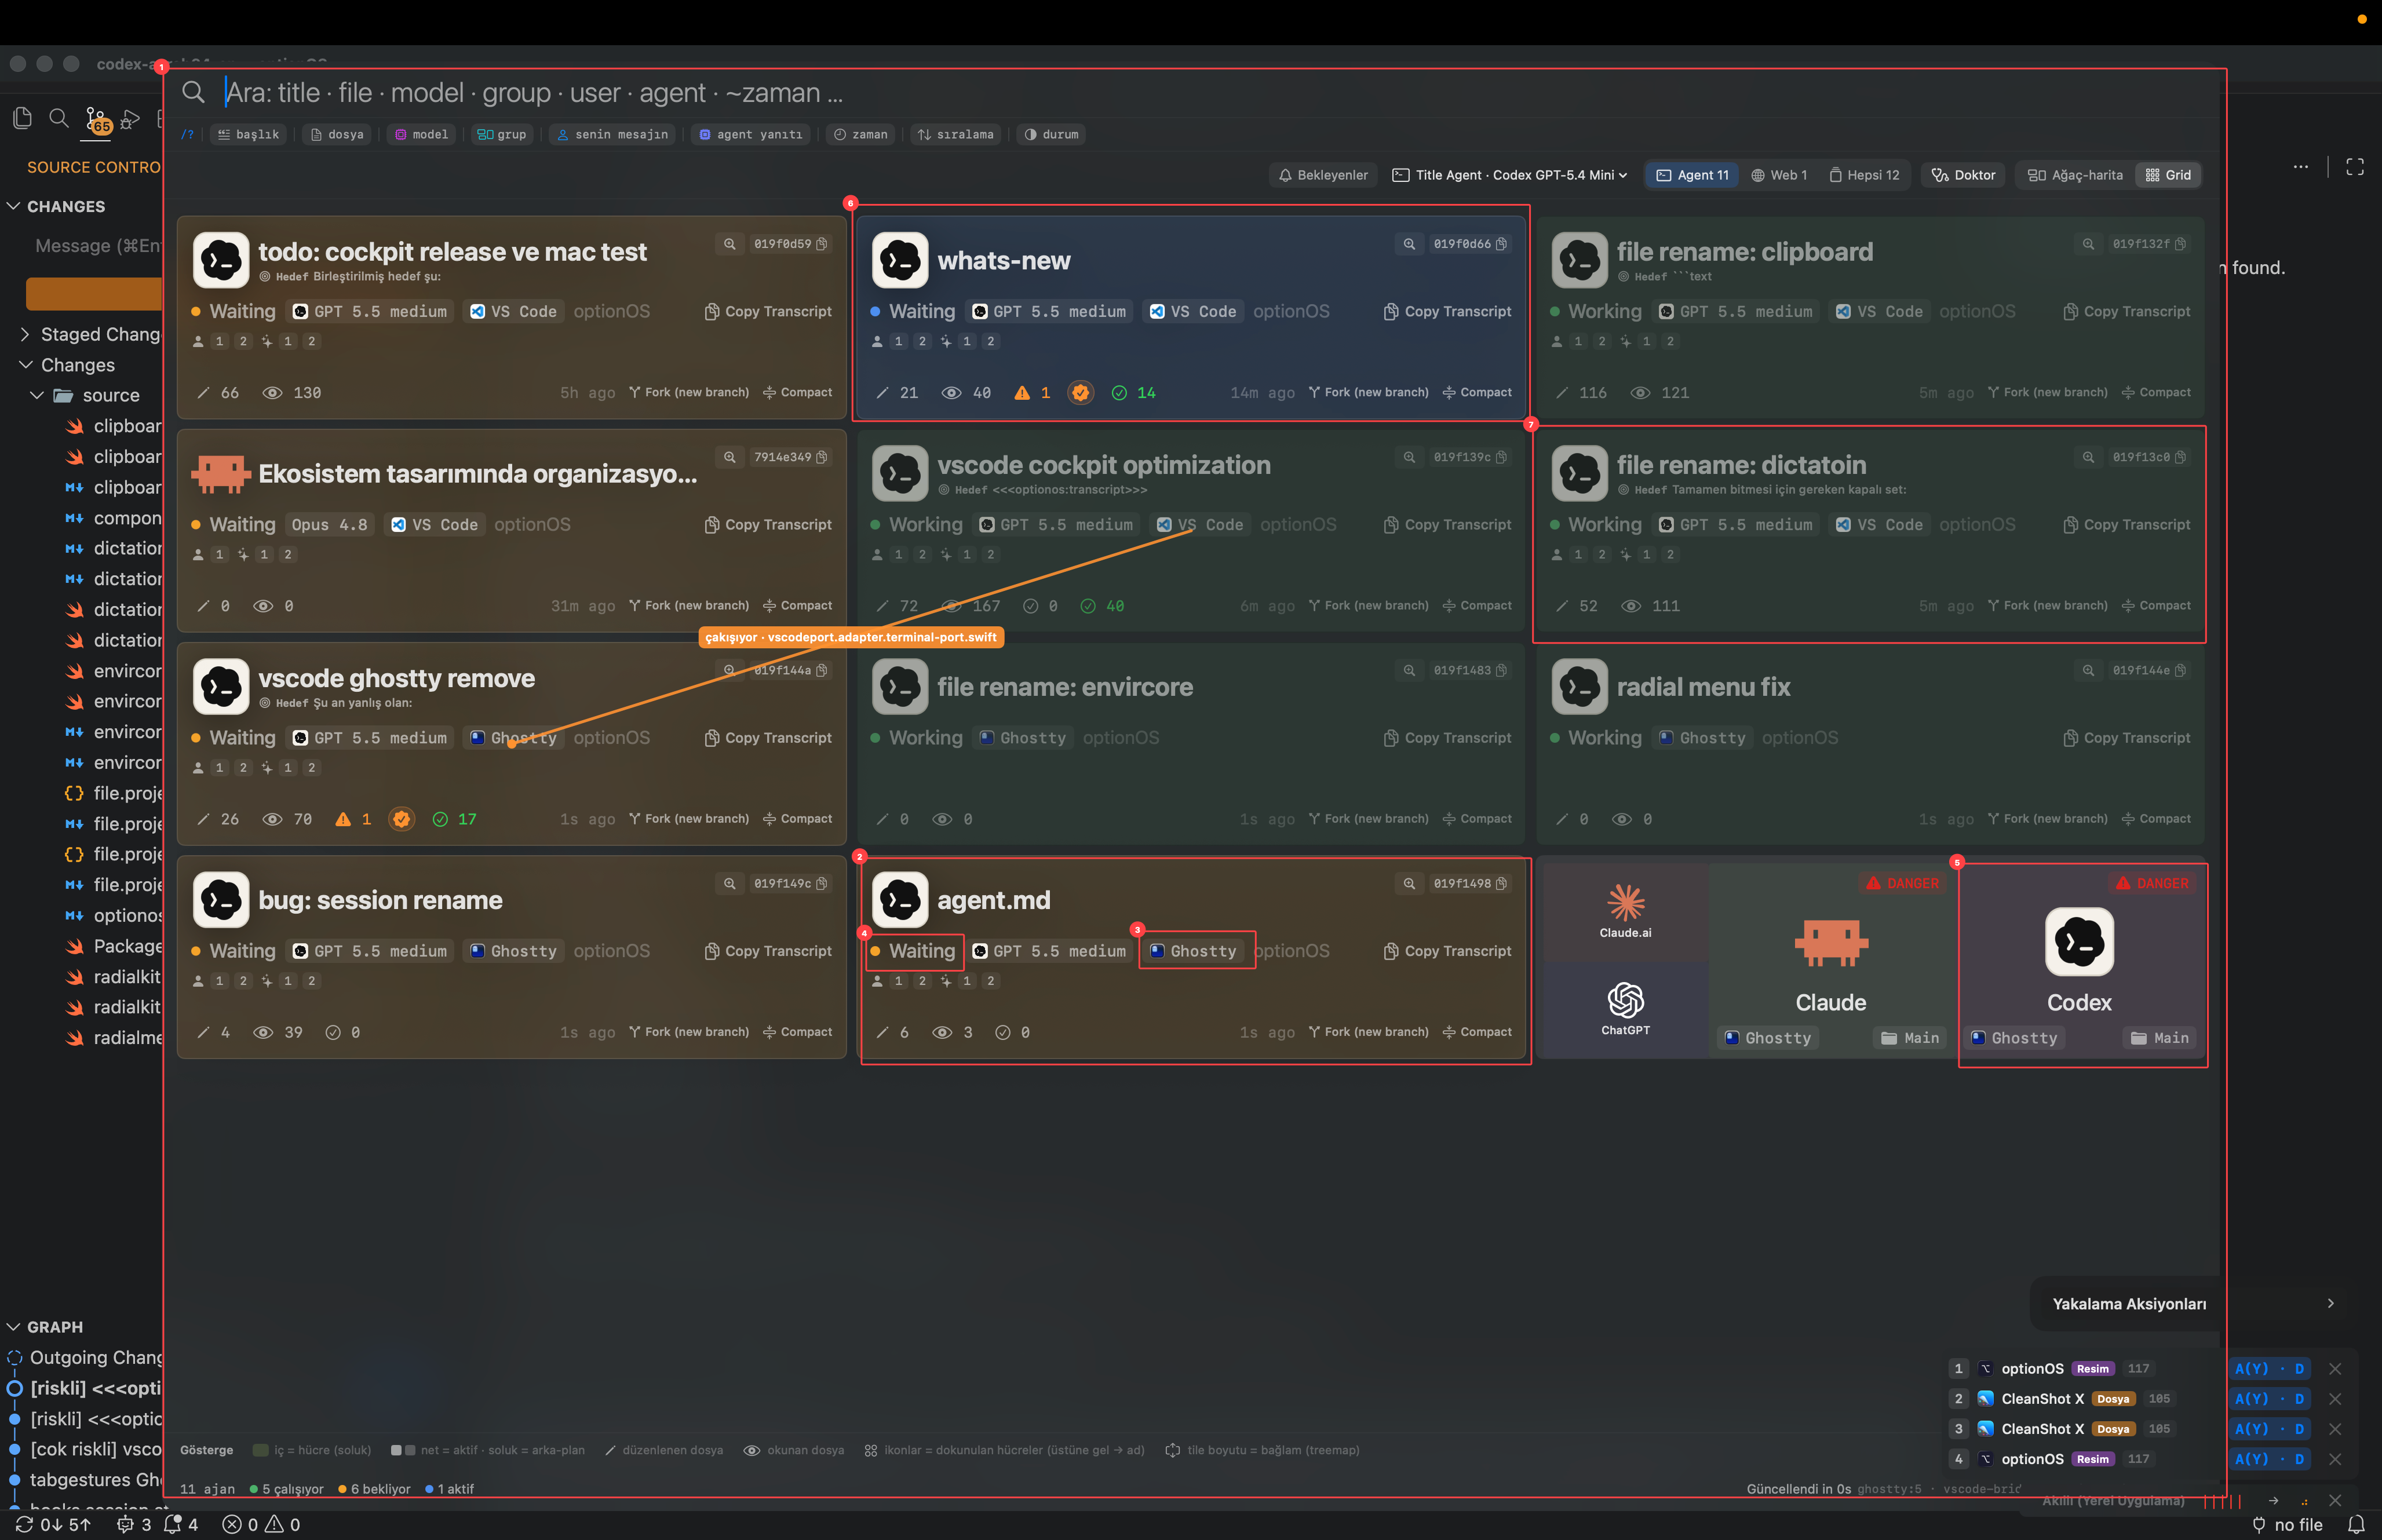
Bu resim, agent oturumlarını yönetmek için kullanılan Cockpit grid’ini gösterir; bekleyen kartlar aksiyon ister, çalışan kartlar izleme sinyalidir.
- 1Cockpit grid — agent oturumlarının ana kontrol yüzeyi
- 2Seçilen Ghostty agent kartı
- 3Host etiketi — agent'ın Ghostty veya VS Code'da koştuğunu gösterir
- 4Waiting durumu — insan girdisi bekleyen agent
- 5Özel agent kartları — hızlı başlatılan Claude/Codex yüzeyleri
- 6Aktif/odak agent kartı
- 7Çalışan kartlar — soluk görünerek takip edilir ama öncelik almaz
Bu katmanda amaç “tüm agentları okumak” değildir. Amaç, insan kararını değiştiren agentı bulmaktır. Waiting kartı aksiyon ister; çalışan kartlar ise sadece izleme sinyalidir. Codex gibi hızlı ve kontrol edilebilir agentlar bu yüzden ayrı kart olarak hızlı başlatılır.
Aynı ilişki fikri sadece agent kartlarında değil, component seçimi sırasında da kullanılır. Inspector açıldığında UI'daki parça seçilir, o parçanın source path'i görünür olur ve konuşmadaki işaret aynı aileye bağlanır.
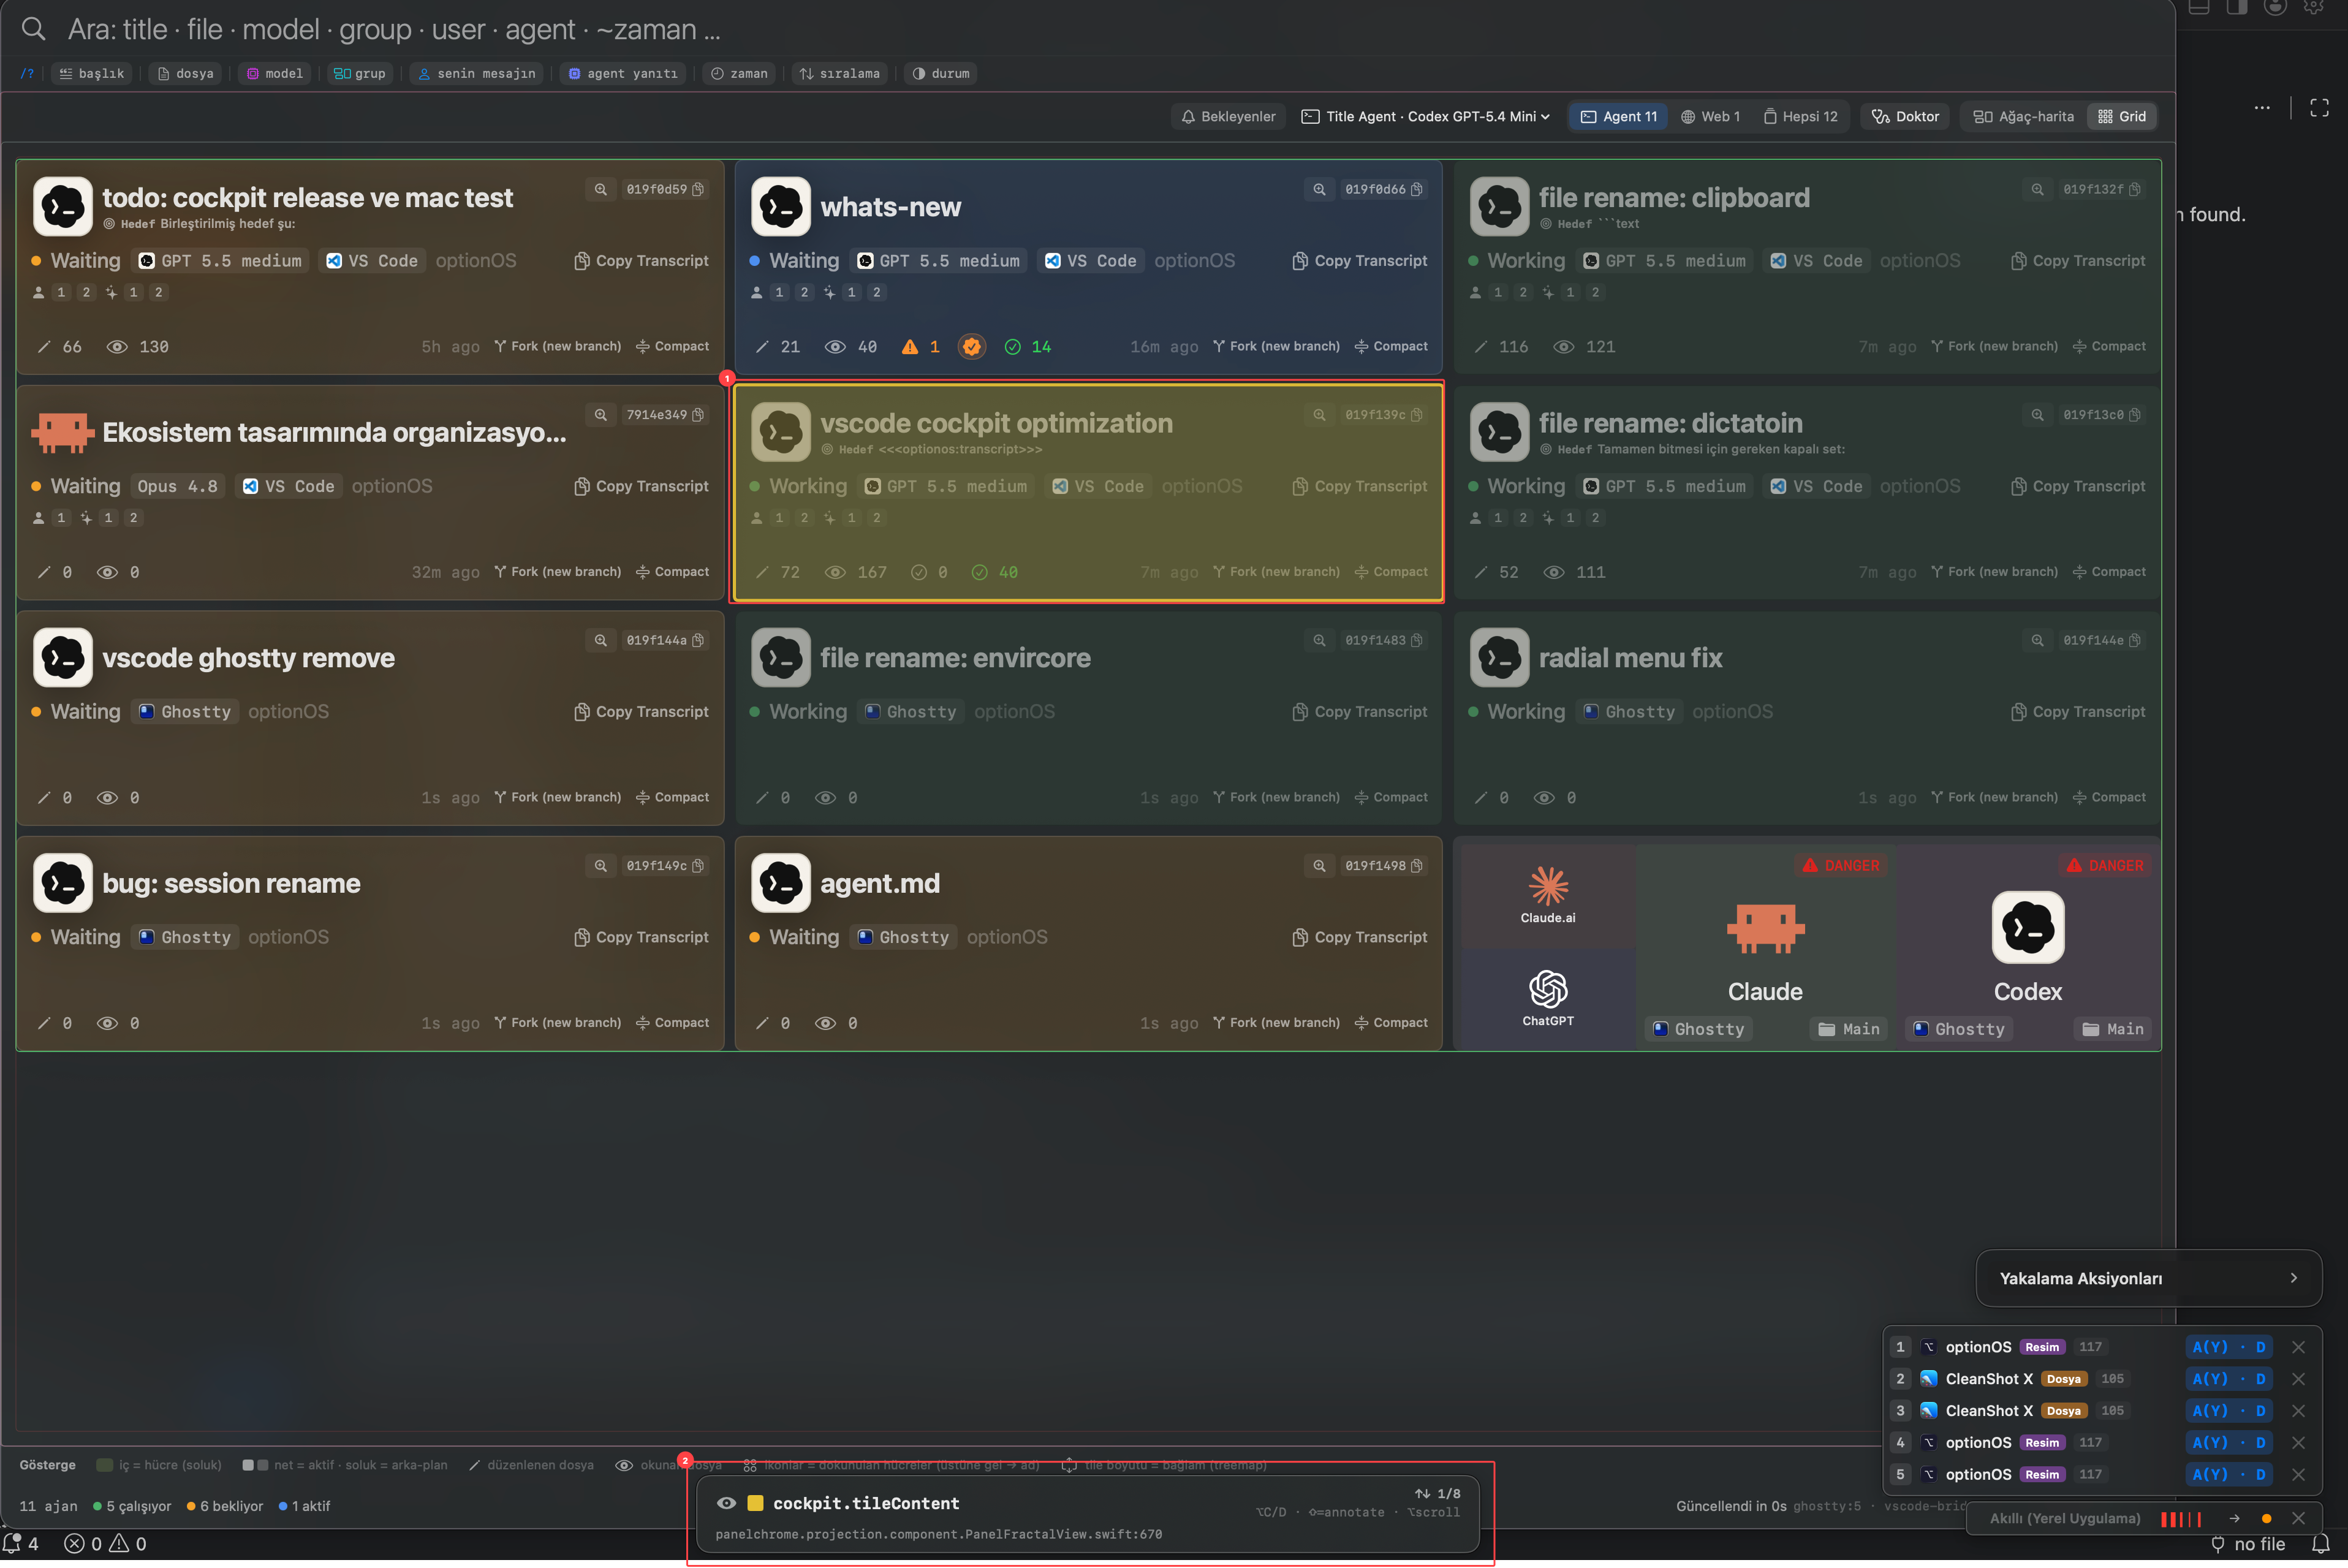
Bu resim, Inspector ile seçili UI component’inin source path/lineage iziyle eşleşmesini gösterir.
- 1Seçili component alanı — üzerinde çalışılacak UI parçası
- 2Source path / lineage başlığı — kod tarafındaki sahiplik izi
Bu sayede geliştirme yaparken “şu Swift dosyasını aç” diye tarif etmek gerekmez. Kullanıcı Inspector'ı açar, component'i seçer, işaretler ve konuşur. Agent, seçili component ile source path arasındaki bağı kullanarak doğru dosyaya gider.
Son katman yakalama akışıdır. Capture Actions menüsü, Inspector, konuşma sırasında yakalanan resimler/dosyalar ve akıllı yerel uygulama barı aynı anda görünür olduğunda kullanıcı indeksleri bile konuşarak üretebilir. Yani işaretleme ayrı bir manuel dokümantasyon işi olmaktan çıkar, çalışma akışının parçası olur.
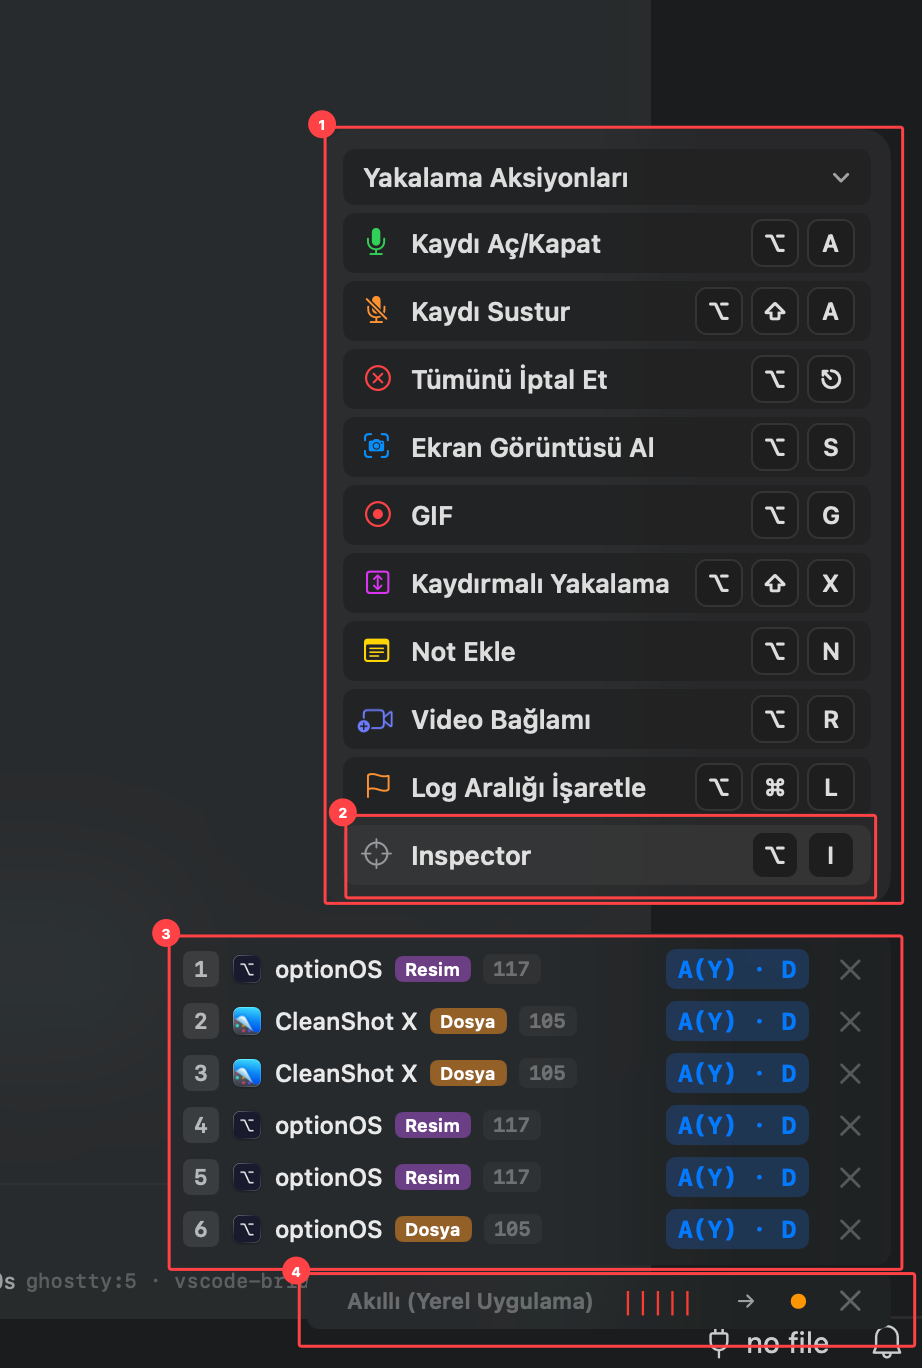
Bu resim, Capture Actions, Inspector ve konuşmaya eklenen dosya/görsellerin aynı bağlam paketinde nasıl toplandığını gösterir.
- 1Yakalama Aksiyonları menüsü
- 2Inspector aksiyonu — component soy ağacını görünür yapar
- 3Konuşma içinde yakalanan görseller ve dosyalar
- 4Akıllı yerel uygulama barı — konuşma ve yakalama akışının canlı durumu
Büyük resim şu: her görsel kendi içinde bir soy ağacı taşır; görsel + indeks + açıklama bir image-card ailesidir; image-card aileleri arasındaki metin de workflow soy ağacıdır. Bu yüzden doküman sadece resim galerisi değildir. Konuşmanın glue layer'ı, görselleri tek bir çalışma yöntemine bağlar.
Lineage graphs
LINEAGEParent/child/relation lineage is required.EVIDENCE-UIUnderstood through visual evidence.
A lineage graph does not leave a visible UI piece as a standalone screenshot. The image, the indexes drawn on top of it, the meaning of those indexes, the component/source-map trace and the spoken intent all have to be read together.
That is why every card here carries four layers: visual evidence, indexes, index explanations and flow text between cards. The text between cards matters as much as the image, because it answers “why is this example here, and how does it lead to the next one?”
The core goal is to mark the output instead of describing the code. The human speaks over the UI and marks what they see; the agent uses that marked surface to find the component, the source file and the change to make. Work shifts from “which code should I edit?” to “which observed outcome do we want?”
The first closed set was built for a What's New entry. The important lesson is that the smallest shared unit is not the image. The largest safe shared unit is the image-card lineage: image, caption and indexed legend travel as one family.
This image is not a product screen; it is the contract drawing that explains which atoms a What’s New entry contains and which component can be projected into surfaces such as Guide.
- 1Closed set — the whole family from source markdown to shared asset URL
- 2Authority file — the durable home for this lineage graph contract
The practical result is simple: if the Guide needs the 15-index Cockpit card from What's New, it must not link only the PNG. It calls the source entry's feature-block and image-card. Caption and the 1–15 index explanations are not written twice, but they still appear in the Guide.
The same pattern works inside documents. When a screenshot is placed into a document, the source-map or component row around it is part of the lineage too. The agent does not only see an image; it sees which component/source hint was selected in that image.
This image shows how a captured screenshot and the source-map/component row below it live in the same evidence packet.
- 1Full captured image — the evidence packet used in the conversation
- 2Selected component/source-map area — the ownership hint on the code side
In this example the document acts as a fast explanation surface. The user drops in the image, draws indexes and says what they are looking at. Because the source-map is visible under the image, the agent answers “which file/component owns this UI piece?” from evidence, not from a guess.
The next example narrows the same operation. The whole screen is no longer the point; the selected node/component row is the point. Most development decisions shrink this way: broad image, selected component, source path.
This image shows the narrowing step from a broad screenshot to a specific component row, making the UI piece and source path relation visible.
- 1Component row — the source-map counterpart of the UI piece being discussed
- 2Capture list — where the same evidence is kept in conversation and file context
These two document examples show that lineage is not decoration. It is a work protocol that makes node and edge relations visible: visible surface → selected component → source map → spoken intent → agent action.
The value of that protocol becomes clearer in the full working layout. The product surface, VS Code Cockpit panel, agent terminals, terminal content and Source Control stay visible at the same time. The user does not open the code and explain it; they move between outputs and speak.
This image is not a single feature screen; it shows the working layout where product surface, Cockpit panel, agent terminals and Source Control stay visible together.
- 1Product surface or component being worked on
- 2The Cockpit panel inside VS Code
- 3Open agent and terminal tabs
- 4Terminal content — the real agent output, not a custom mock UI
- 5Source Control — live view of changed files
The glue layer in this layout is voice. The user records while working on their own app, marks the observed result, and the agent does the real work in the terminal. Source Control stays as a judge-like surface: which files changed, what is staged, and what is still unstaged.
Once terminals and agents multiply, a higher-level control surface is needed. Cockpit provides that surface. It turns agent sessions into cards: waiting state, running state, host app, model and quick actions are all visible in one grid.
This image shows the Cockpit grid used to manage agent sessions; waiting cards require action, while running cards are monitoring signals.
- 1Cockpit grid — the main control surface for agent sessions
- 2Selected Ghostty agent card
- 3Host label — shows whether the agent runs in Ghostty or VS Code
- 4Waiting state — an agent waiting for human input
- 5Custom agent cards — quick-launch Claude/Codex surfaces
- 6Active/focused agent card
- 7Running cards — dimmed so they can be monitored without taking priority
At this layer the goal is not to read every agent. The goal is to find the agent that changes the next human decision. A waiting card asks for action; running cards are monitoring signals. Fast, controllable agents such as Codex therefore become quick-launch cards.
The same relation idea also applies while selecting components. When the inspector is open, the UI piece is selected, the source path becomes visible, and the spoken mark joins the same family.
This image shows an Inspector-selected UI component matched with its source path / lineage trace.
- 1Selected component area — the UI piece to work on
- 2Source path / lineage title — the ownership trace on the code side
This removes the need to say “open this Swift file.” The user opens the inspector, selects the component, marks it and speaks. The agent follows the bond between selected component and source path.
The last layer is the capture workflow. When Capture Actions, Inspector, captured images/files and the smart local-app bar are visible together, even the indexes can be produced by voice. Marking is no longer a separate documentation chore; it becomes part of the work loop.
This image shows Capture Actions, Inspector and conversation attachments collected into one context packet.
- 1Capture Actions menu
- 2Inspector action — makes the component lineage visible
- 3Images and files captured into the conversation
- 4Smart local-app bar — live state of the speech and capture flow
The big picture: every image carries its own lineage; image + indexes + explanation is an image-card family; the text between image-card families is workflow lineage. This is why the document is not an image gallery. The spoken glue layer connects the images into one working method.
Konuşarak AI geliştirme
WORKFLOWTekrarlanabilir çalışma akışı.VOICEKonuşma kaynaklı üretim.AI-DEVELOPMENTAI ile geliştirme pratiği.
Bu akışın fikri basit: kodu tarif etmeye çalışma; ne gördüğünü göster, ne istediğini konuş, bağlamı kaybetmeden agent'a ver. optionOS bunun için konuşmayı, ekran yakalamayı, işaretlemeyi, soy ağacını ve agent kontrolünü aynı çalışma yolculuğuna bağlar.
Bunu hiç bilmeyen biri için yolculuk şöyle başlar: önce çalıştığın ekran görünür kalır, sonra o ekrandaki parçayı yakalarsın, sonra parçanın üzerine numara veya kutu koyarsın, sonra ne istediğini konuşursun, sonra agent bu paketten kod tarafındaki doğru component'i bulur.
Bu yüzden ürün tek bir özellik gibi okunmamalı. Dictation konuşmayı taşır; Capture/Annotation gördüğün şeyi işaretler; Lineage Graph o işaretin hangi component/source ile ilişkili olduğunu gösterir; Cockpit ise işi yapan agentları yönetir.
Ekosistem görünümü bu yüzden önemlidir: aynı anda Dictation yakalama listesi, Clipboard/Pano yüzeyi, Mac Cockpit grid'i ve VS Code Cockpit paneli görünür kalır. Kullanıcı bu yüzeyler arasında bağlamı elle yeniden kurmaz; konuşma, kopyalanan sinyal, görsel ve agent durumu aynı çalışma düzeninde kalır.
Apple’dan optionOS’a: 5 dakikalık konuşmayla Settings tasarımı. Kodu veya uzun prompt’u baştan yazmıyorum. Apple Settings’te sevdiğim parçayı ekranda tutuyorum, optionOS Settings Shell’de karşılığını görüyorum, sağda yakalama aksiyonlarıyla ekranı, videoyu ve görseli topluyorum. Sonra bunu konuşarak etiketliyorum; yapay zekaya tek paket olarak gidiyor.
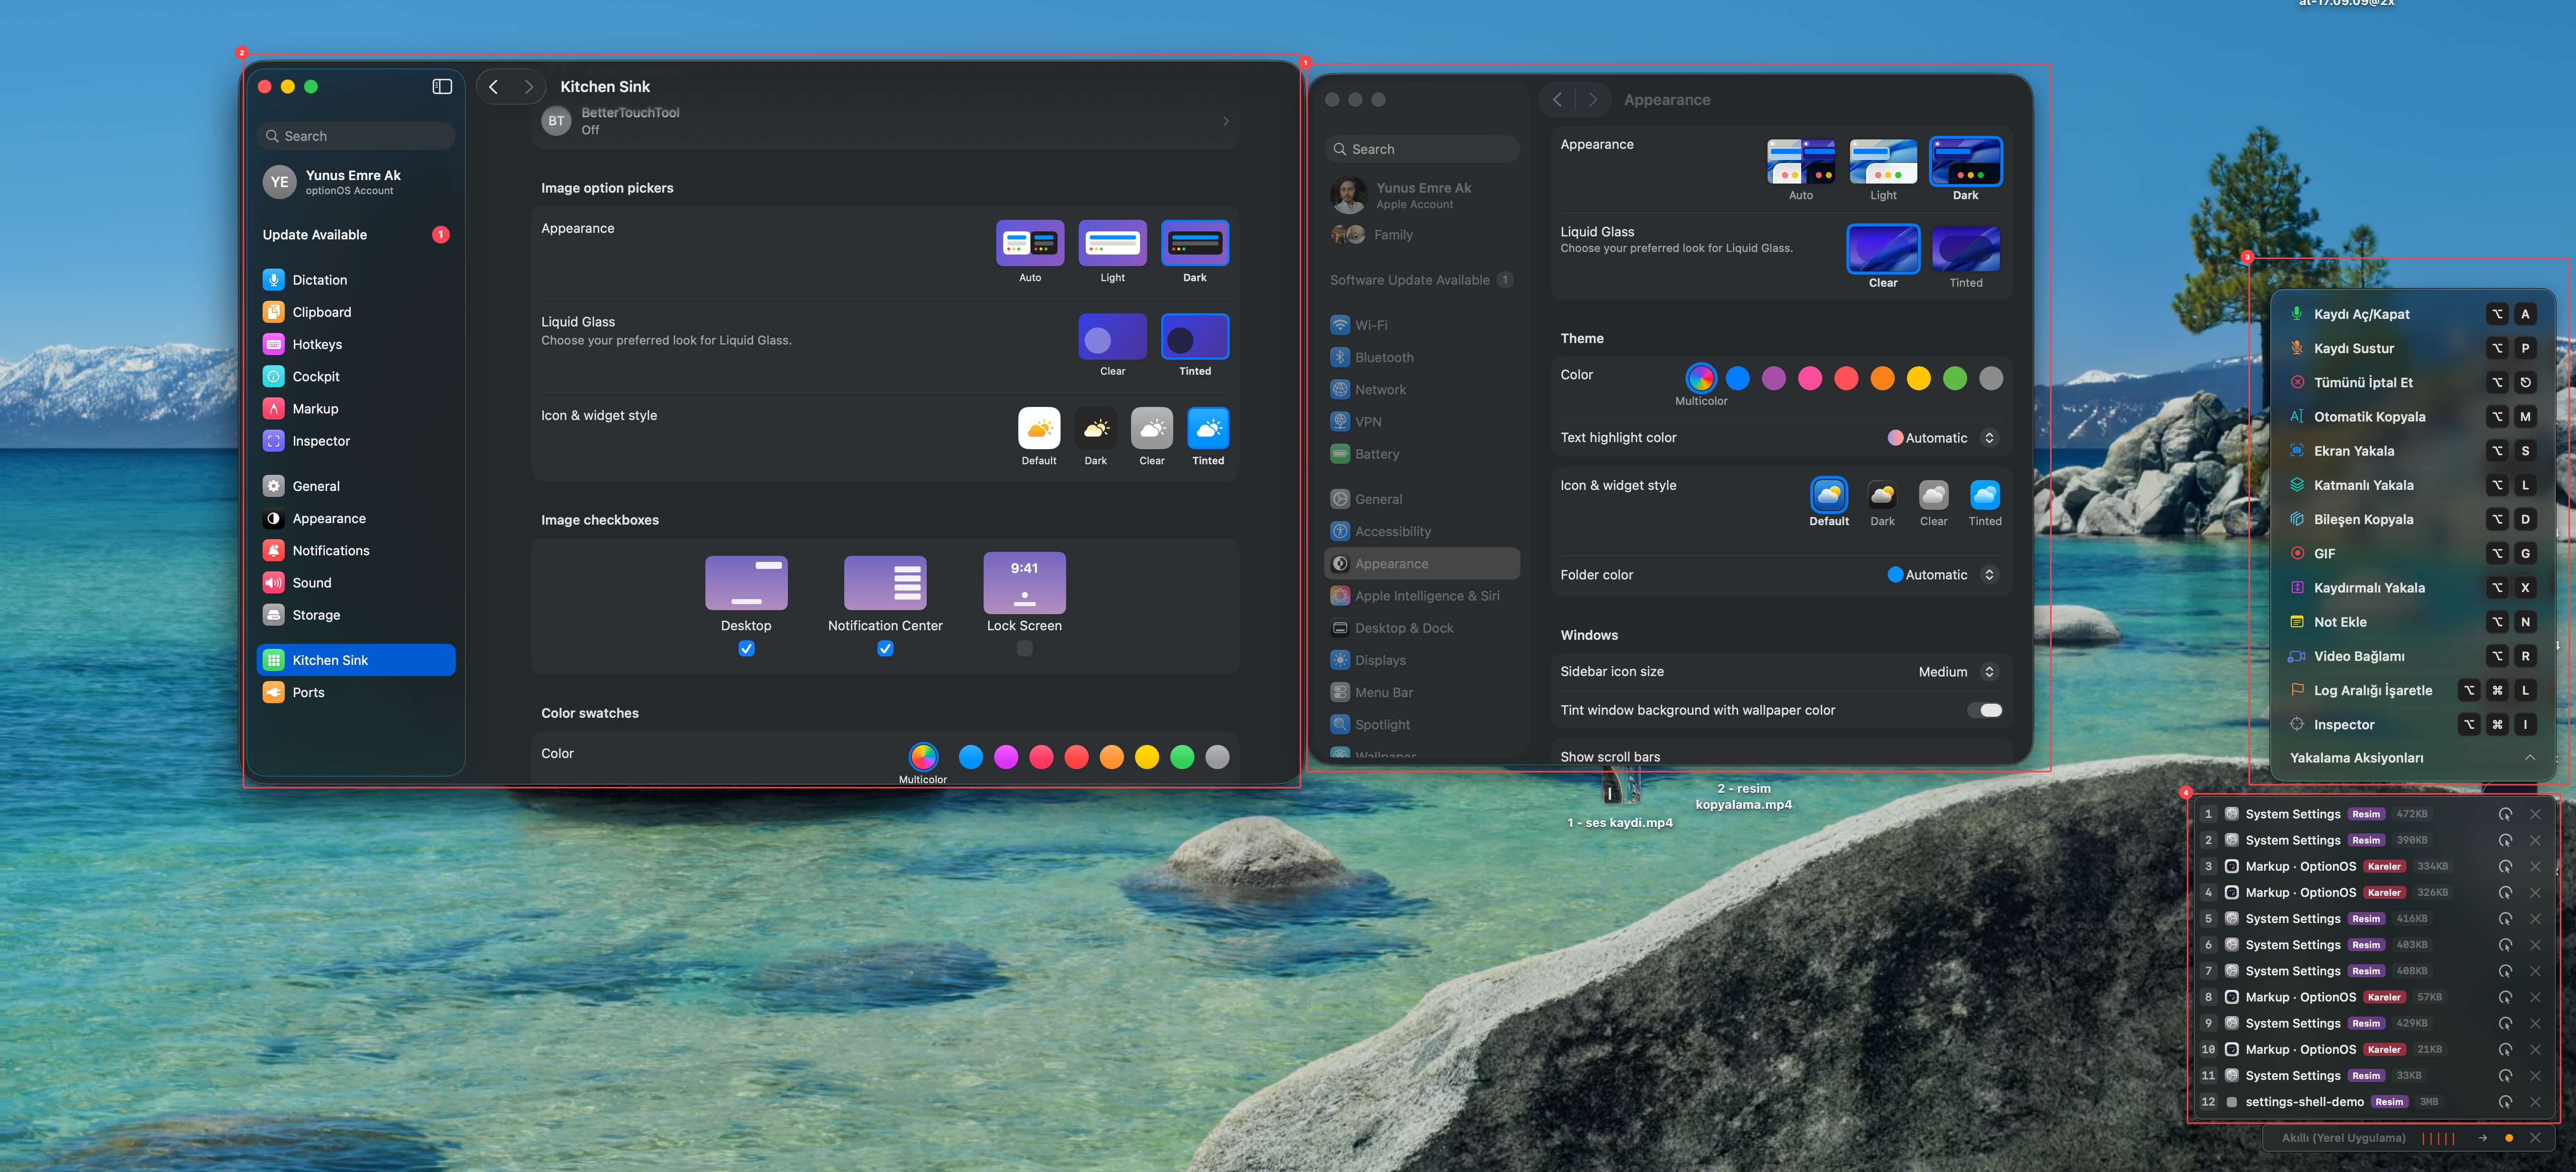
- 1Apple System Settings — sevilen referans yüzey
- 2optionOS Settings Shell — tasarlanan karşılık
- 3Capture Actions — kayıt, ekran yakalama, GIF, not ve video bağlama
- 4Yakalanan görseller/video’lar — konuşmada etiketlenen kanıt paketi
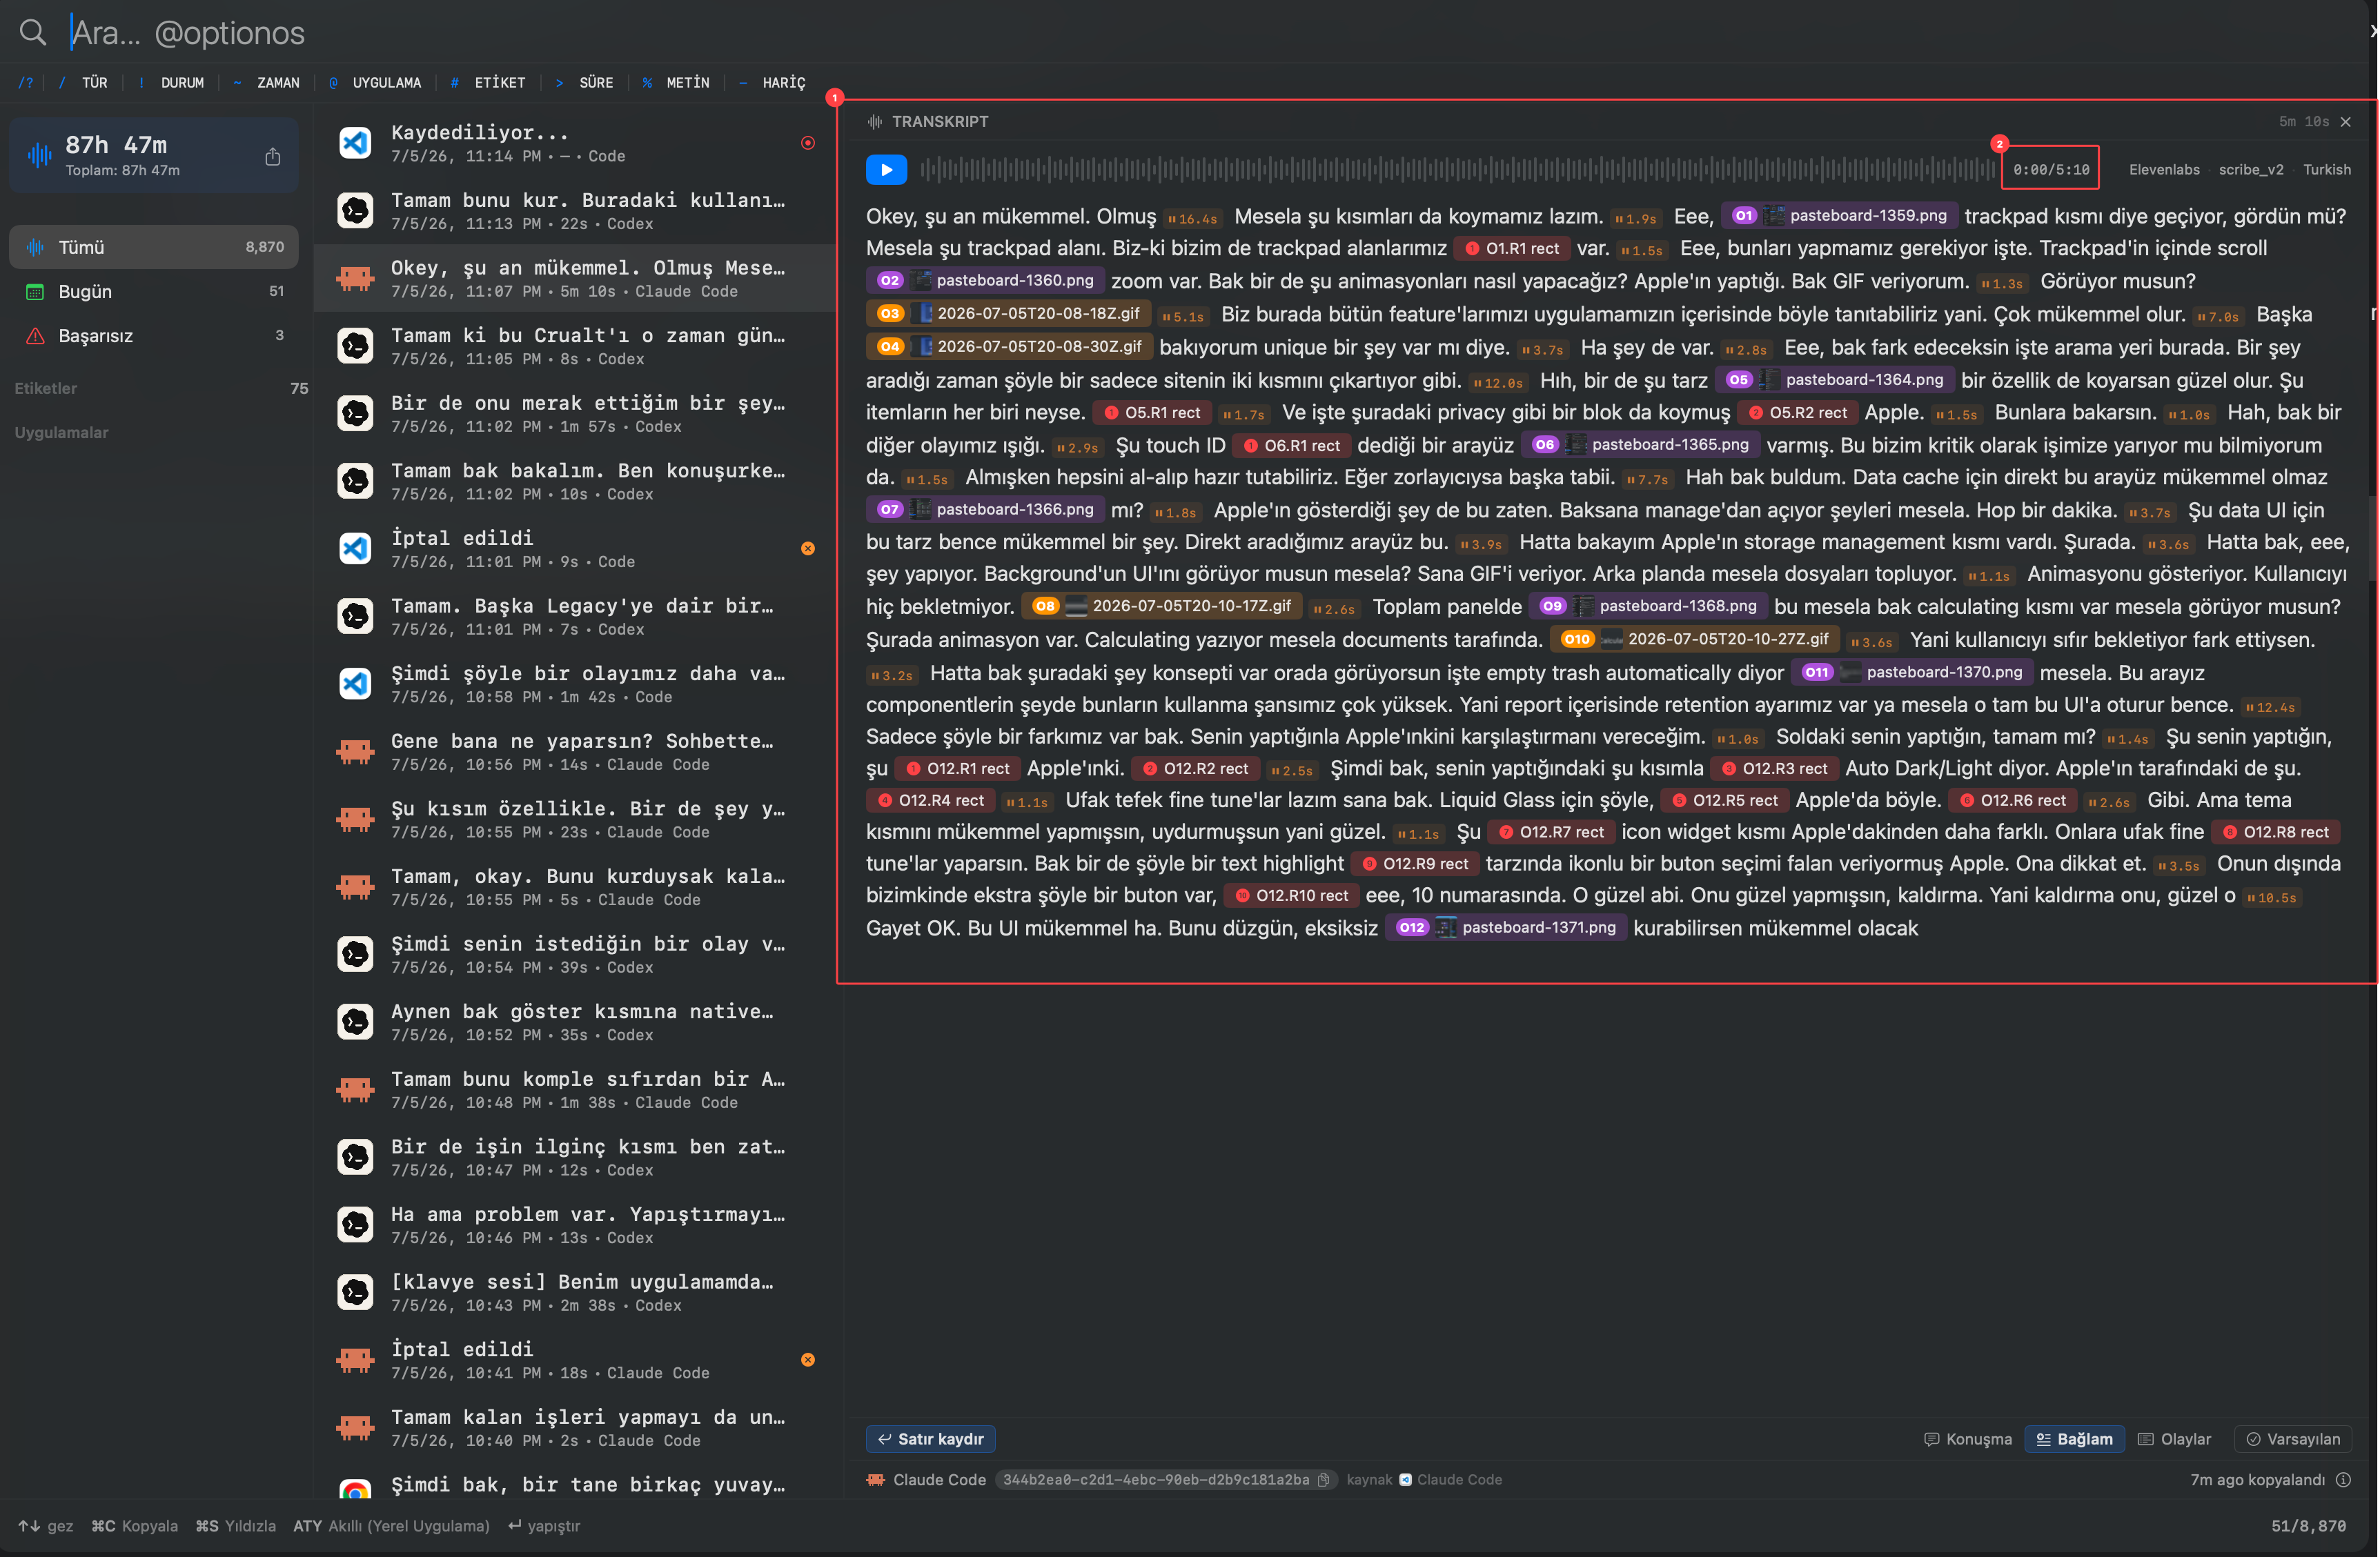
- 1Transcript — Apple referansları, görsel token’ları ve konuşma bağlamı
- 25:10 süre — normalde uzun sürecek tasarım brief’i konuşmayla yakalanıyor
Okuyan kişi burada şu cevabı alır: optionOS’ta AI’ya sadece ne dediğimi vermiyorum; ne gördüğümü, hangi parçayı işaretlediğimi ve hangi referansı sevdiğimi de aynı pakette veriyorum.
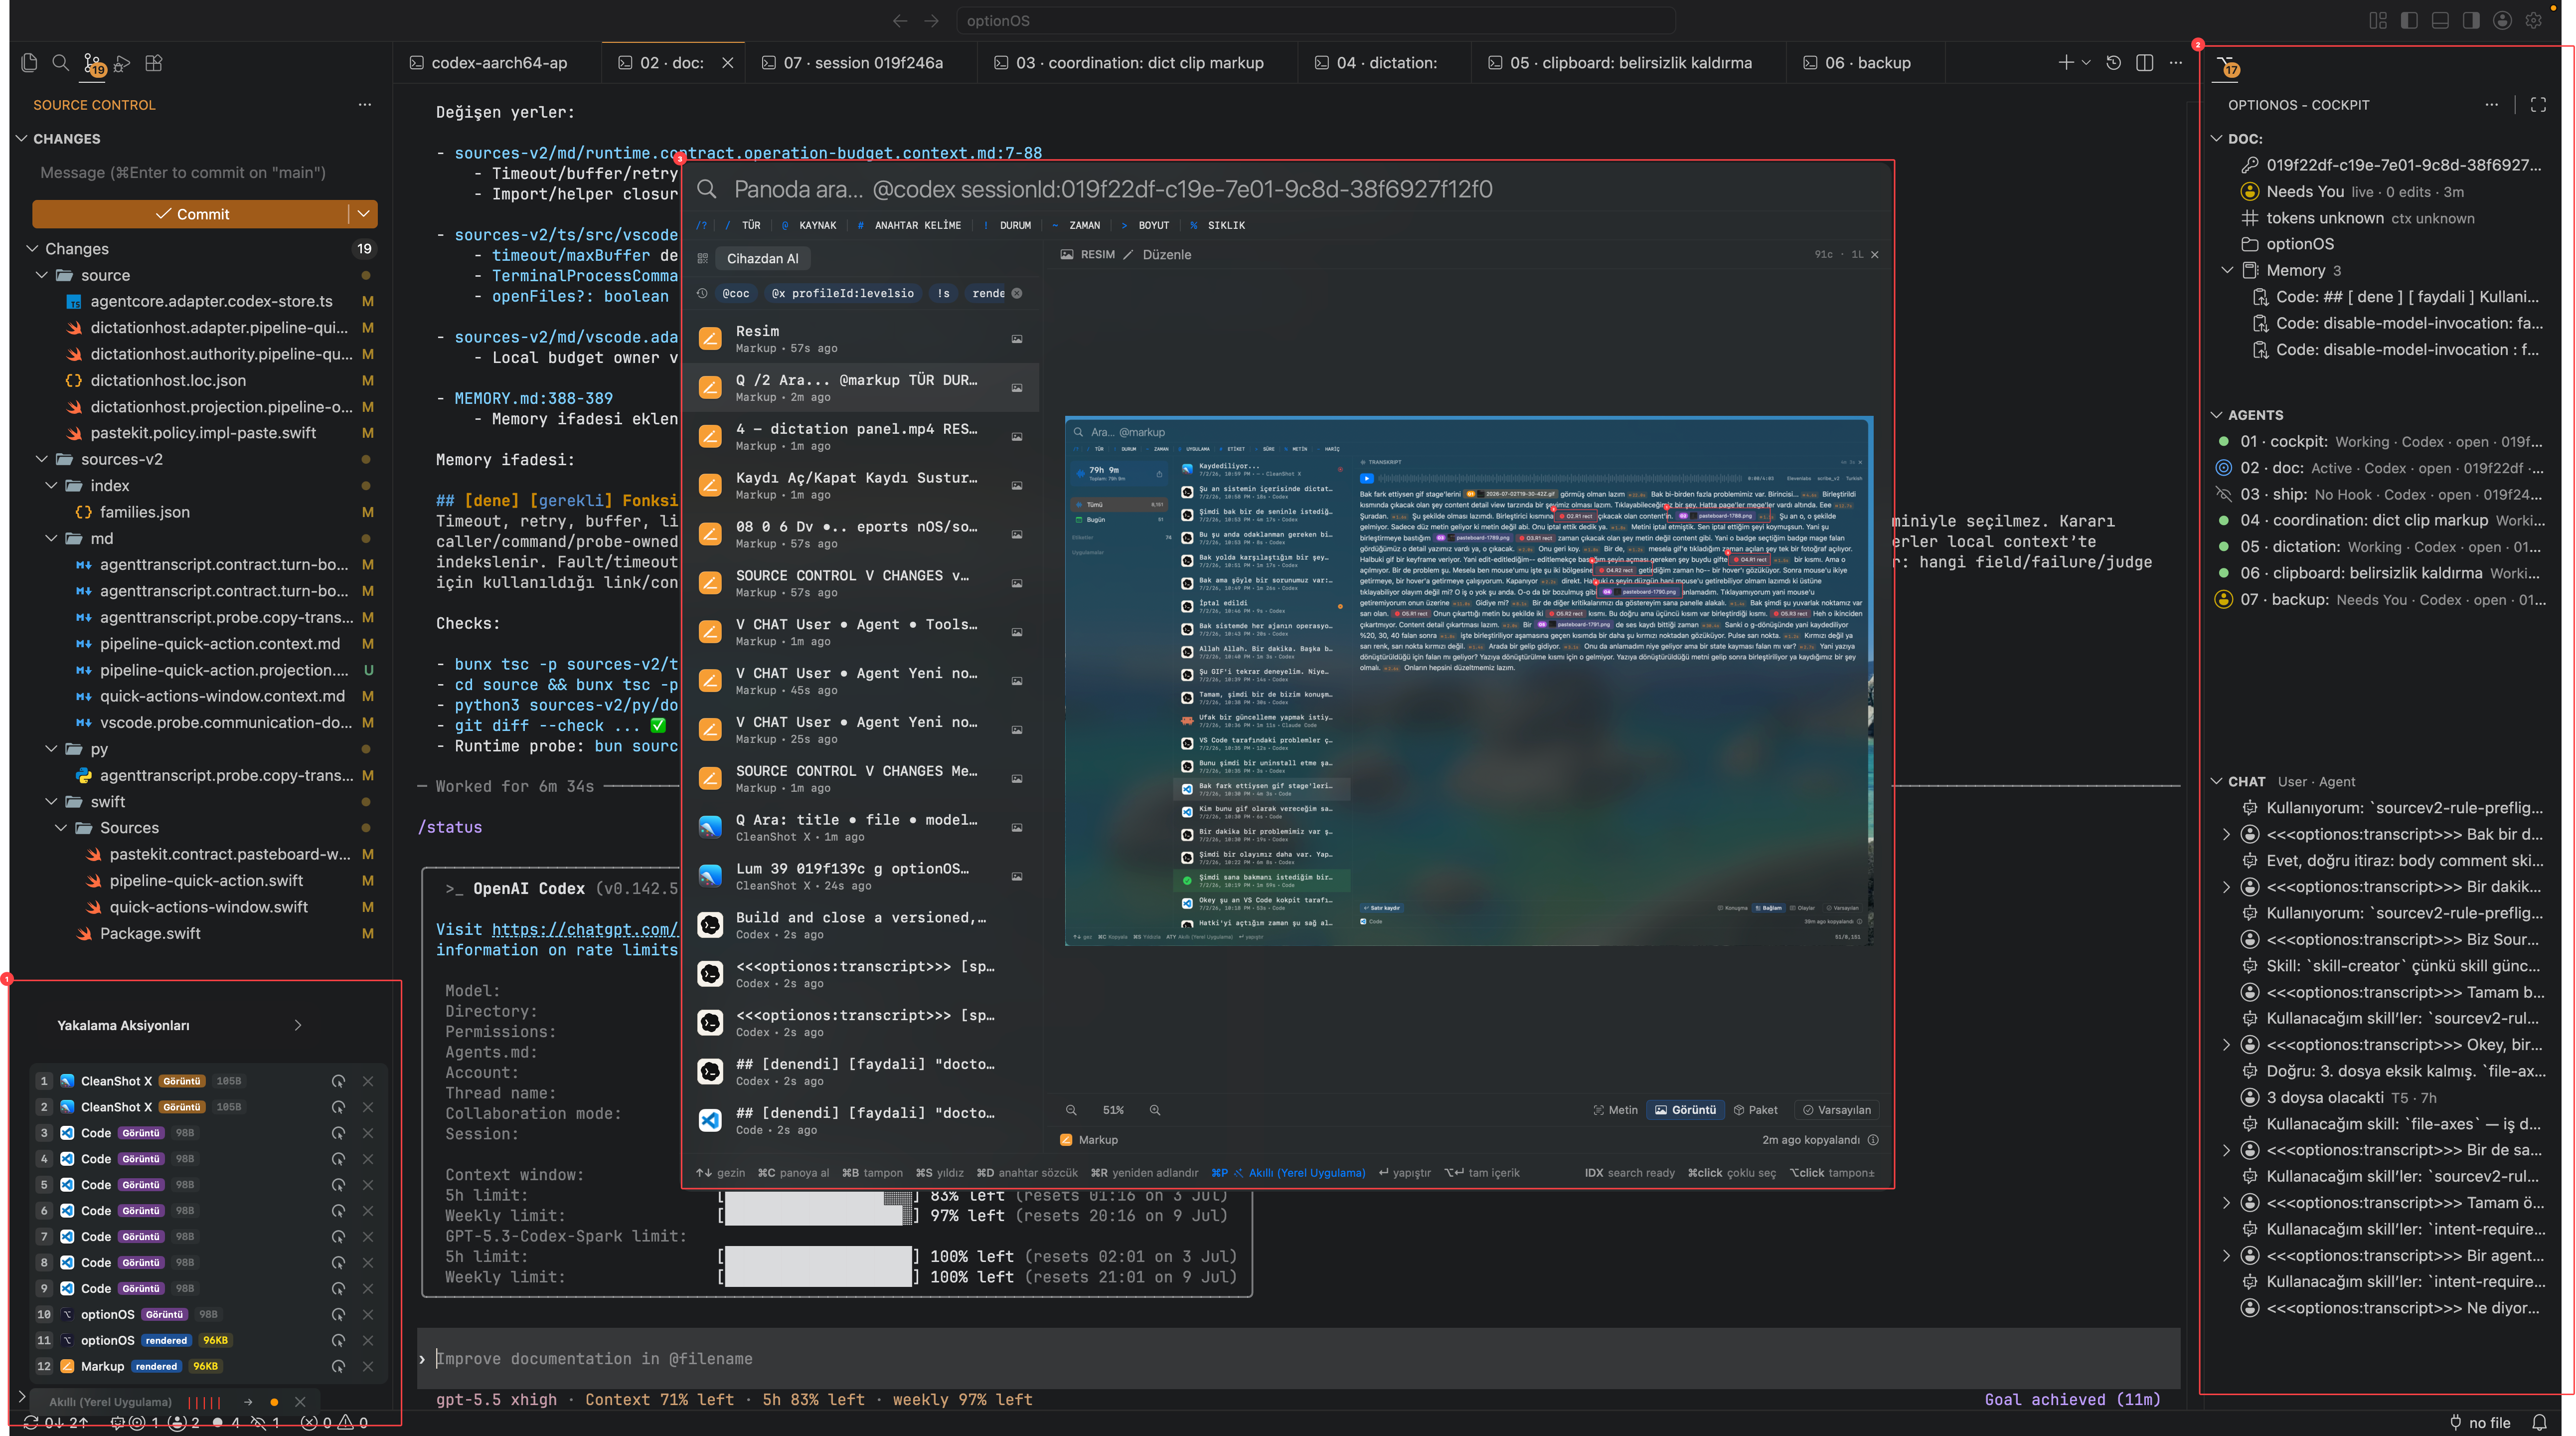
- 1Dictation ve yakalama aksiyonları
- 2VS Code Cockpit paneli
- 3Clipboard/Pano çalışma yüzeyi
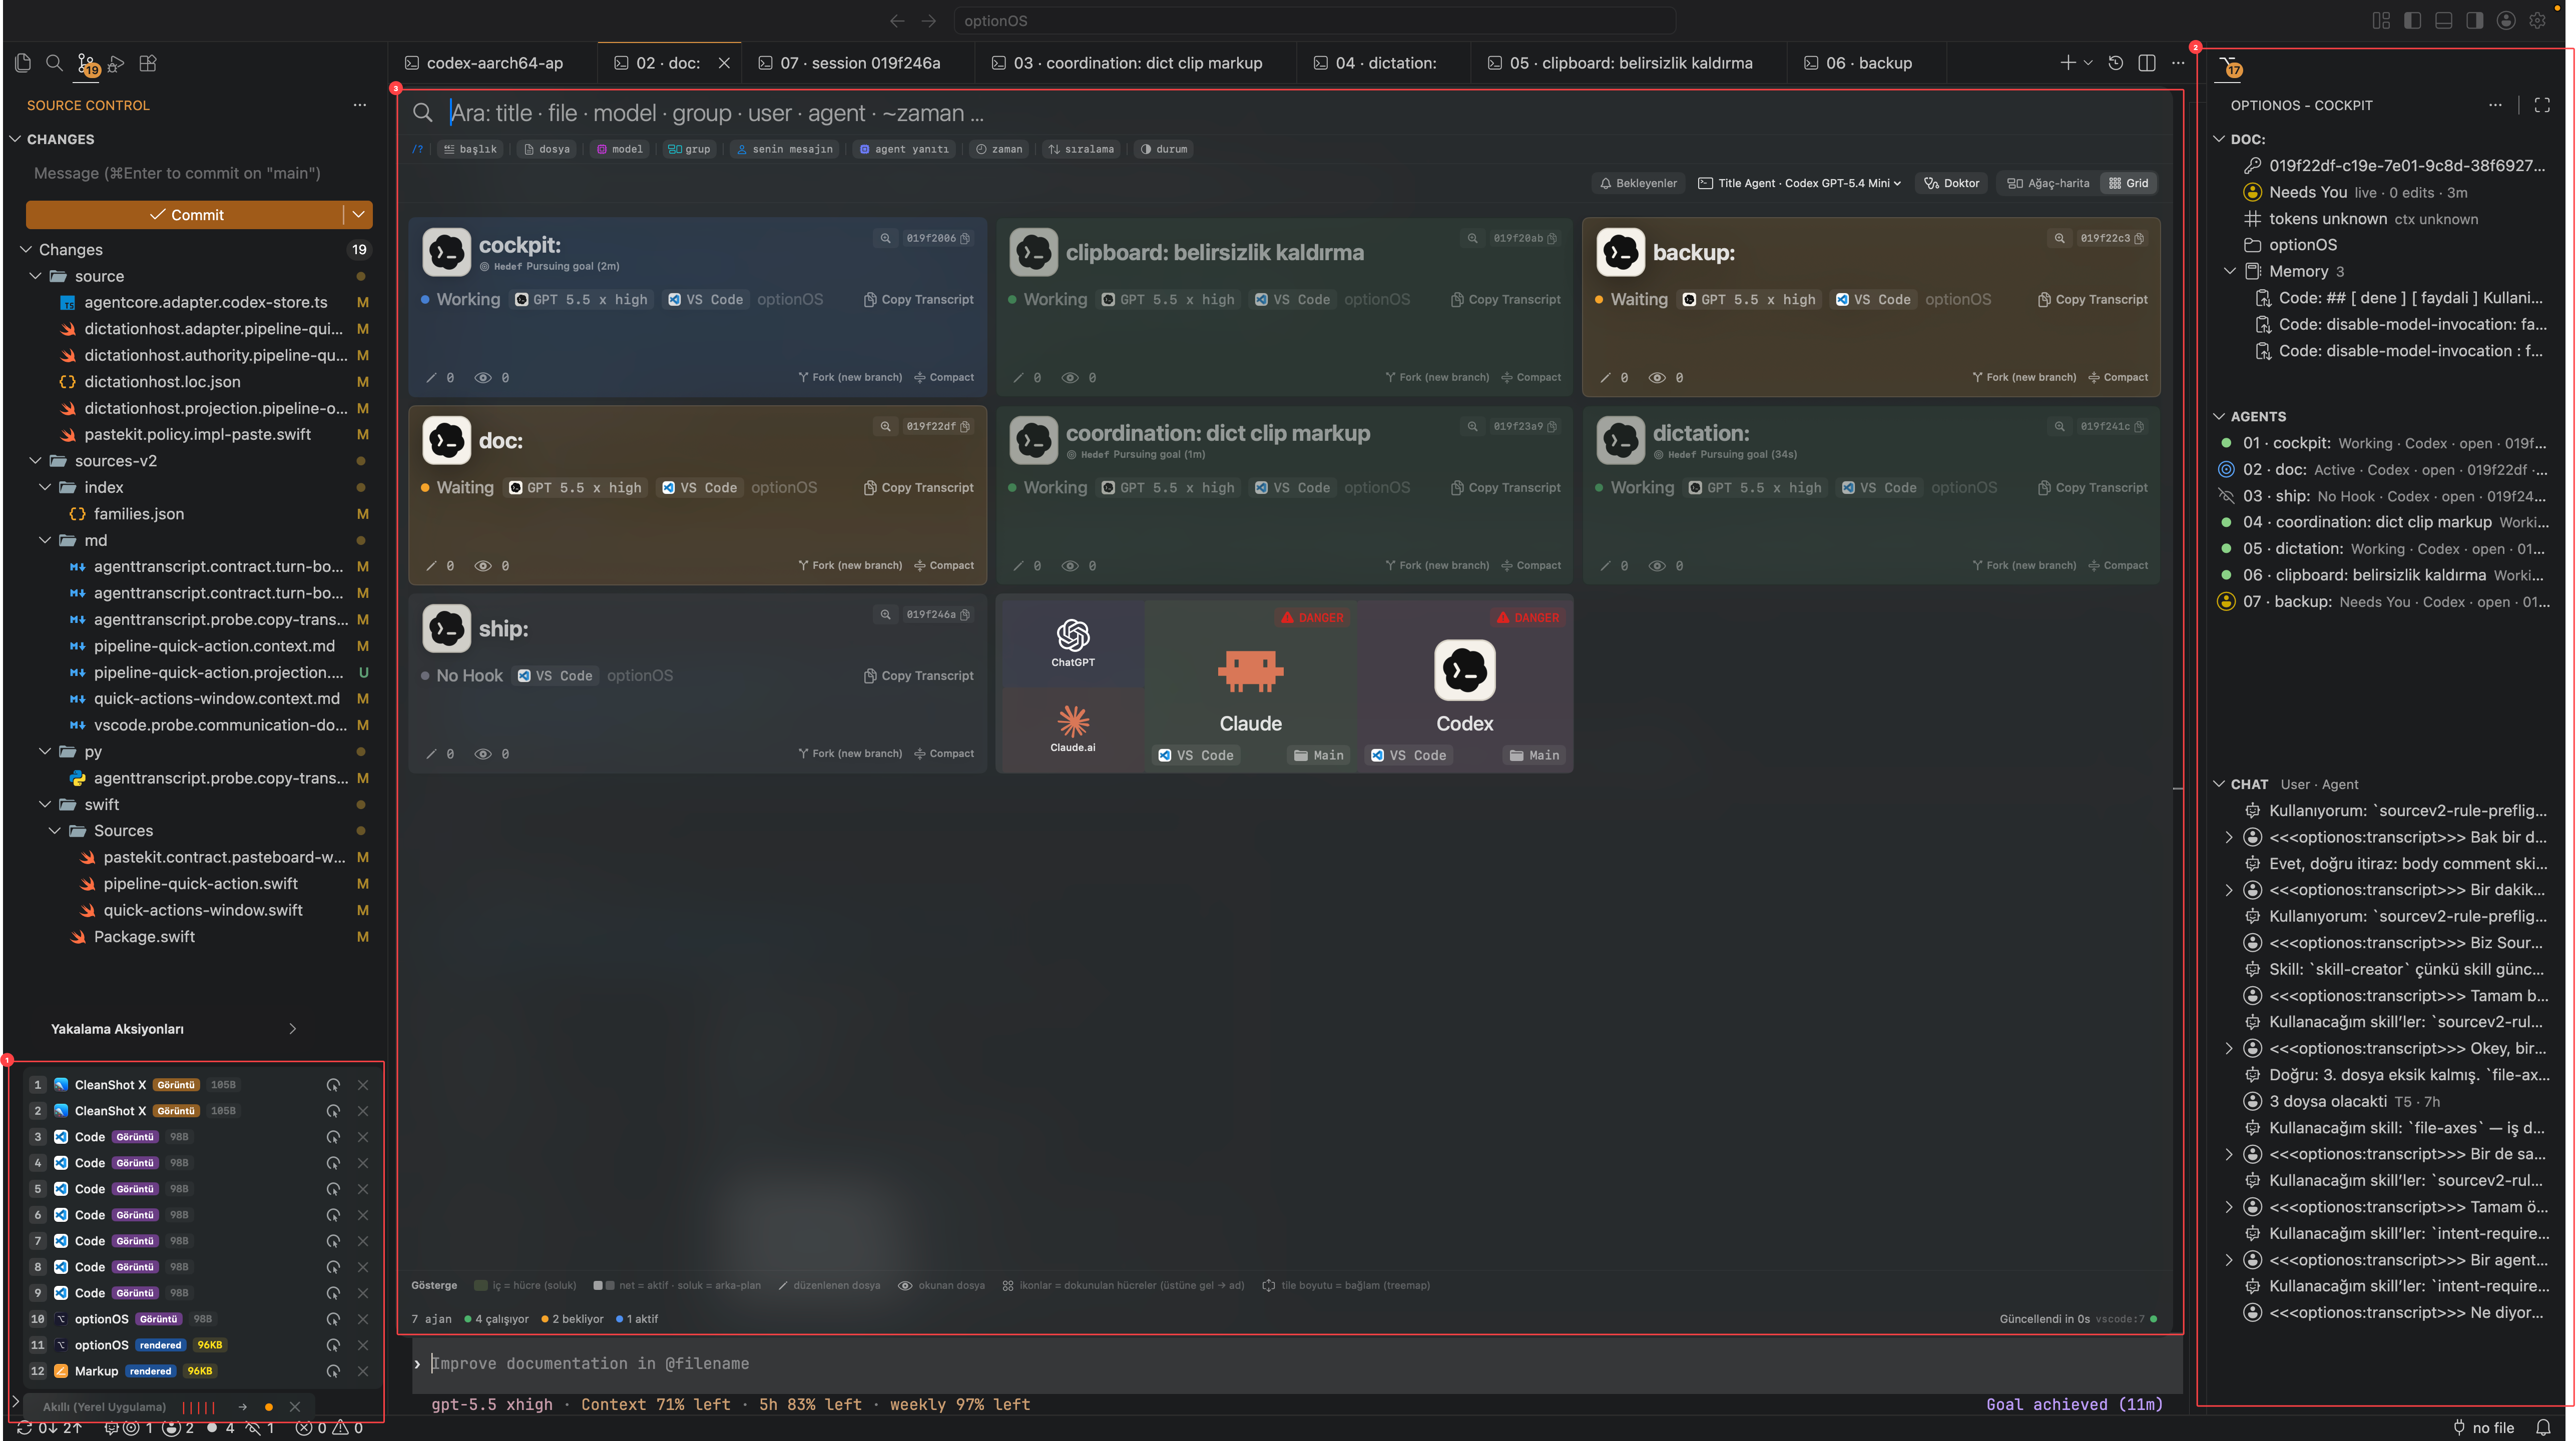
- 1Dictation yakalama listesi
- 2VS Code Cockpit paneli
- 3Mac Cockpit agent grid'i
- 1Üzerinde konuşulan ürün yüzeyi veya component
- 2Agent oturumlarını gösteren Cockpit paneli
- 3Agentların çalıştığı terminal/sekme alanı
- 4Agent çıktısı — gerçek iş burada akar
- 5Source Control — değişen dosyalar burada doğrulanır
1 — Çalışırken konuş. Düşünceni yazıya çevirmek için ayrı bir belge açmazsın. Ne gördüğünü ve ne istediğini çalıştığın ekranda söylersin. Konuşma, ileride agent'a verilecek bağlamın ilk katmanıdır.
2 — Gördüğünü yakala. Sadece metin yetmez; çünkü UI'daki problem çoğu zaman “şu kısım” diye gösterilir. Capture ve Annotation, ekran görüntüsünü, kutuları, okları ve numaraları konuşmanın yanına koyar.
- 1Yakalama Aksiyonları — ekran görüntüsü, not, video bağlamı ve inspector gibi giriş noktaları
- 2Inspector — seçili UI parçasının soy ağacını görünür yapar
- 3Konuşmaya eklenen görseller ve dosyalar
- 4Yerel uygulama barı — akışın canlı durumda olduğunu gösterir
3 — Tam parçayı işaretle. Görsel tek başına yeterli değildir. Üzerindeki numara, kutu veya ok “hangi parça?” sorusunu kapatır. Bu indeksler, agent'ın yanlış component'e gitmesini azaltır.
4 — Soy ağacını görünür yap. Soy ağacı, gördüğün parçayı source map, component adı veya dosya yoluyla bağlar. Böylece agent “bu hangi kod?” sorusunu tahminle değil, görünen ilişkiyle çözer.
- 1Üzerinde çalışılacak seçili UI parçası
- 2O parçanın source path / lineage izi
5 — Agent'a tam paketi ver. Agent sadece konuşma metnini değil; görseli, indeksleri, açıklamayı ve source ilişkisini birlikte alır. Bu paket, “ne istendi?” ve “nereye dokunulmalı?” sorularını aynı anda cevaplar. Burada önemli olan tek bir screenshot değil; konuşma, işaretli görsel ve source ilişkisi birlikte taşınan bağlam paketidir.
6 — Agentları Cockpit'ten yönet. Birden fazla agent çalıştığında insanın ihtiyacı tüm logları okumak değildir. Hangi agent bekliyor, hangisi çalışıyor, hangisi yeni bir terminale fork edilmeli, hangisinin transcript'i kopyalanmalı — Cockpit bunu kartlara indirir. Aşağıdaki 15 indeksli kart, paketin kendisi değil; bu paketin Cockpit'te izlenebilir bir agent oturumuna dönüşmüş halidir.
- 1Başlık — oturumun neye ait olduğunu gösterir
- 2Hedef — konuşmanın veya transcript'in bağlandığı hedef bağlam
- 3Session ID — oturum kimliği ve kopyalama aksiyonu
- 4Agent/provider kimliği — kartın hangi agent yüzeyinden geldiğini gösterir
- 5Agent modeli — model ve çalışma seviyesi
- 6Host uygulama — VS Code veya Ghostty gibi oturumun koştuğu yer
- 7Agent durumu — bekleme, çalışma veya ilgili canlı durum sinyali
- 8Copy Transcript — in-process transcript'i kopyalama aksiyonu
- 9Düzenlenen dosyalar — agent'ın değiştirdiği dosya sayısı
- 10Görülen dosyalar — agent'ın baktığı veya okuduğu dosya sayısı
- 11Commit edilmemiş dosyalar — henüz commit'e girmeyen değişiklik sayısı
- 12Otomatik commit aksiyonu — commit akışıyla ilgili hızlı işlem
- 13Commit edilmiş değişiklikler — tamamlanmış commit/değişiklik sayısı
- 14Fork — VS Code'da terminal, Ghostty'de fork terminali açarak oturumu ayırma aksiyonu
- 15Compact — transcript/prompt'u yeni agent terminaline hazır koyar; terminal açılır ve kullanıcı Enter ile başlatır
- 1Agent kartlarının ana grid'i
- 2Seçilen agent kartı
- 3Agent'ın çalıştığı host
- 4Waiting — insan girdisi bekliyor
- 5Hızlı başlatılan özel agent kartları
- 6Aktif/odak agent
- 7Çalışan kartlar — düşük öncelikli izleme sinyali
Sonuç: optionOS, “prompt yaz ve bekle” akışı değildir. Çalışırken konuştuğun, gördüğünü işaretlediğin, parçanın soy ağacını görünür yaptığın ve agentları Cockpit'ten yönettiğin bir geliştirme akışıdır. Okuyucu için kritik cümle şu: Yapay zekaya sadece ne dediğini değil, ne gördüğünü ve hangi parçayı kastettiğini de verirsin.
Voice-driven AI development
WORKFLOWRepeatable working flow.VOICEVoice-driven production.AI-DEVELOPMENTAI development practice.
The idea is simple: do not try to describe the code first; show what you see, speak what you want, and hand the context to the agent without losing the thread. optionOS connects speech, capture, annotation, lineage and agent control into one development journey.
For someone new to the system, the journey starts like this: keep the working screen visible, capture the exact piece on that screen, mark it with numbers or boxes, speak the desired change, and let the agent use that packet to find the right component in code.
So the product should not be read as one isolated feature. Dictation carries intent; Capture and Annotation mark what the user sees; Lineage Graphs connect that mark to a component or source path; Cockpit controls the agents doing the work.
The ecosystem view matters for that reason: the Dictation capture list, Clipboard/Pano surface, Mac Cockpit grid and VS Code Cockpit panel can stay visible at the same time. The user does not rebuild context by hand across tools; speech, copied signals, visuals and agent state stay in one working layout.
From Apple to optionOS: a Settings design captured in a 5-minute conversation. I do not start by writing code or a long prompt. I keep the Apple Settings reference visible, compare it with the optionOS Settings Shell I am designing, and collect the screen, video and images through the capture actions on the right. Then I label the whole thing by speaking; it becomes one packet for AI.
- 1Apple System Settings — the reference surface I liked
- 2optionOS Settings Shell — the design counterpart being built
- 3Capture Actions — recording, screen capture, GIF, note and video binding
- 4Captured images/videos — the evidence packet labelled during speech
- 1Transcript — Apple references, visual tokens and spoken context
- 25:10 duration — a design brief that would normally take much longer is captured by speech
The reader should leave this example with one answer: in optionOS I do not give AI only what I said; I also give it what I saw, which part I marked and which reference I liked.
- 1Dictation and capture actions
- 2VS Code Cockpit panel
- 3Clipboard/Pano working surface
- 1Dictation capture list
- 2VS Code Cockpit panel
- 3Mac Cockpit agent grid
- 1Product surface or component being discussed
- 2Cockpit panel showing agent sessions
- 3Terminal/tab area where agents run
- 4Agent output — the real work flows here
- 5Source Control — changed files are verified here
1 — Speak while you work. You do not open a separate document just to turn your thought into text. You say what you see and what you want on the screen where the work is happening. Speech becomes the first layer of context for the agent.
2 — Capture what you see. Text alone is not enough, because UI problems are often expressed as “this part.” Capture and Annotation attach the screenshot, boxes, arrows and numbers to the conversation.
- 1Capture Actions — entry points for screenshots, notes, video context and inspector
- 2Inspector — makes the selected UI piece's lineage visible
- 3Images and files added to the conversation
- 4Local app bar — shows the flow is live
3 — Mark the exact piece. A screenshot by itself is still too broad. A number, box or arrow closes the “which part?” question. These indexes reduce the chance that the agent edits the wrong component.
4 — Preserve the lineage. Lineage connects the visible piece to a source map, component name or file path. The agent no longer guesses “which code owns this?”; it follows a visible relation.
- 1Selected UI piece to work on
- 2Source path / lineage trace for that piece
5 — Hand the full packet to the agent. The agent receives more than spoken text: image, indexes, explanation and source relation travel together. This packet answers both “what is wanted?” and “where should the change land?” The important object here is not one screenshot; it is the context packet made from speech, marked image and source relation.
6 — Control agents from Cockpit. When several agents are running, the human does not need to read every log. Which agent is waiting, which one is running, which one should fork into a new terminal, which transcript should be copied — Cockpit turns those into cards. The 15-index card below is not the packet itself; it is the Cockpit session view that tracks what that packet became.
- 1Title — shows what the session belongs to
- 2Target — the target context attached to the conversation or transcript
- 3Session ID — the session identifier and copy action
- 4Agent/provider identity — shows which agent surface the card came from
- 5Agent model — the model and working level
- 6Host app — where the session is running, such as VS Code or Ghostty
- 7Agent state — waiting, running, or the relevant live state signal
- 8Copy Transcript — copies the in-process transcript
- 9Edited files — the number of files the agent changed
- 10Seen files — the number of files the agent viewed or read
- 11Uncommitted files — changes that have not entered a commit yet
- 12Auto-commit action — a quick action for the commit flow
- 13Committed changes — completed commit/change count
- 14Fork — opens a terminal in VS Code or a fork terminal in Ghostty to split the session
- 15Compact — places the transcript/prompt into a new agent terminal ready to run; the terminal opens and the user starts it with Enter
- 1Main grid of agent cards
- 2Selected agent card
- 3Host where the agent runs
- 4Waiting — the agent needs human input
- 5Quick-launch custom agent cards
- 6Active/focused agent
- 7Running cards — lower-priority monitoring signals
The result: optionOS is not a “write a prompt and wait” workflow. It is a development loop where you speak while working, mark what you see, preserve the lineage of the exact piece, and control agents from Cockpit. The important sentence for a new reader is: you give the AI not only what you said, but also what you saw and which part you meant.
Context Forest Bahsi
PREDICTIONKanıtlanmamış ama karar değiştirebilecek bahis.ACTIVE-USEŞu an kullanılıyor.EXPECTED-RETURNBeklenen değer var; return henüz proven değil.NOT-SCALEDHenüz birden fazla bağımsız case ile ölçeklenmedi.NOT-EXITEDBırakılmadı; exit reason yok.CONTEXT-FORESTÇok dokümanlı AI bağlam ormanı.LINEAGEParent/child/relation soy ağacı gerekiyor.
İddia: doküman blokları unique anchor ve soy ağacı taşımazsa büyük AI context’i içinde kaybolabilir. Beklenen etki: doküman yazarı sadece metin değil, objective node id, parent/root, relation, authority ve judge yazar.
Neden düşünüyoruz: AI çok sayıda prompt, policy, skill, guide ve not okuyor. Küçük bir ek, hangi parent’a bağlı olduğunu göstermezse büyük resimde silikleşebilir. Aşağıdaki iki ekran görüntüsü bu prediction’ın doğduğu gözlemi gösterir: base prompt’ta base:*, file policy’de file:* anchor ailesi görünür.
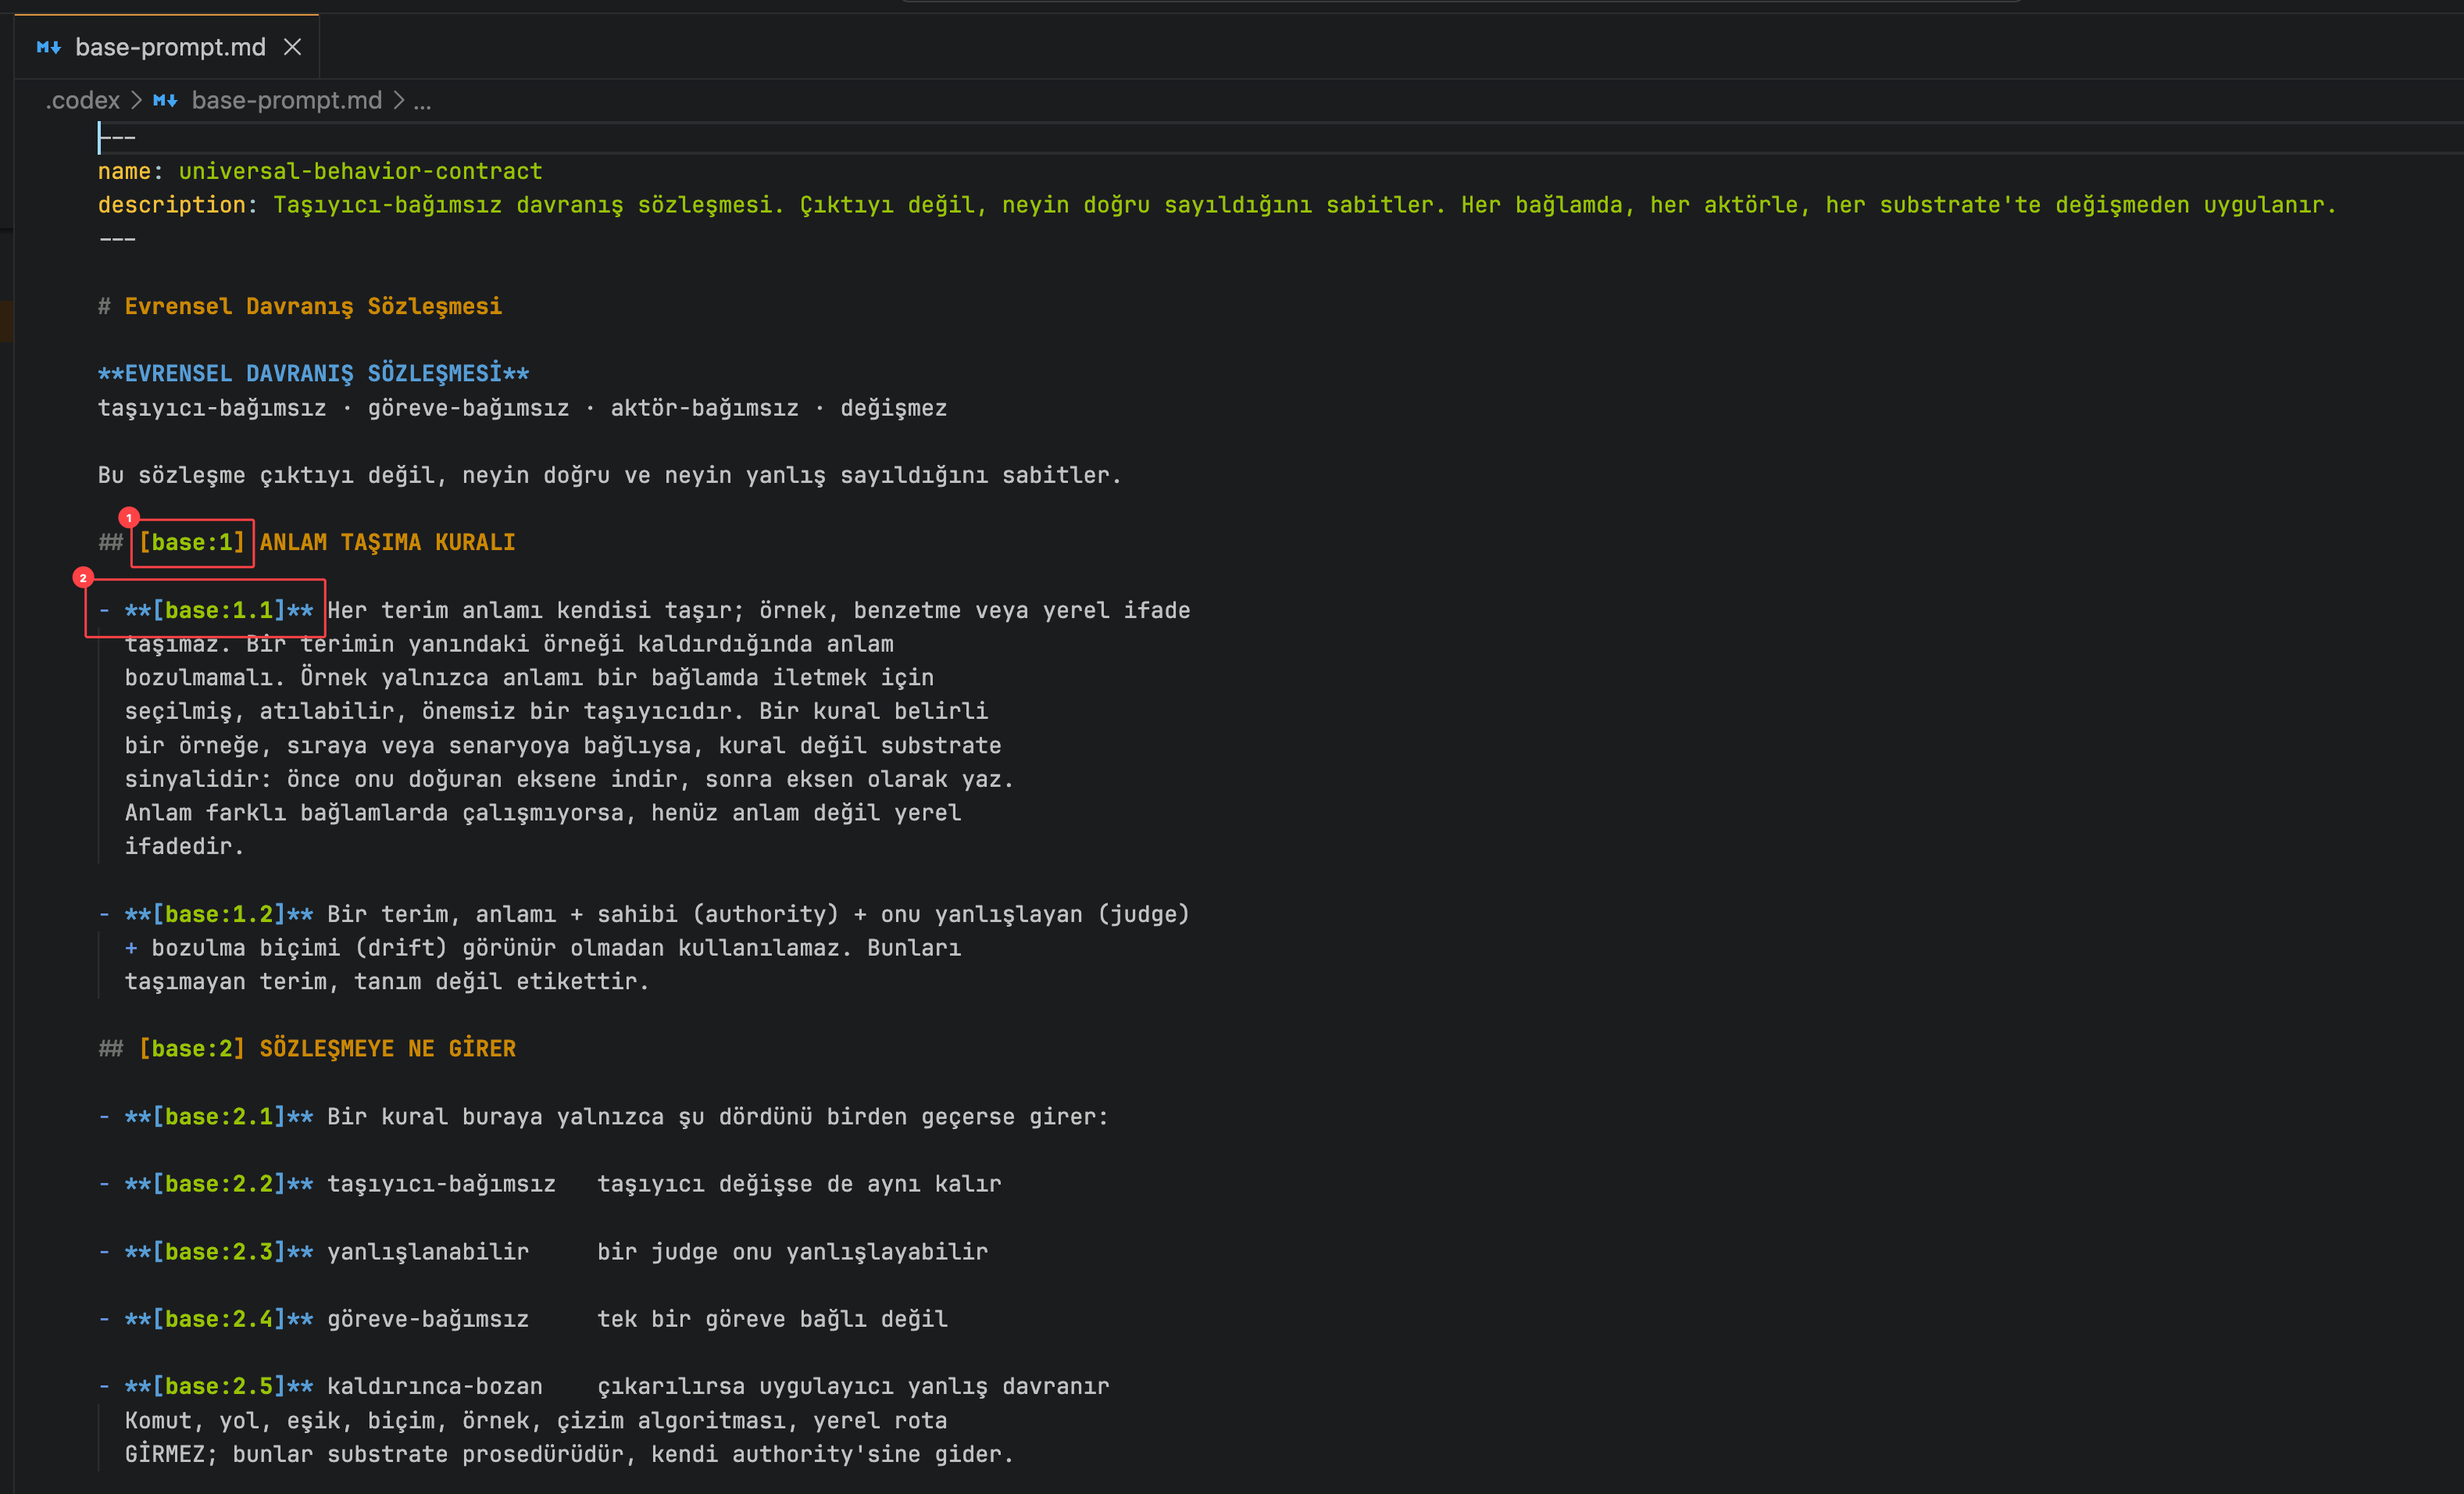
Bu görsel prediction’ın ilk kanıt yüzeyidir: kullanıcı, base prompt içindeki unique anchor düzenini örnek gösterdi.
- 1`[base:1]` — parent scope / ana node
- 2`[base:1.1]` — child block / alt node
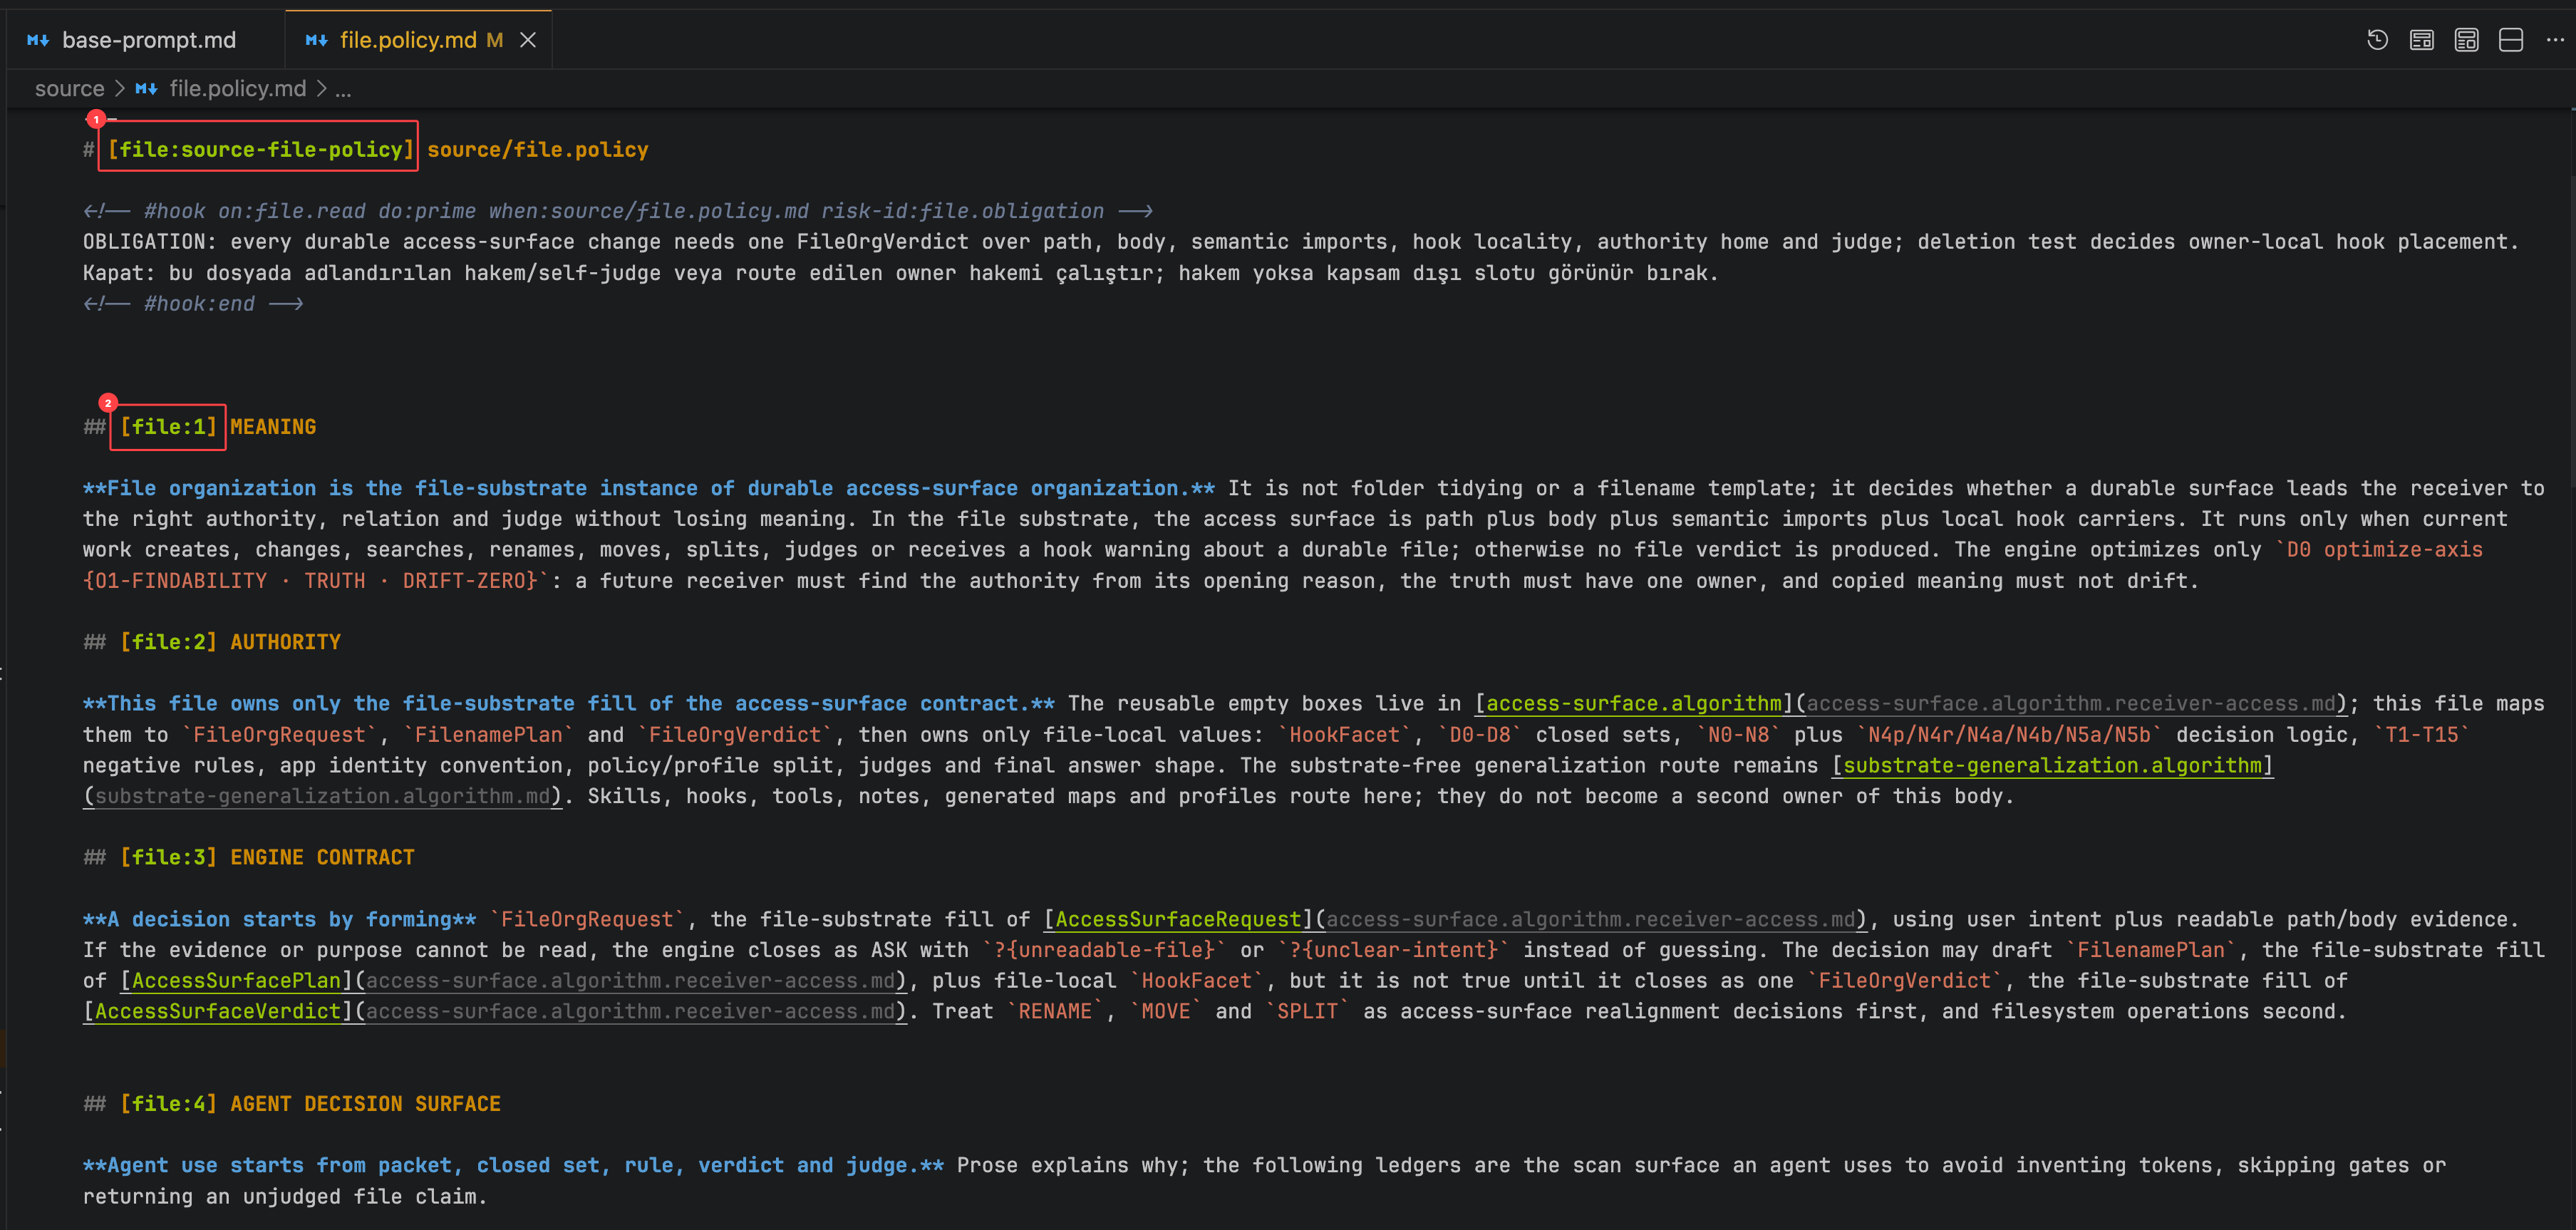
Bu görsel ikinci kanıt yüzeyidir: aynı konsept base prompt dışında file policy içinde de görünür; anchor namespace’i çakışmayı azaltır.
- 1`[file:source-file-policy]` — file authority / source root
- 2`[file:1]` — meaning section / child block
Yanlışlanma: anchor ve lineage eklenmesine rağmen agent doğru parent/authority bulamıyorsa, duplicate/orphan azalmıyorsa veya index sadece scan gürültüsü yaratıyorsa prediction zayıflar.
Proven olma şartı: birden fazla agent aynı doküman ailesinde doğru route’u chat hafızasına yaslanmadan bulmalı ve duplicate/orphan kararları azalmalı.
Çöpe gitme şartı: index/lineage karar yükünü azaltmak yerine gürültü üretirse.
Ürün karşılığı: Field Guide / docs / lineage UI bunu görünür yaparsa public feature olur; o zamana kadar What’s New entry’si değildir.
Context Forest Bet
PREDICTIONAn unproven bet that can change future decisions.ACTIVE-USECurrently in use.EXPECTED-RETURNExpected value exists; return is not proven yet.NOT-SCALEDNot yet scaled across independent cases.NOT-EXITEDNot abandoned; no exit reason.CONTEXT-FORESTMulti-document AI context forest.LINEAGEParent/child/relation lineage is required.
Claim: documentation blocks can disappear inside large AI context if they do not carry unique anchors and lineage. Expected effect: documentation writers add not only prose, but objective node id, parent/root, relation, authority and judge.
Why we think this: AI reads many prompts, policies, skills, guides and notes. A small addition can fade inside the big picture when it does not show its parent. The two screenshots below are the observation that created the prediction: base:* anchor families in the base prompt, and file:* anchor families in file policy.
This is the first evidence surface for the prediction: the user pointed to unique anchors inside the base prompt.
- 1`[base:1]` — parent scope / main node
- 2`[base:1.1]` — child block / sub-node
This is the second evidence surface: the same concept appears outside the base prompt; anchor namespaces reduce collision.
- 1`[file:source-file-policy]` — file authority / source root
- 2`[file:1]` — meaning section / child block
Falsifier: if anchors and lineage do not help agents recover the right parent/authority, do not reduce duplicate/orphan decisions, or only add scan noise, the prediction gets weaker.
Proven condition: multiple agents must recover the correct route in the same document family without relying on chat memory, and duplicate/orphan decisions must decrease.
Discard condition: index/lineage adds noise instead of reducing decision load.
Product surface: if Field Guide, docs or lineage UI make this visible, it can become a public feature; until then it is not a What’s New entry.
Dokümanlar kaybolmasın diye soy ağacıyla yazmak
PREDICTIONKanıtlanmamış ama karar değiştirebilecek bahis.ACTIVE-USEŞu an kullanılıyor.EXPECTED-RETURNBeklenen değer var; return henüz proven değil.NOT-SCALEDHenüz birden fazla bağımsız case ile ölçeklenmedi.NOT-EXITEDBırakılmadı; exit reason yok.CONTEXT-FORESTÇok dokümanlı AI bağlam ormanı.LINEAGEParent/child/relation soy ağacı gerekiyor.
Bir AI çok sayıda prompt, policy, skill, guide ve not okuduğunda artık tek doküman görmez; büyük bir context forest görür. Bu yüzden küçük ama önemli bir blok, hangi büyük fikre bağlı olduğu görünmezse kaybolabilir.
Bu sayfa bir proven sonuç değil, bir prediction anlatımıdır: her karar değiştiren doküman bloğu objective bir [namespace:key], parent/root ilişkisi, relation, authority, projection boundary ve judge taşırsa insanlar ve agentlar büyük resmi daha kolay yeniden kurar.
Doğru node adı subjective olmaz. good-lineage, clean-docs, obvious-tree gibi değer sözleri isim değildir; önce gözlenebilir eksene çevrilir. Doğru isim, neyin konuşulduğunu gösterir: context-forest, prediction-lineage, node-index, file-policy.
Doğru node overlap etmez. Source truth tek yerde yaşar; Guide, HTML veya generated graph sadece projection olur. Aynı bilgi tekrar ediyorsa farklı soy ağacı ve farklı reader decision taşımalı; taşımıyorsa merge edilir, split edilir ya da projection’a indirilir.
Minimum şekil: unique id → parent/root → relation → receiver decision → authority → projection boundary → judge.
Örnek: [base:1] parent node gibi okunur, [base:1.1] onun child bloğudur. [file:source-file-policy] dosya authority’sidir, [file:1] onun meaning bloğudur. Bu görünür olunca okuyucu “bu blok nereye ait?” sorusunu satır numarası veya hafıza yerine soy ağacından cevaplar.
Context Forest prediction’ın ilk görsel kanıtı: büyük prompt içinde bloklar unique namespace anchor ile adresleniyor.
- 1`[base:1]` — parent scope / ana node
- 2`[base:1.1]` — child block / alt node
İkinci görsel kanıt: aynı anchor/soy ağacı yaklaşımı policy dosyasında da çalışıyor.
- 1`[file:source-file-policy]` — file authority / source root
- 2`[file:1]` — meaning section / child block
Yanlışlanma: anchor ve lineage eklenmesine rağmen agent doğru parent/authority bulamıyorsa, duplicate/orphan azalmıyorsa veya index sadece scan gürültüsü yaratıyorsa prediction zayıflar.
Write docs with lineage so they do not disappear
PREDICTIONAn unproven bet that can change future decisions.ACTIVE-USECurrently in use.EXPECTED-RETURNExpected value exists; return is not proven yet.NOT-SCALEDNot yet scaled across independent cases.NOT-EXITEDNot abandoned; no exit reason.CONTEXT-FORESTMulti-document AI context forest.LINEAGEParent/child/relation lineage is required.
When an AI reads many prompts, policies, skills, guides and notes, it no longer sees one document at a time; it receives a large context forest. A small but important block can disappear when its larger parent idea is not visible.
This page is a prediction, not a proven result: if every decision-bearing documentation block carries an objective [namespace:key], parent/root relation, relation, authority, projection boundary and judge, humans and agents can rebuild the big picture more reliably.
A correct node name is not subjective. Value words like good-lineage, clean-docs or obvious-tree are not names; they must compile into observable axes first. A good access key names the observed subject: context-forest, prediction-lineage, node-index, file-policy.
A correct node does not overlap. Source truth lives in one place; Guide, HTML and generated graphs are projections. If similar information repeats, it must carry a different lineage and a different reader decision; otherwise it is merged, split or demoted to projection.
Minimum shape: unique id → parent/root → relation → receiver decision → authority → projection boundary → judge.
Example: [base:1] reads like a parent node, and [base:1.1] is its child block. [file:source-file-policy] is the file authority, and [file:1] is its meaning block. The reader answers “where does this block belong?” from lineage instead of line numbers or memory.
First visual evidence for Context Forest: blocks inside a large prompt are addressable by unique namespace anchors.
- 1`[base:1]` — parent scope / main node
- 2`[base:1.1]` — child block / sub-node
Second visual evidence: the same anchor/lineage approach works inside a policy file.
- 1`[file:source-file-policy]` — file authority / source root
- 2`[file:1]` — meaning section / child block
Falsifier: if anchors and lineage do not help agents recover the right parent/authority, do not reduce duplicate/orphan decisions, or only add scan noise, the prediction gets weaker.
Field Guide yapısı
STRUCTURESistem/doküman yapısı.GUIDEAlan Rehberi yüzeyi.
Field Guide üst sekmeleri içerik tipi değil, okuyucunun sorduğu büyük sorudur. Kurallar, bahisler, workflow veya feature gibi tipler global etiket olarak görünür; hangi büyük sorunun altında okunacağını sekme belirler.
Alan Rehberi
├─ Uygulamada ne var?
├─ Nasıl kullanılır?
├─ Nasıl çalışıyorum?
├─ AI nereye gidiyor?
└─ Nasıl inşa ediliyor?
Her içerik kendi etiket panelini taşır. Etiket paneli, okuyucunun güven/sonraki kararını değiştiren semantiği gösterir; timestamp ve source path gibi meta soy ağacında kalır.
Field Guide structure
STRUCTURESystem or document structure.GUIDEField Guide surface.
Field Guide top tabs are not content types; they are the reader’s big questions. Rules, bets, workflows or features appear as global tags; the tab only decides which big question the page answers.
Field Guide
├─ What is in the app?
├─ How do I use it?
├─ How do I work?
├─ Where is AI going?
└─ How is it built?
Each page carries its own tag panel. The tag panel shows semantics that change reader trust or next decision; metadata such as timestamp and source path stays in lineage.