Every visible change, as it ships.Her görünür değişiklik, çıktığı anda.
UnreleasedYayınlanmadı
Mac
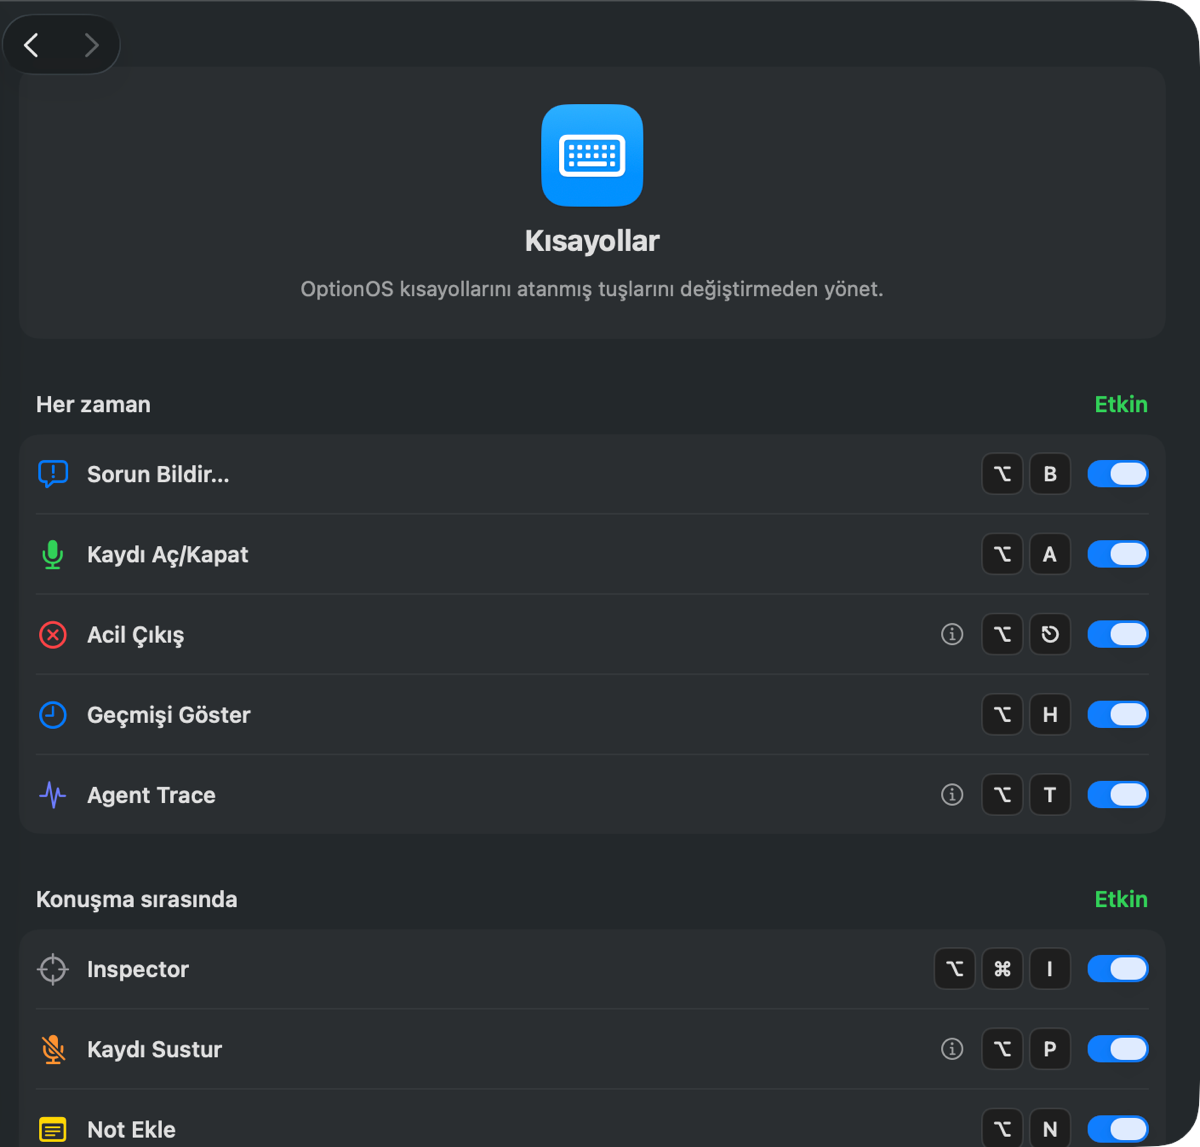
Kısayolları Ayarlar’dan aç; hangisinin ne zaman çalıştığını kategorisinden gör
Kısayollar artık Ayarlar’daki tek bir yüzeyde. Her eylemin tuşlarını ve etkinlik durumunu aynı satırda görebilir; kısayolun her zaman mı, konuşma sırasında mı, yoksa konuşma veya oturum dışındaki araçlarda mı çalıştığını kategorisinden anlayabilirsin.
Her zaman çalışanlarla konuşmaya bağlı olanları ayır
Her zaman ve Konuşma sırasında grupları, her kısayolun kullanım koşulunu listede görünür kılar. Eylem, atanmış tuşlar ve açma-kapama denetimi aynı satırda kalır.
Kısayolun tuşunu ve hangi durumda çalıştığını aynı listede gör.
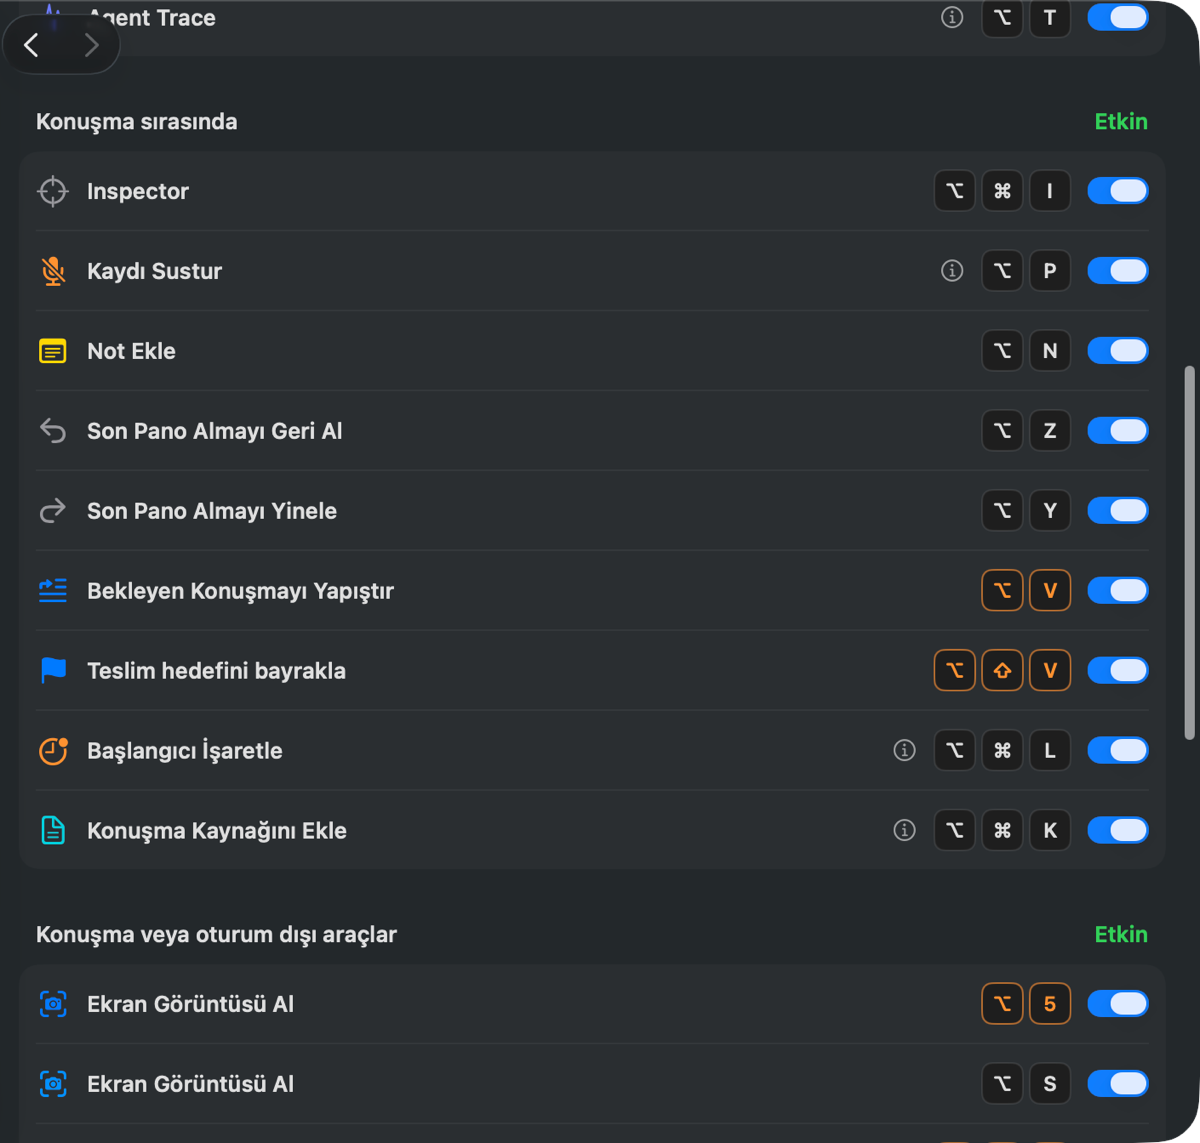
Konuşma varken çalışan kısayolları kendi grubunda bul
Bekleyen Konuşmayı Yapıştır ve Teslim hedefini bayrakla gibi konuşmaya bağlı eylemler, Konuşma sırasında grubunda yer alır. Bir sonraki grup ise konuşma veya oturum dışında kullanabileceğin araçları ayrı tutar.
Koşullu kısayollar, çalıştıkları bağlamın başlığı altında görünür.
Open Shortcuts from Settings and see when each one works from its category
Shortcuts now live on one Settings surface. Each row shows the action, assigned keys, and enabled state, while its category tells you whether it works at all times, during a conversation, or in tools used outside a conversation or session.
Separate always-available actions from conversation actions
The Always and During conversation groups make each shortcut’s usage condition visible in the list. Its action, assigned keys, and enable control stay together on one row.
See a shortcut’s keys and the context in which it works in the same list.
Find conversation-only shortcuts in their own group
Conversation-dependent actions such as Paste Pending Speech and Flag delivery target live under During conversation. The next group keeps tools used outside a conversation or session separate.
Conditional shortcuts appear under the context in which they work.
Mac
Görseller daha hızlı hazırlanıyor; dil sorunları giderildi, uzun konuşmalar daha akıcı
Bu sürümde görsel teslimi, Türkçe–İngilizce metinler ve uzun oturum performansı birlikte iyileştirildi.
Görseller daha hafif. Büyük görseller gönderilmeden önce uygun boyuta indiriliyor. GIF hazırlama, seçilen kaliteye göre kare ve genişlik bütçesi kullanarak ana arayüz işinden ayrı ilerliyor.
Dil yüzeyleri daha tutarlı. Türkçe ve İngilizce aksiyonlarla durum metinlerindeki eksik veya uyumsuz karşılıklar tamamlandı.
Uzun konuşmalar daha akıcı. Uzun transkriptlerin çizimi ölçeklendi; görsel işleme ve ağır gözlem işleri arayüzü daha az bloke edecek şekilde arka plana taşındı.
Images prepare faster, language issues are fixed, and long conversations feel smoother
This release improves media delivery, Turkish–English text, and long-session performance together.
Lighter images. Large images are resized before delivery. GIF preparation uses frame and width budgets for the selected quality and runs separately from the main interface work.
More consistent language. Missing or mismatched Turkish and English action and status text has been completed.
Smoother long conversations. Long-transcript rendering now scales, while media processing and heavier observation work move into the background to block the interface less often.
Mac
Kelimenin başını yaz; doğru kaydı ve transkriptte geçtiği yeri birlikte bul
si gibi bir başlangıç yazdığında optionOS, signal gibi uygun arama etiketini önerir. Arama tamamlandığında eşleşmeler hem kayıt listesinde hem de açık transkriptin içinde vurgulanır.
Kelimenin başını yaz; uygun arama etiketini seç
si gibi bir başlangıç yazdığında optionOS, signal gibi uygun arama etiketini önerir. Öneriyi seçtiğinde arama doğrudan o anlamla devam eder.
Kelimenin başını yazdığında uygun arama etiketi önerilir ve sonuçlar seçiminle güncellenir.
Eşleşmenin hangi kayıtta ve transkriptte nerede geçtiğini birlikte gör
Seçtiğin arama, eşleşen kayıtları listede bulur ve açık transkriptte geçtiği yerleri aynı anda vurgular. Böylece doğru kaydı ve aradığın ifadenin konuşmadaki yerini tek aramada görürsün.
Aynı arama, kayıt listesindeki sonucu ve transkript içindeki eşleşmeleri birlikte gösterir.
Type the start of a word; find the right recording and every transcript match together
Type a beginning such as si, and optionOS suggests a matching search token such as signal. Once selected, matches are highlighted both in the recording list and inside the open transcript.
Type the start of a word and select the matching search token
Type a beginning such as si, and optionOS suggests a matching search token such as signal. Select the suggestion to continue the search with that meaning.
Type the start of a word to get a matching search token and update the results with your selection.
See which recording matches and where the phrase appears in its transcript
The selected search finds matching recordings in the list and highlights every occurrence inside the open transcript at the same time. You can identify the right recording and the phrase’s location in one search.
One search shows both the matching recording and every occurrence inside its transcript.
Mac
Yazacağın alanı bayrakla; başka uygulamada konuşsan da metni aynı hedefe yapıştır
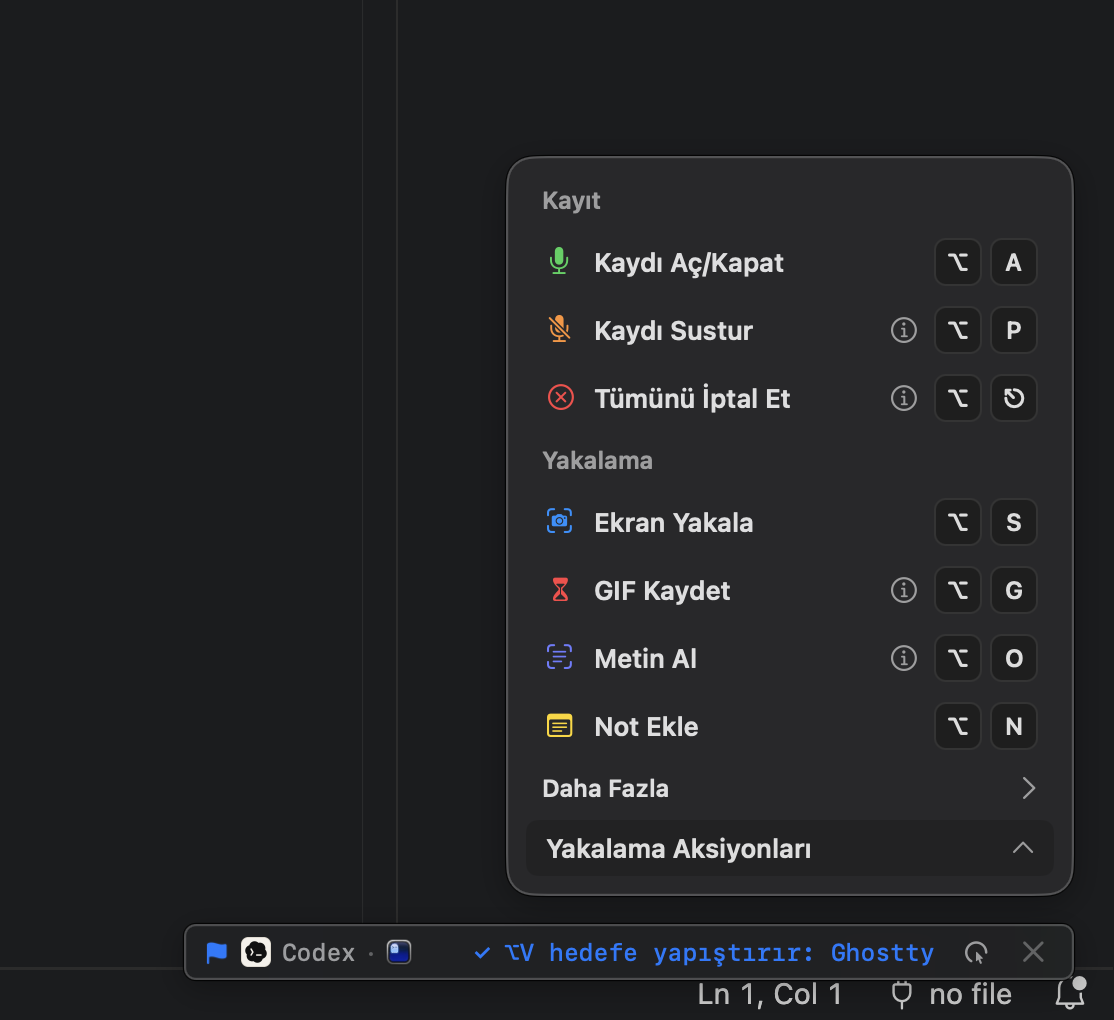
⌥⇧V ile imlecin altındaki yazılabilir alanı teslim hedefi olarak bayraklayabilirsin. Sonra başka uygulamalara geçip konuşmaya devam et; bekleyen konuşmayı ⌥V ile öndeki uygulamaya değil, bayrakladığın alana yapıştır.
Hedefi bir kez bayrakla; konuşurken uygulamalar arasında dolaş
Bayrak, konuşmanın teslim edileceği yazı alanını sabit tutar. Alt çubuk hedef uygulamayı ve ⌥V teslim aksiyonunu gösterir; böylece birden fazla uygulama ya da ajan arasında çalışırken konuşmanın nereye gideceğini kaybetmezsin.
Bayrak ve hedef uygulama alt çubukta görünür kalır; `⌥V` bekleyen konuşmayı bu alana teslim eder.
Flag the field first, then paste back to it even after speaking in another app
Press ⌥⇧V over a writable field to flag it as the delivery target. You can move through other apps while speaking, then press ⌥V to paste the pending dictation into the flagged field instead of the frontmost app.
Flag the destination once, then move between apps while you speak
The flag keeps the destination field fixed while you work elsewhere. The bottom bar shows the target app and the ⌥V delivery action, so you do not lose where the dictation will go when several apps or agents are open.
The flag and target app remain visible in the bottom bar; `⌥V` delivers pending dictation to that field.
Mac
Yazıyı kopyalayacaksan Metin Al’a; konuşarak not tutacaksan Not Ekle’ye bas
Sık kullandığın dört yakalama eylemi artık tek listede: Ekran Yakala, GIF Kaydet, Metin Al ve Not Ekle.
Metin Al ve Not Ekle artık ana Yakalama menüsünde
Metin Al ile ekranda bir alan seçip algılanan yazıyı panoya kopyalayabilirsin. Not Ekle ile doğrudan konuşarak not başlatabilirsin; iki aksiyon da artık Ekran Yakala ve GIF Kaydet yanında görünür.
Metin Al ve Not Ekle artık Daha Fazla katmanını açmadan ana Yakalama menüsünden seçilebilir.
Use Capture Text to copy words on screen; use Add Note to start a spoken note
Your four frequent capture actions now share one list: Screen Capture, Record GIF, Capture Text, and Add Note.
Capture Text and Add Note now appear in the primary Capture menu
Use Capture Text to select an area and copy the recognized words. Use Add Note to start a note directly from speech; both actions now appear beside Screen Capture and Record GIF.
Capture Text and Add Note can now be selected from the primary Capture menu without opening More.
Mac
Konuşmanın akışı ve yakalanan içeriğin kaynağı artık görünür
optionOS artık konuşmanın sırasını, oynatımda hangi kelimede olduğunu ve yakalanan içeriklerin kaynağını doğrudan gösterir. Terminal ajanı ve ses dönüşleri ayrı hedeflerde kalır; oynatılan kelime transkriptte ilerler; yakalanan ajan veya dosya da geldiği uygulamayla birlikte görünür.
Terminal ajanı ve her ses ayrı satırda
Terminal ajanı kendi kimliğiyle görünür; her konuşma dönüşü 1. ses veya 2. ses olarak ayrılır. Bir sesin yanındaki düzenleme aksiyonuna tıkladığında o sesi editörde açıp düzenleyebilirsin. Böylece bar daha sade kalır ve yapmak istediğin aksiyona aradaki birleşik katmanı okumadan ulaşırsın.
Terminal ajanı, konuşma sırası ve düzenleme aksiyonu artık aynı barda ayrı ayrı okunur.
Kayıt oynarken transkript söylediğin kelimeyi takip eder
Bir ses kaydını oynattığında o anda duyduğun kelime transkriptte vurgulanır. Oynatım ilerledikçe vurgu da kelime kelime ilerler; uzun bir konuşmada sesin nerede olduğunu metinden kaybetmezsin.
Ses ilerledikçe transkriptteki vurgu da duyulan kelimeyi takip eder.
Terminal ajanı geldiği uygulamayla birlikte görünür
Ghostty'de çalışan bir ajan yakalandığında ajan kimliği ve terminal kaynağı aynı satırda görünür. Böylece yakalanan ajanın hangi terminal oturumundan geldiğini panelden doğrudan okursun.
Yakalanan ajan, kimliği ve geldiği terminal uygulamasıyla birlikte görünür.
Yakalanan dosya adı ve editörü birlikte görünür
VS Code'dan yakalanan içerik dosya adıyla ve VS Code kaynağıyla aynı satırda görünür. Markdown, Package.swift ve JSON dosya adları aynı kaynak ilişkisini taşır. Bu bilgi şimdilik yalnızca arayüzde görünür; yapay zekâya ek dosya bağlamı olarak gönderilmez.
Yakalanan dosya, adı ve geldiği editörle birlikte görünür.
Speech flow and the source of captured content are now visible
optionOS now shows conversation order, the current word during playback and the source of captured content directly. The terminal agent and voice turns remain separate targets, the played word advances through the transcript, and a captured agent or file appears with the app it came from.
The terminal agent and every voice turn have separate rows
The terminal agent keeps its own identity, while each conversation turn is separated as voice 1 or voice 2. Click the editing action beside a voice turn to open and edit that voice in the editor. The bar stays simpler, and the action you want no longer sits behind a combined intermediate layer.
The terminal agent, conversation order and editing action are now readable as separate targets in the same bar.
The transcript follows each word while a recording plays
When you play a voice recording, the word you are hearing is highlighted in the transcript. The highlight advances word by word with playback, so you do not lose your place in the text during a long conversation.
As audio advances, the transcript highlight follows the word being heard.
A terminal agent appears with its source app
When optionOS captures an agent running in Ghostty, the agent identity and terminal source appear in the same row. You can read which terminal session the captured agent came from directly in the panel.
The captured agent appears with its identity and source terminal app.
A captured file appears with its name and editor
Content captured from VS Code appears in the same row as its filename and VS Code source. Markdown, Package.swift and JSON filenames carry the same source relation. For now this information is visible only in the interface; it is not sent to AI as additional file context.
A captured file appears with its name and the editor it came from.
Mac
Yapıştırma biçimini seçme; optionOS hedef uygulamaya göre kendisi belirler
Yapıştırmadan önce ayrı bir biçim kartını okumak veya mod seçmek artık gerekmiyor.
Ayrı biçim kartı kaldırıldı; yapıştırma hedef uygulamaya göre ilerler
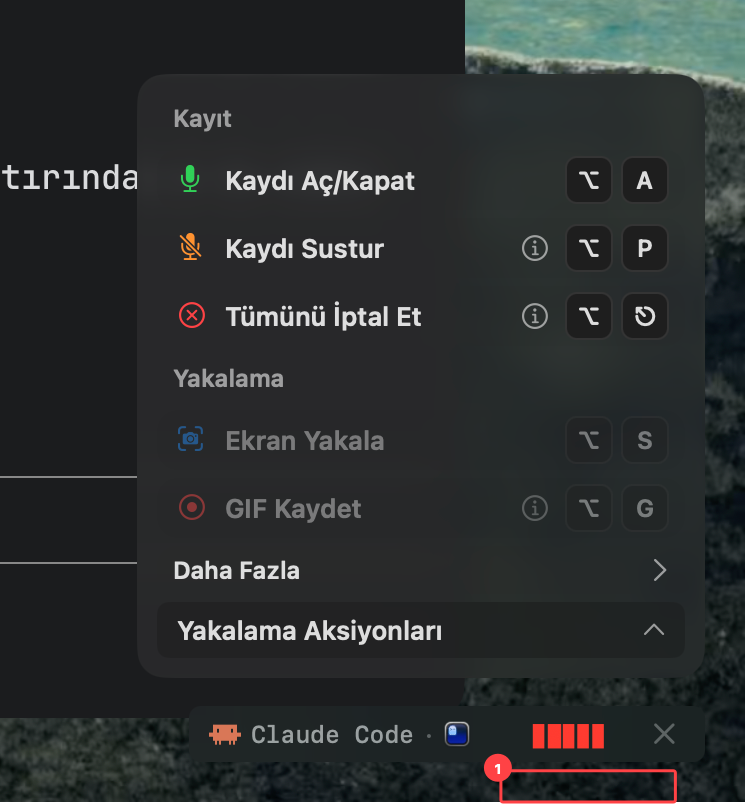
Kayıt çubuğunun altında yer kaplayan ayrı Akıllı biçim alanı kaldırıldı. optionOS hedef uygulamayı okuyup uygun yapıştırma yolunu otomatik belirler. Hedef tanınmıyorsa içeriği referanslı metin biçiminde taşır.
Yapıştırma biçimi artık ayrı bir karttan seçilmez; optionOS hedef uygulamaya göre kendisi belirler.
1Ayrı Akıllı biçim kartının kaldırıldığı alan
Stop choosing a paste format; optionOS now selects it for the target app
You no longer need to read a separate format card or choose a mode before pasting.
The separate format card is gone; pasting follows the target app
The separate Smart format area beneath the recording bar has been removed. optionOS reads the target app and selects the appropriate paste route automatically. Unknown targets use referenced text.
Paste format is no longer selected from a separate card; optionOS selects it for the target app.
1Area where the separate Smart format card was removed
Mac
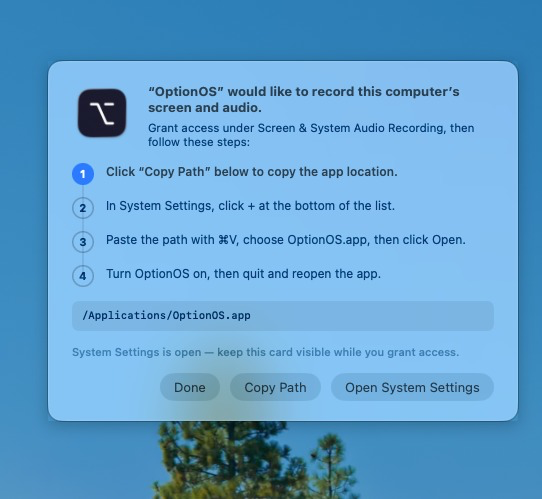
Ekran kaydı izni artık tek karttan doğru ayar sayfasına yönlendiriyor
Ekran kaydı izni gerektiğinde doğru Sistem Ayarları bölümü ve tamamlaman gereken adımlar tek yönlendirme kartında kalır.
Ekran kaydı izni için doğru ayar sayfasını tek karttan aç
Sizi dinliyoruz. Bu değişiklik bir kullanıcı talebiyle geldi.
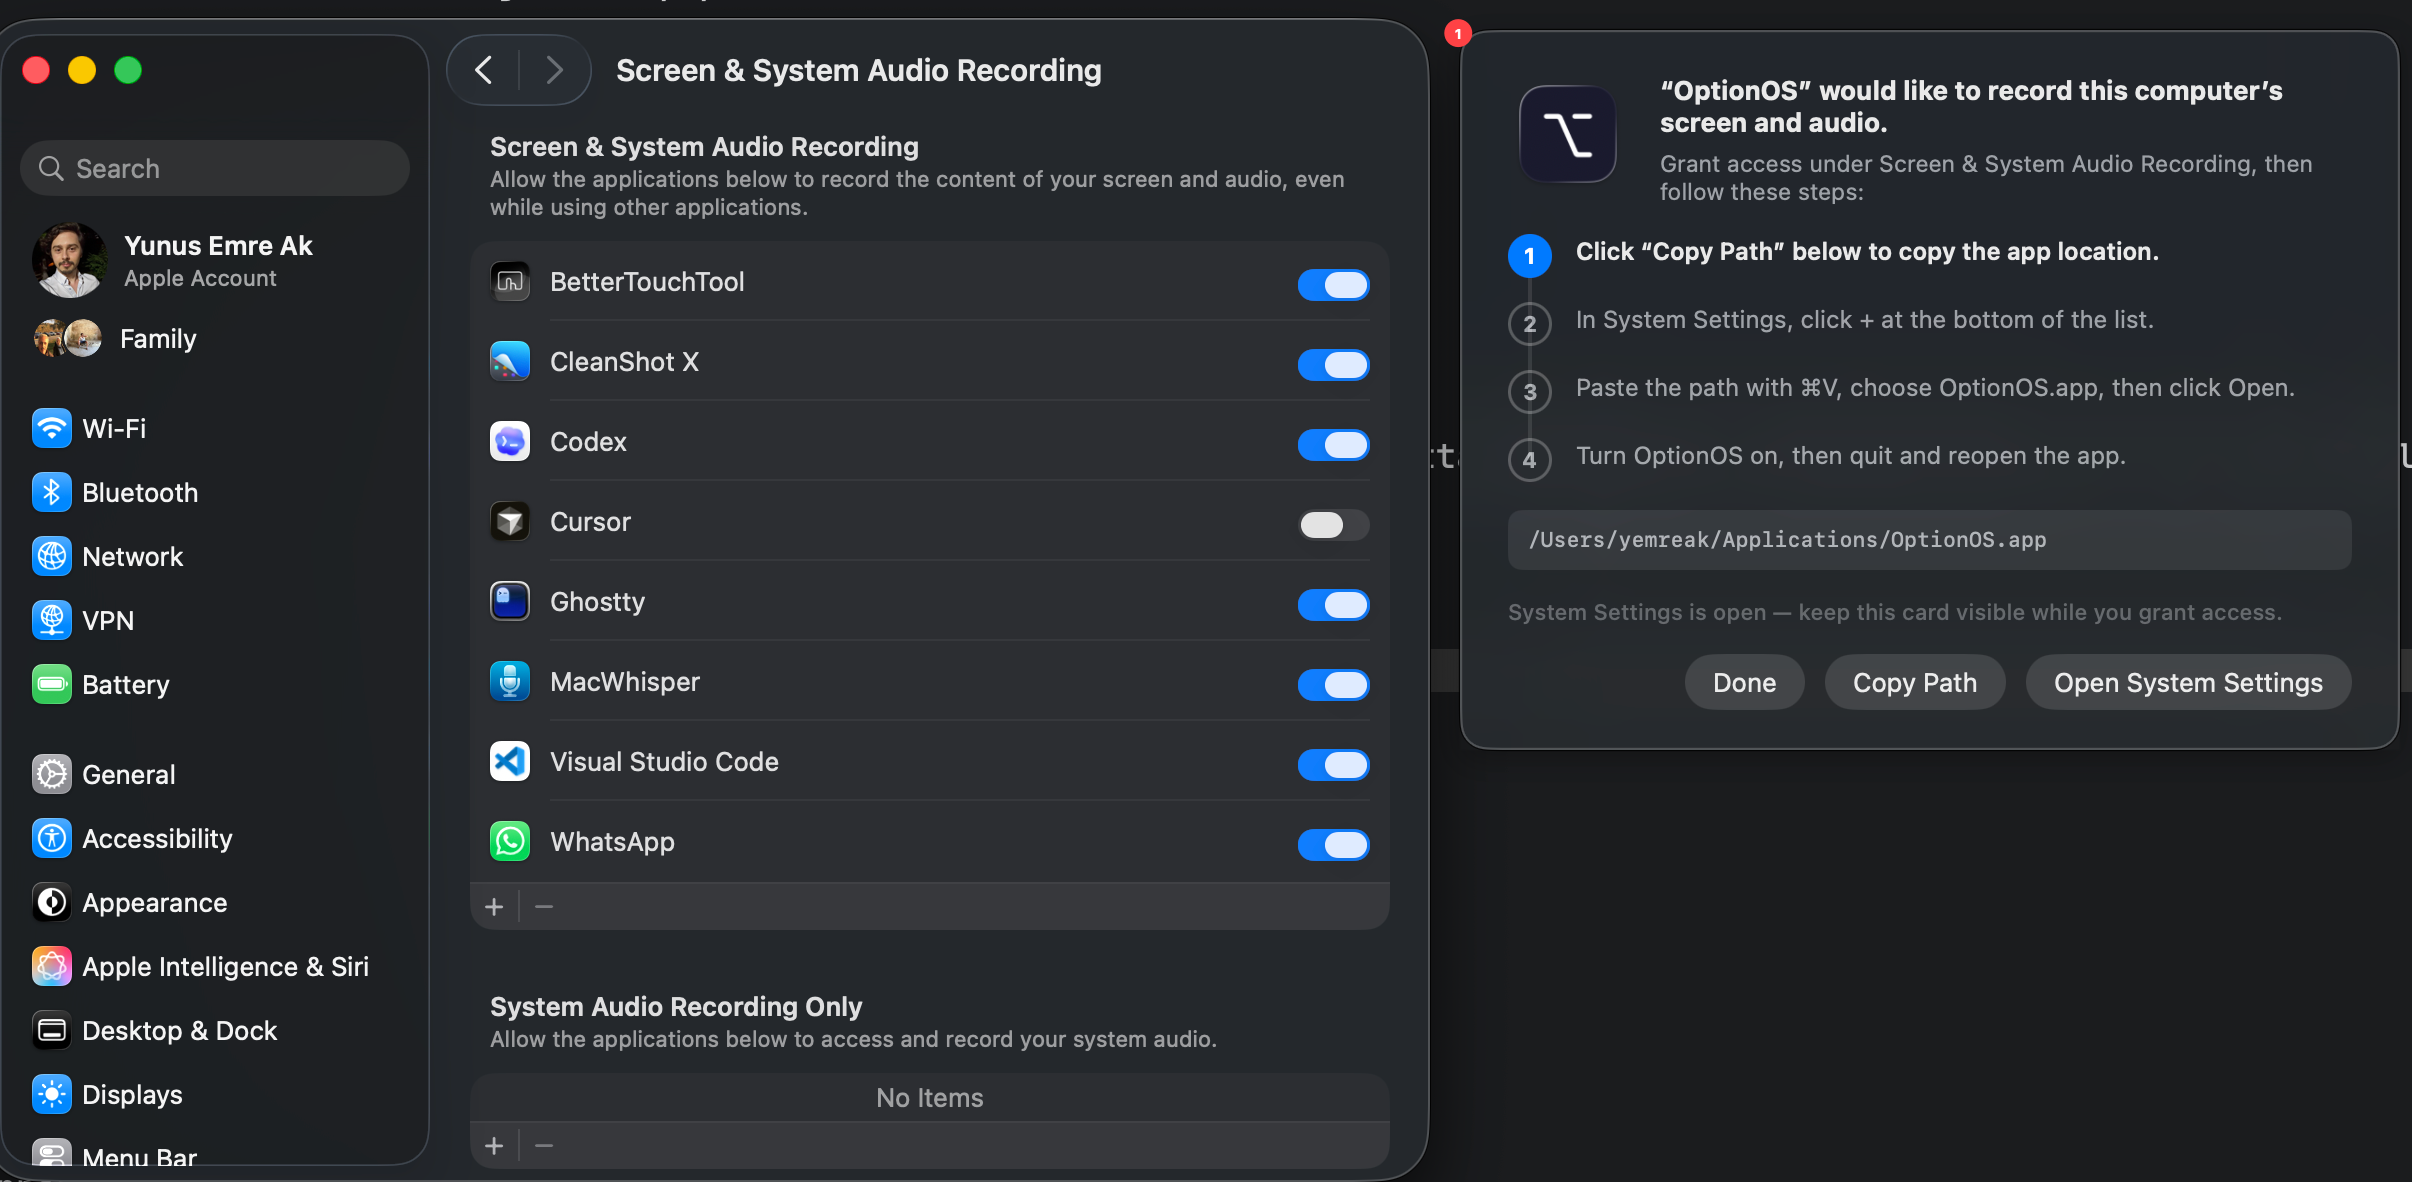
Ekran kaydı izni gerektiğinde iç içe yönlendirme pencereleri yerine tek kart açık kalır. Kart artık Mac’in standart pencere kontrollerini taşır. Open System Settings, doğrudan Screen & System Audio Recording bölümünü açar. OptionOS listede yoksa Copy Path ve dört adım aynı kartta kalır.
İzin adımları, uygulama yolu ve doğru Sistem Ayarları geçişi aynı kartta kalır.
Screen-recording permission now leads to the right Settings page from one card
When screen-recording access is needed, the correct System Settings destination and every required step remain in one guide card.
Open the right Settings page from one card to grant screen-recording access
We’re listening. This change came from a user request.
Instead of stacking handoff windows, one guide stays visible throughout the screen-recording permission flow. It now carries standard Mac window controls, while Open System Settings opens Screen & System Audio Recording directly. If OptionOS is missing, Copy Path and all four steps remain on the same card.
Permission steps, the app path and the correct System Settings handoff remain on one card.
Mac
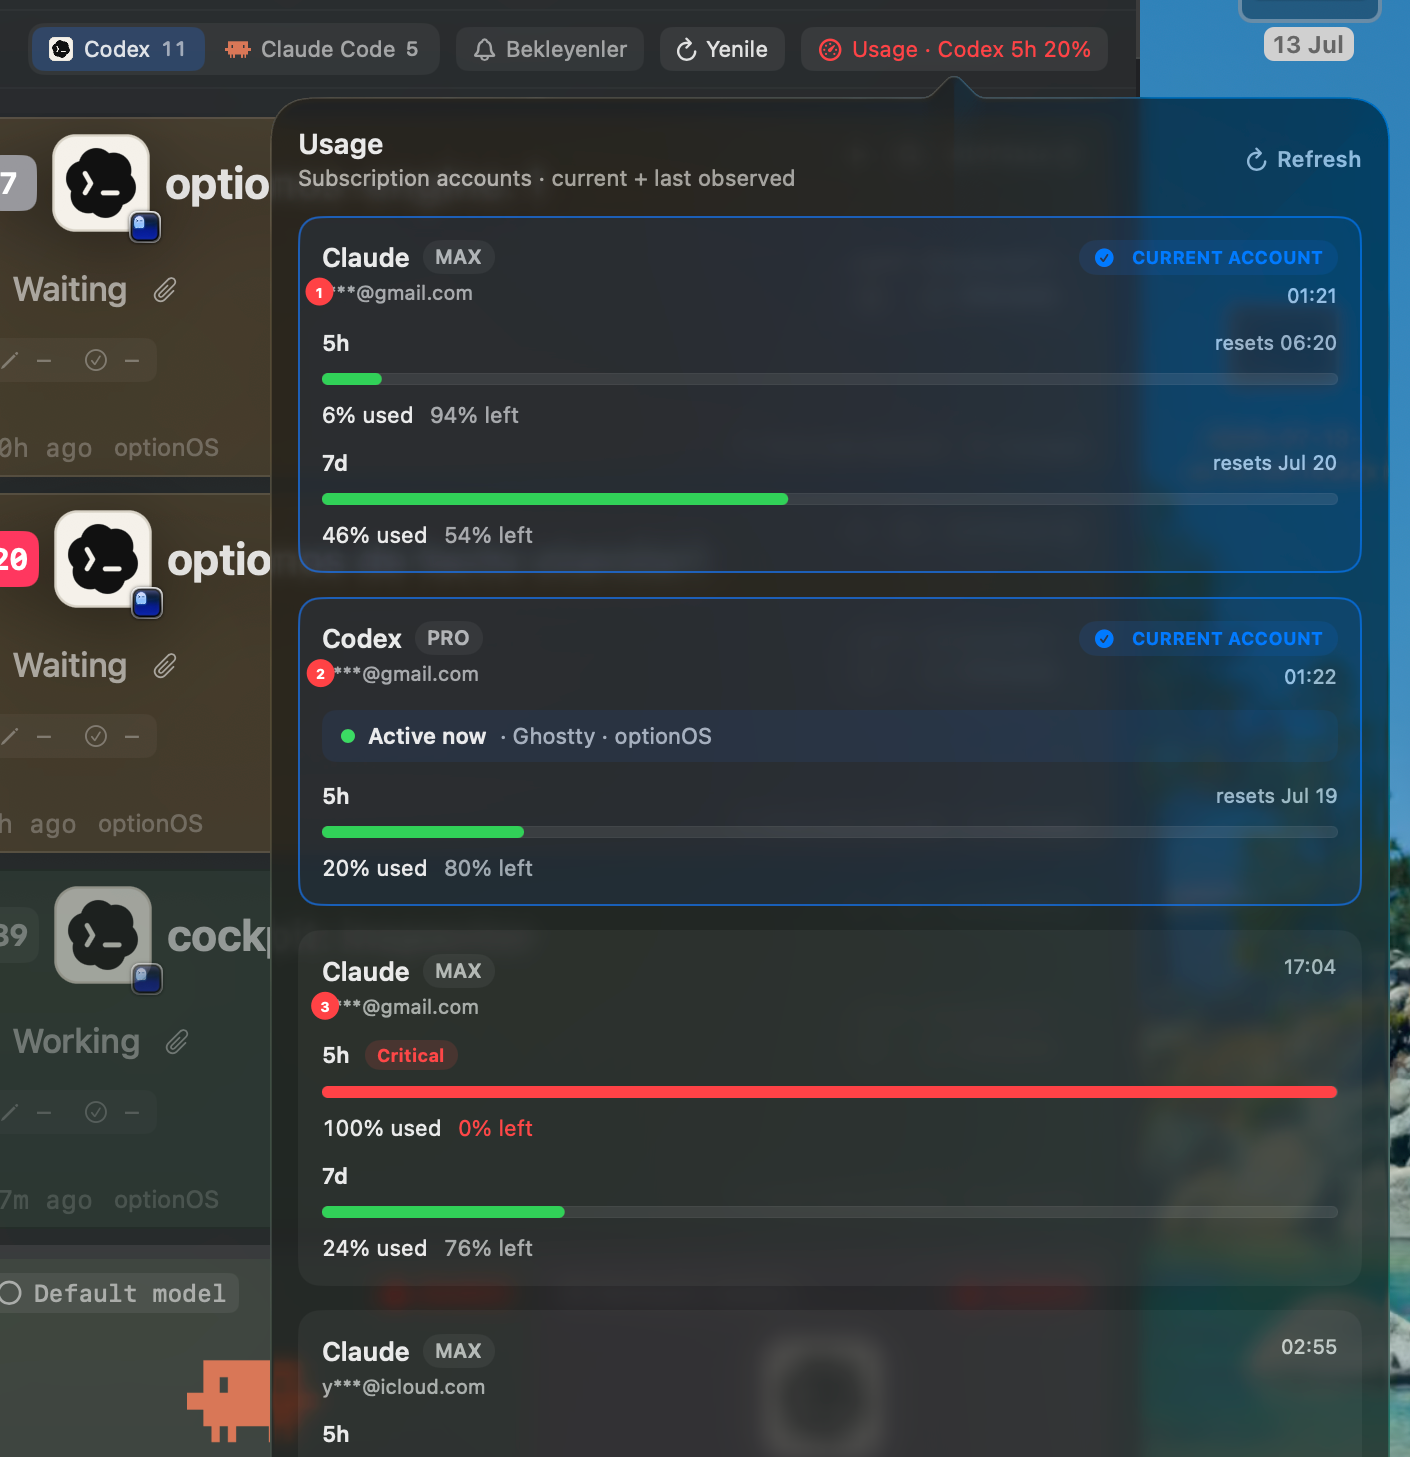
Bu Mac’te bir hesaba bir kez giriş yap; Cockpit kullanımını diğer hesapların yanında tutar
Hesap değiştirdiğinde eski kullanım görünümü kaybolmaz. Cockpit bu bilgisayarda gözlemlediği Claude ve Codex hesaplarını hatırlayıp son bilinen 5h/7d kullanım durumlarını tek panelde toplar.
Aktif ve daha önce görülen hesapların kullanımı aynı panelde
Toolbar’daki Usage rozetini açtığında current + last observed listesi görünür. CURRENT ACCOUNT aktif hesabı ayırır; daha önce bu Mac’te giriş yaptığın hesaplar son gözlem zamanı ve varsa 5h / 7d kullanımlarıyla listede kalır.
Bir hesabın burada görünmesi için bu Mac’te bir kez oturum açılmış olması yeterlidir.
Aktif ve daha önce gözlemlenen hesapların son bilinen kullanım durumları aynı Usage panelinde kalır.
1Aktif Claude hesabı
2Aktif Codex hesabı
3Daha önce gözlemlenen Claude hesabı ve saklanan son kullanım durumu
Sign in to an account once on this Mac; Cockpit keeps its usage beside your other accounts
Switching accounts no longer makes the previous usage view disappear. Cockpit remembers the Claude and Codex accounts observed on this computer and keeps their last-known 5h/7d usage together in one panel.
Current and previously seen accounts share one usage panel
Open the Usage chip to see the current + last observed list. CURRENT ACCOUNT distinguishes the active account; accounts previously used on this Mac remain listed with their last observation time and available 5h / 7d usage.
An account only needs to have been signed in once on this Mac to appear here.
Last-known usage for active and previously observed accounts remains together in the same Usage panel.
1Active Claude account
2Active Codex account
3Previously observed Claude account with its retained last-known usage
Mac
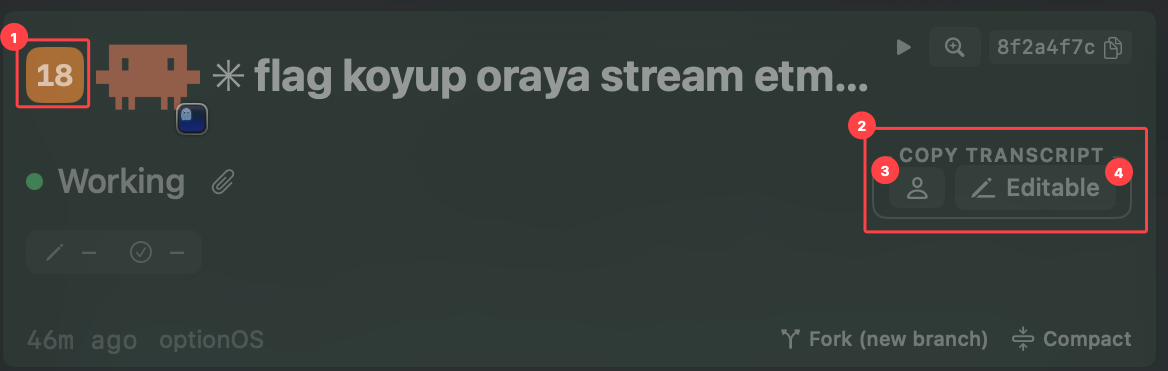
Cockpit kartlarının artık sabit numarası, renk etiketi ve iki transkript kopyası var
Cockpit kartları artık bir ajan oturumunu yeniden bulmayı ve transkriptte hangi kapsamı taşıyacağını doğrudan seçmeyi kolaylaştırır.
Numara ve renk kartı hatırlatır; iki buton kopyalama kapsamını ayırır
Her ajan oturumu ilk göründüğünde değişmeyen bir numara alır. Karta sağ tıklayıp bir renk seçebilir, değiştirebilir veya kaldırabilirsin; ilişkili gördüğün kartlara aynı rengi vererek kendi görsel anlamını taşıyabilirsin.
Copy Transcript altında soldaki kişi butonu yalnız senin promptlarını kopyalar. Sağdaki Editable butonu senin ve ajanın mesajlarıyla ajanın düzenlediği dosyaların yol özetlerini kopyalar; ham patch gövdelerini taşımaz.
Kart kimliği ve renk görsel hafızayı, iki transkript butonu ise kopyalanacak kapsamı ayırır.
1Sabit kart kimliği — sistemin atadığı sayı ve kullanıcının seçtiği renk
2Copy Transcript — iki kopyalama kapsamının ortak grubu
3Yalnız kullanıcı — yalnız human promptlarını kopyalar
4Editable — human ve agent mesajlarıyla düzenlenen dosya yollarını kopyalar
Cockpit cards now have a stable number, a color tag, and two transcript-copy scopes
Cockpit cards now make it easier to find an agent session again and choose exactly which transcript scope should travel with you.
Number and color identify the card; two controls separate the copy scope
Each agent session receives a stable number the first time it appears. Right-click a card to choose, replace, or clear a color; give cards you consider related the same color to carry your own visual meaning.
Under Copy Transcript, the left person button copies only your prompts. The right Editable button copies the human and agent messages plus edit headlines for paths changed by the agent; raw patch bodies are left out.
Card identity and color support visual memory, while two transcript controls separate the copy scope.
1Stable card identity — the system-assigned number and user-selected color
2Copy Transcript — the shared group for both copy scopes
3User only — copies only human prompts
4Editable — copies human and agent messages plus edited-file paths
Mac
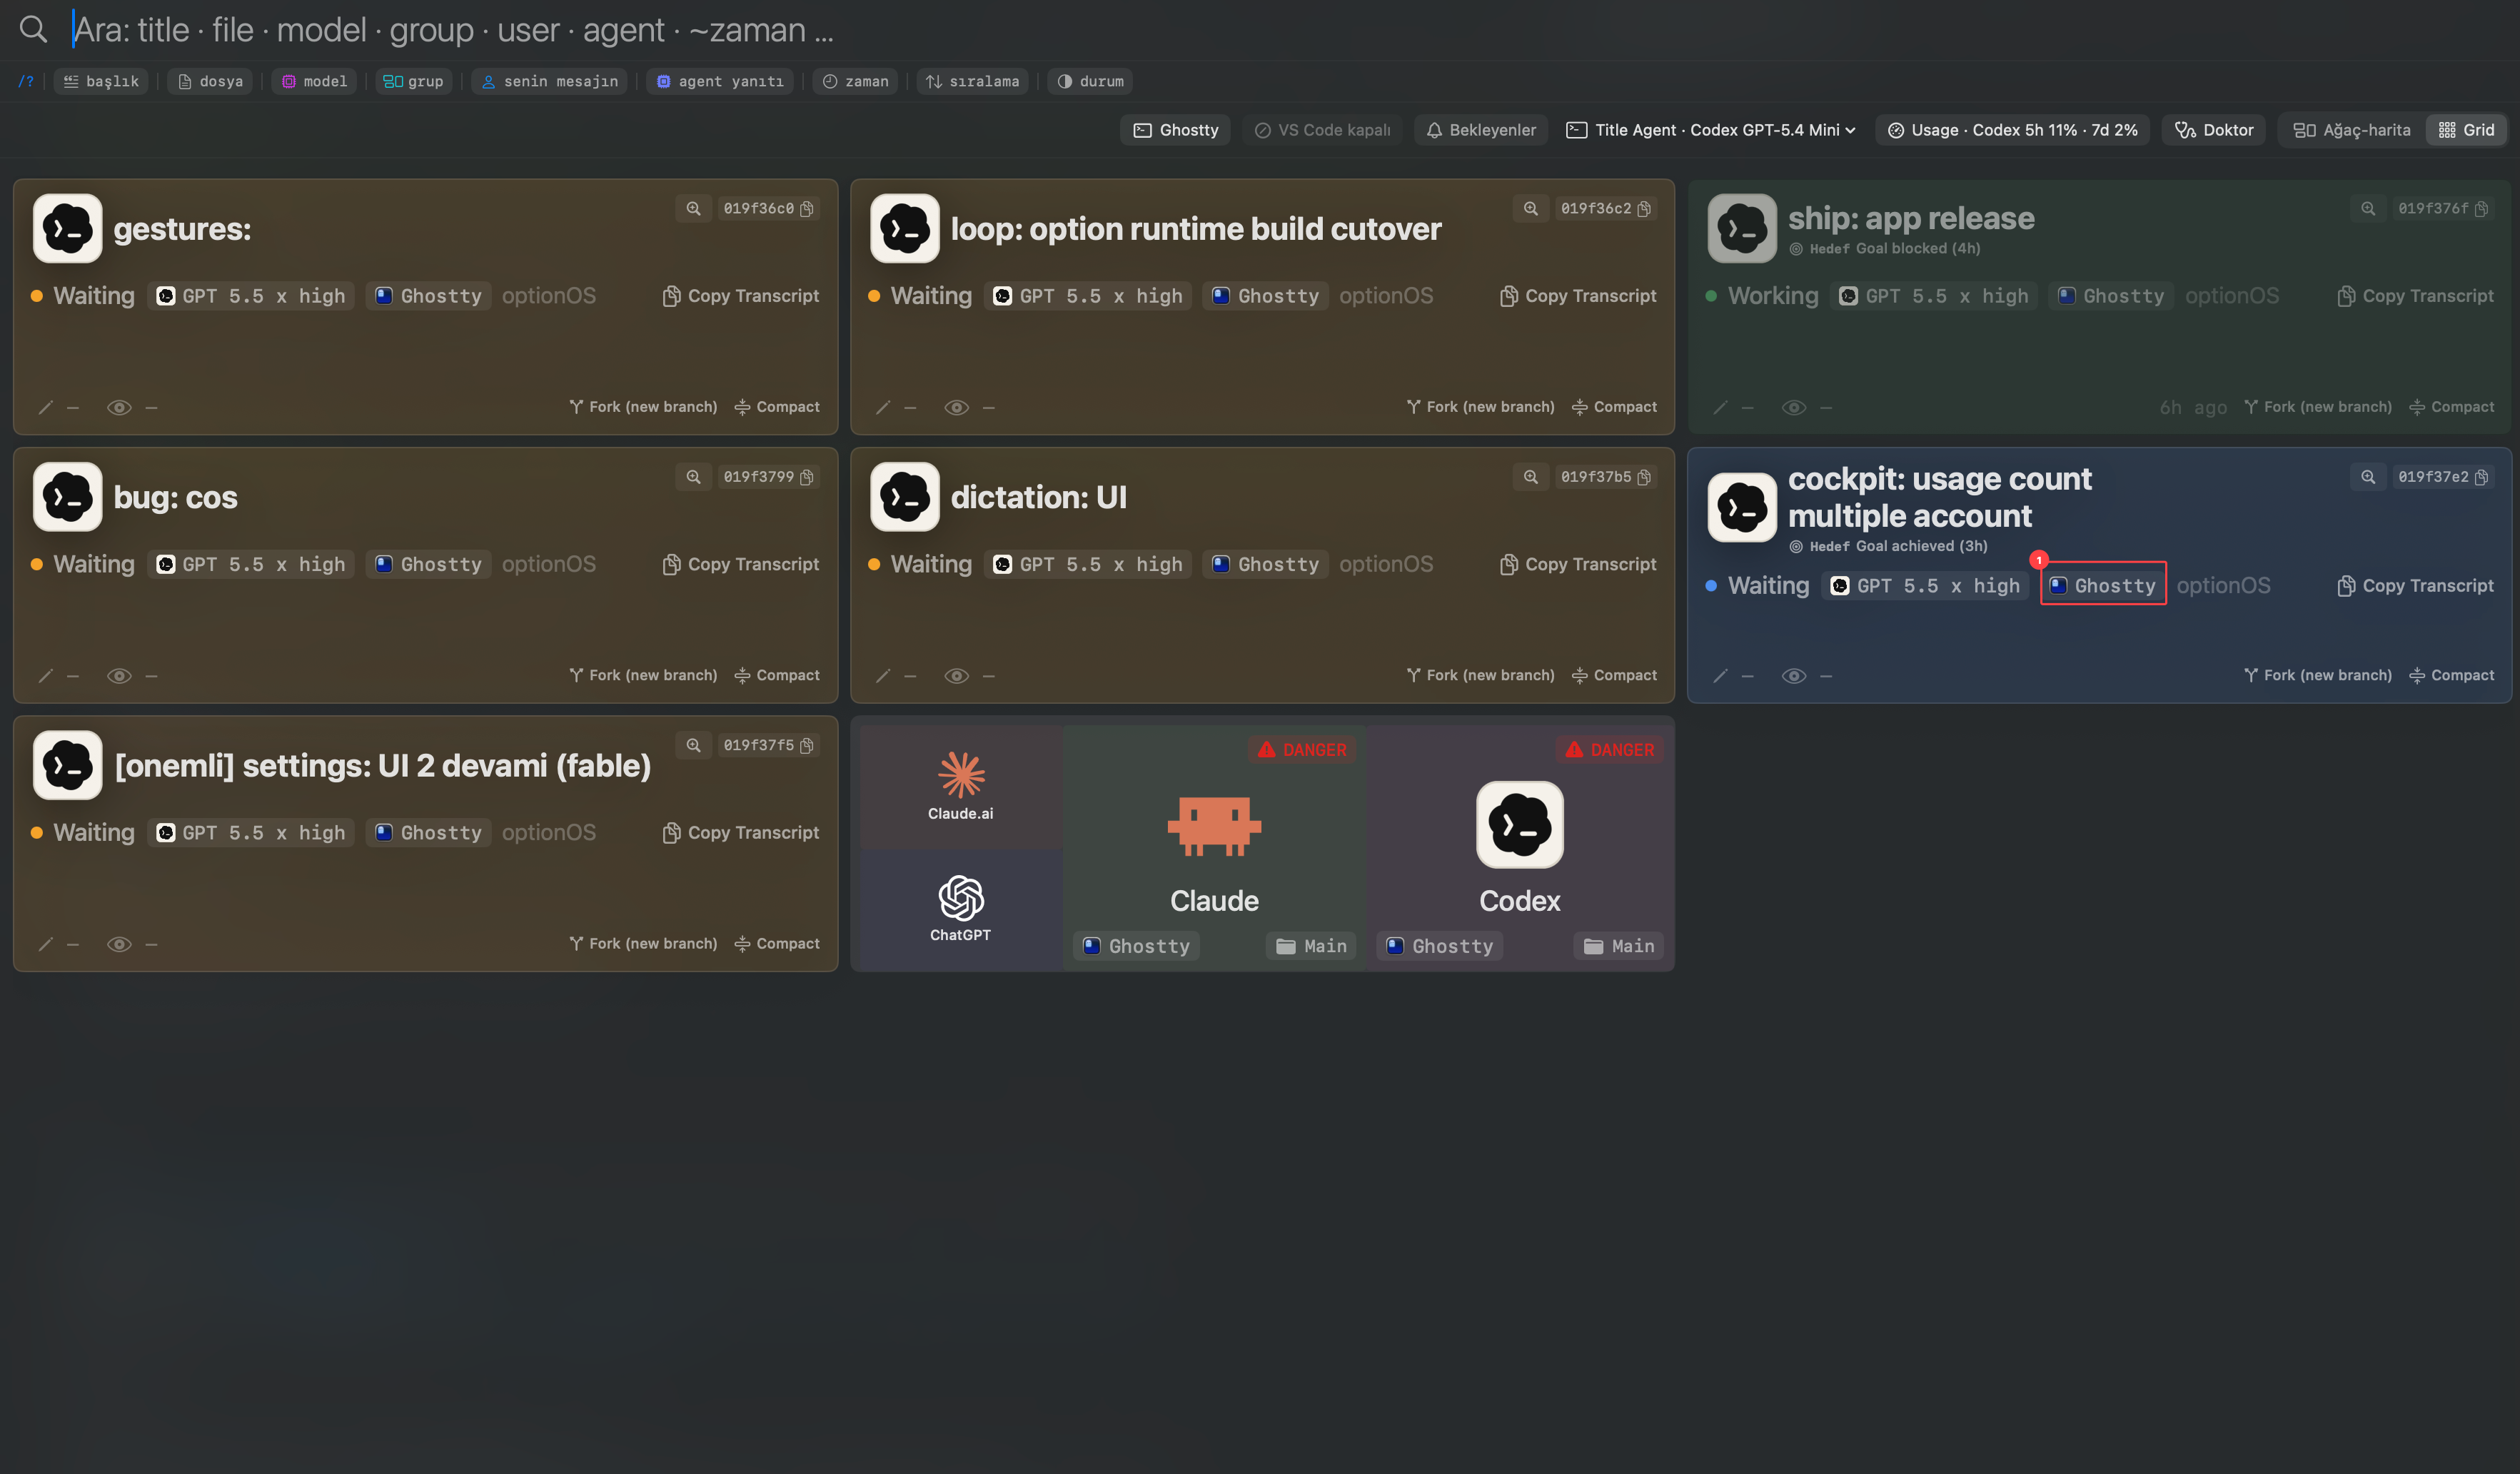
Cockpit kullanım limitlerini ve Ghostty kartlarını gösteriyor
Cockpit'in Mac grid'inde Usage rozeti artık Codex 5h/7d kullanım yüzdelerini gösterir. Açılan panel Claude ve Codex için o anda kullanılabilen subscription account bilgilerini aynı yüzeyde toplar. Kart geçişlerinde animasyon feedback'i görünür; Ghostty chip'i ve Ghostty kart akışı da artık sorunsuz çalışır.
Usage limiti ve aktif hesaplar
Toolbar'daki Usage rozeti limit durumunu özetler. Rozete bastığında aktif Claude ve Codex hesaplarını ve güvenli CLI'dan alınabilen kota bilgilerini aynı panelde görürsün.
Usage paneli, aktif Claude ve Codex subscription hesaplarını limit bilgisiyle aynı yüzeyde toplar.
Ghostty kart akışı
Ghostty'den gelen Cockpit kartları grid'de doğru runtime chip'iyle görünür. Böylece terminal tarafındaki agent oturumunu diğer Cockpit kartlarıyla aynı yüzeyde takip edebilirsin.
Ghostty chip'i, terminal tarafındaki agent kartının hangi runtime yüzeyinden geldiğini açıkça gösterir.
1Ghostty runtime chip'i
Cockpit shows usage limits and stable Ghostty cards
The Mac Cockpit grid now shows Codex 5h/7d usage percentages in the Usage chip. Opening it keeps the currently available Claude and Codex subscription account details on one surface. Card state changes now have animated feedback, and the Ghostty chip/card flow works reliably.
Usage limits and active accounts
The Usage chip summarizes the limit state in the toolbar. Open it to see active Claude and Codex accounts and any quota details that can be read safely from the CLI on the same panel.
The Usage panel keeps active Claude and Codex subscription accounts together with limit details.
Ghostty card flow
Cockpit cards coming from Ghostty now appear in the grid with the correct runtime chip. You can track the terminal-side agent session on the same surface as the rest of your Cockpit cards.
The Ghostty chip shows which runtime surface the terminal-side agent card came from.
1Ghostty runtime chip
Mac
Cockpit kartları ajan oturumunu tek tek veri akışı olarak gösteriyor
Cockpit kartı artık bir ajan oturumunu tek satırlık özet yerine ayrı ayrı okunabilen veri noktalarıyla gösterir. Başlık, hedef, session kimliği, model, host uygulama, durum, transcript aksiyonu, dosya sayaçları, commit akışı ve fork/compact aksiyonları aynı kart üzerinde izlenir.
Ajan kartındaki 15 veri noktası
Karttaki her işaretli alan ayrı bir karar sinyali taşır: oturumun neye çalıştığını, hangi ortamda koştuğunu, ne gördüğünü, ne değiştirdiğini ve agent'a nasıl devam ettirileceğini aynı yüzeyden okuyabilirsin. Compact aksiyonu terminali doğrudan çalıştırmak yerine prompt hazır şekilde açar; kullanıcı Enter ile devam ettirir.
Tek Cockpit kartı, ajan oturumunun takip ve devam ettirme noktalarını aynı yüzeyde toplar.
Cockpit cards show an agent session as individual data-flow points
A Cockpit card now shows an agent session as separate readable data points instead of only a one-line summary. The title, target, session identity, model, host app, state, transcript action, file counters, commit flow, and fork/compact actions are visible on the same card.
The 15 data points in an agent card
Each marked area on the card carries its own decision signal: what the session is working on, where it is running, what it saw, what it changed, and how you can continue the agent from the same surface. The Compact action does not immediately run the prompt; it opens the terminal with the prompt ready, then the user starts it with Enter.
One Cockpit card keeps the tracking and continuation points for an agent session on the same surface.
v0.5.0
Mac
v0.5: Konuşmanın arkasındaki sistemi görünür hale getirdik
Eskiden kayıt, yazıya çevirme, yakalama, yapıştırma, depolama ve ajan akışlarının çoğu arka planda çalışıyordu; sistemin ne yaptığını yalnız geliştiren kişi görebiliyordu. v0.5 ile durumları, seçenekleri, hataları, kullanımı ve geçmişi herkesin okuyabileceği ve denetleyebileceği yüzeylere taşıdık.
Bu tek yayın, 7–11 Temmuz 2026 arasında tamamlanan bütün görünür değişiklikleri bir araya getiriyor.
Çentik yüzeyi bu sürümde beta: deneysel olduğu için bazı makinelerde lag ya da kasma yapabilir. Stabil ilerlemek isteyenler HUD'u kullanabilir; HUD zaten taşınabilir ve çalışma alanının istediğin tarafına alınabilir.
Yapacağımız şeyleri söylediğimiz bir Söz alanımız da var: Sözler sayfasında yapmak istediğimiz işleri görüp ileride oy verebileceksiniz. Bu sürümde oylama yapısını kurmadık; şimdilik bu bir söz.
Konuşma, ayar ve yakalama aynı çalışma yüzeyinde
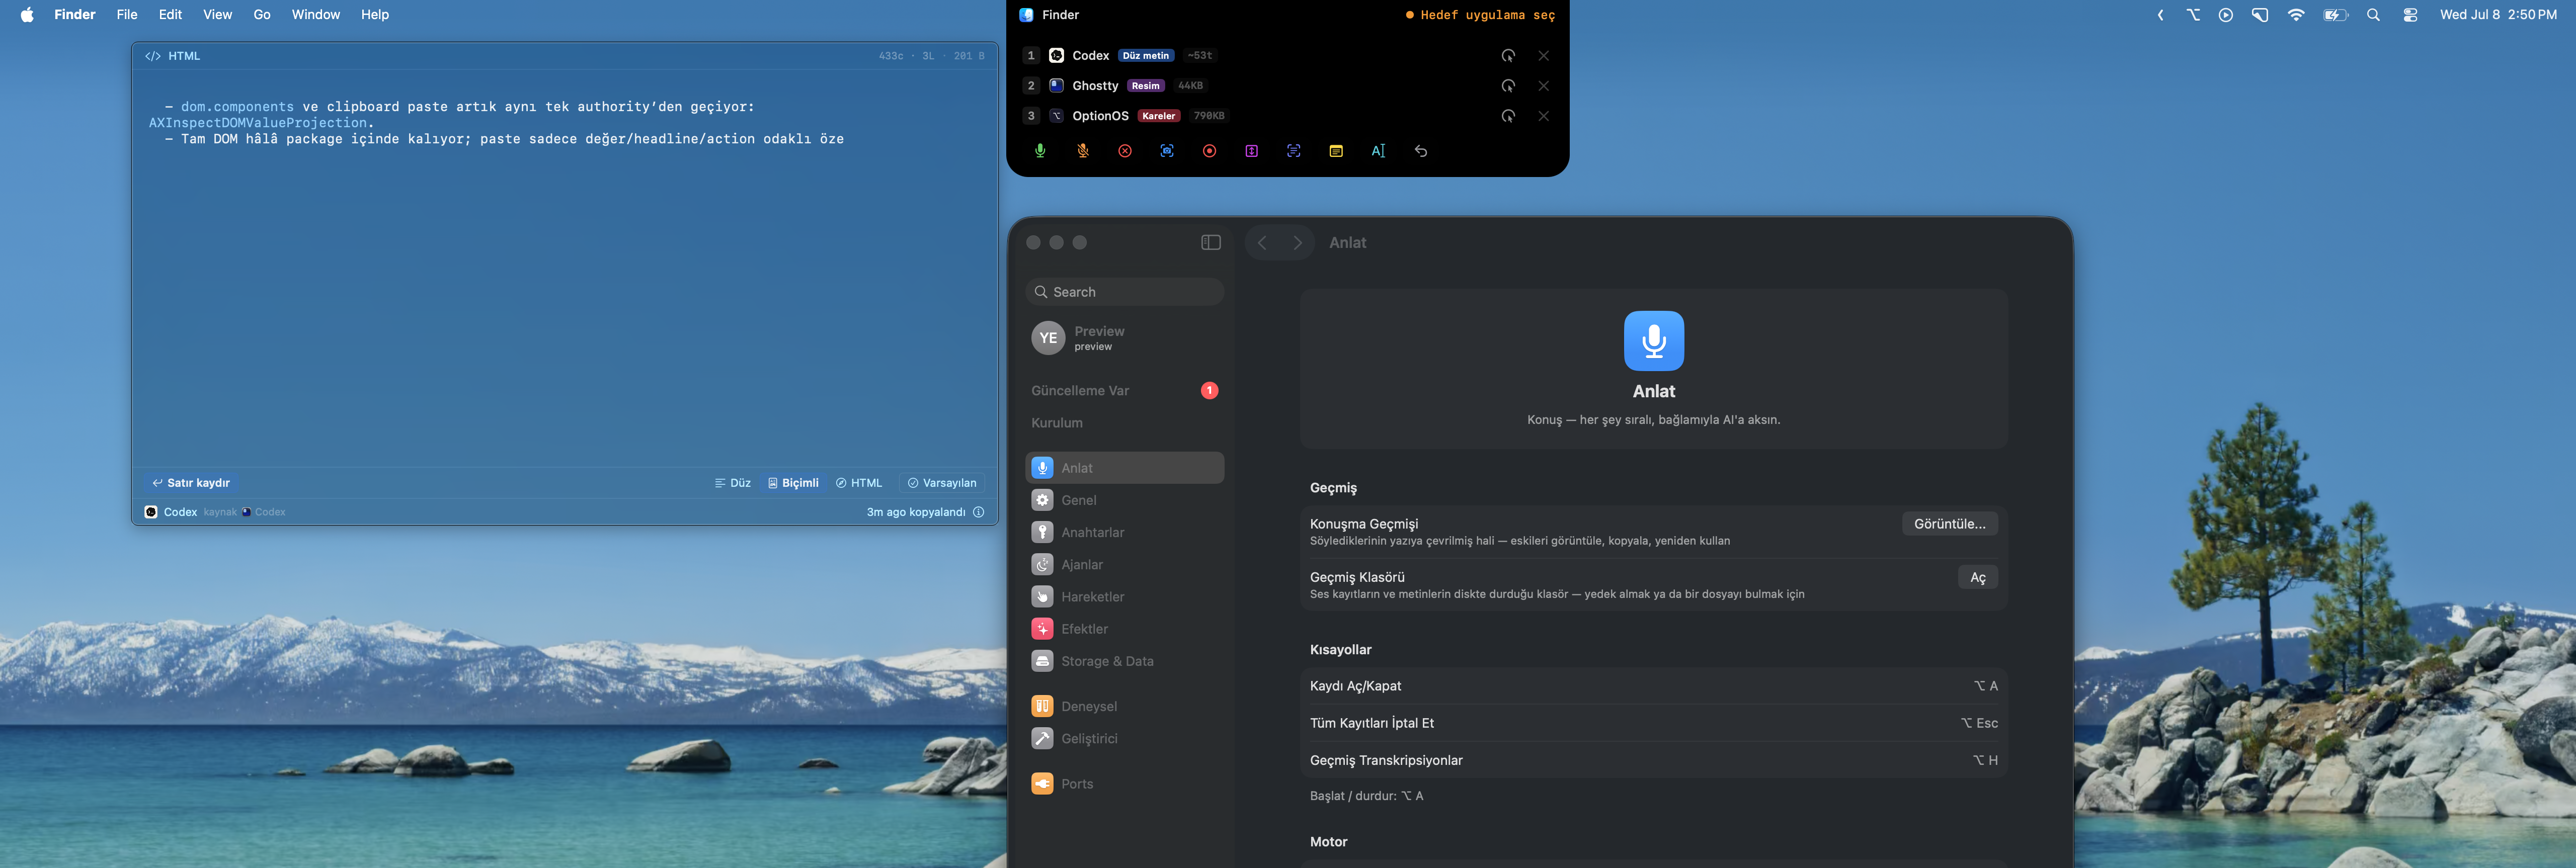
Settings paneli, hedef uygulama seçimi ve yakalama kuyruğu aynı anda görünür. Bir tarafta hangi uygulamaya konuştuğunu seçersin; diğer tarafta ayarlar, geçmiş ve yakalanan içerikler akışı bozmadan durur.
v0.5'in ana akışı: konuşma, hedef uygulama, ayarlar ve yakalama kuyruğu aynı çalışma yüzeyinde.
1Hedef uygulama seçici
2Yeni Settings paneli
3Yakalanan içerik kuyruğu
Bu Neler Yeni sayfası da optionOS'la konuşarak hazırlandı
Bu sayfadaki metin ve görsel kararları optionOS'la konuşurken toplandı. Konuşma, ekrandaki işaretler, kopyalanan içerikler ve önizleme aynı akışta kaldı; burada okuduğun sürüm anlatısı doğrudan bu konuşmadan çıktı.
Konuşma, yakalama aksiyonları ve bu sayfayı besleyen içerik listesi aynı çalışma yüzeyinde.
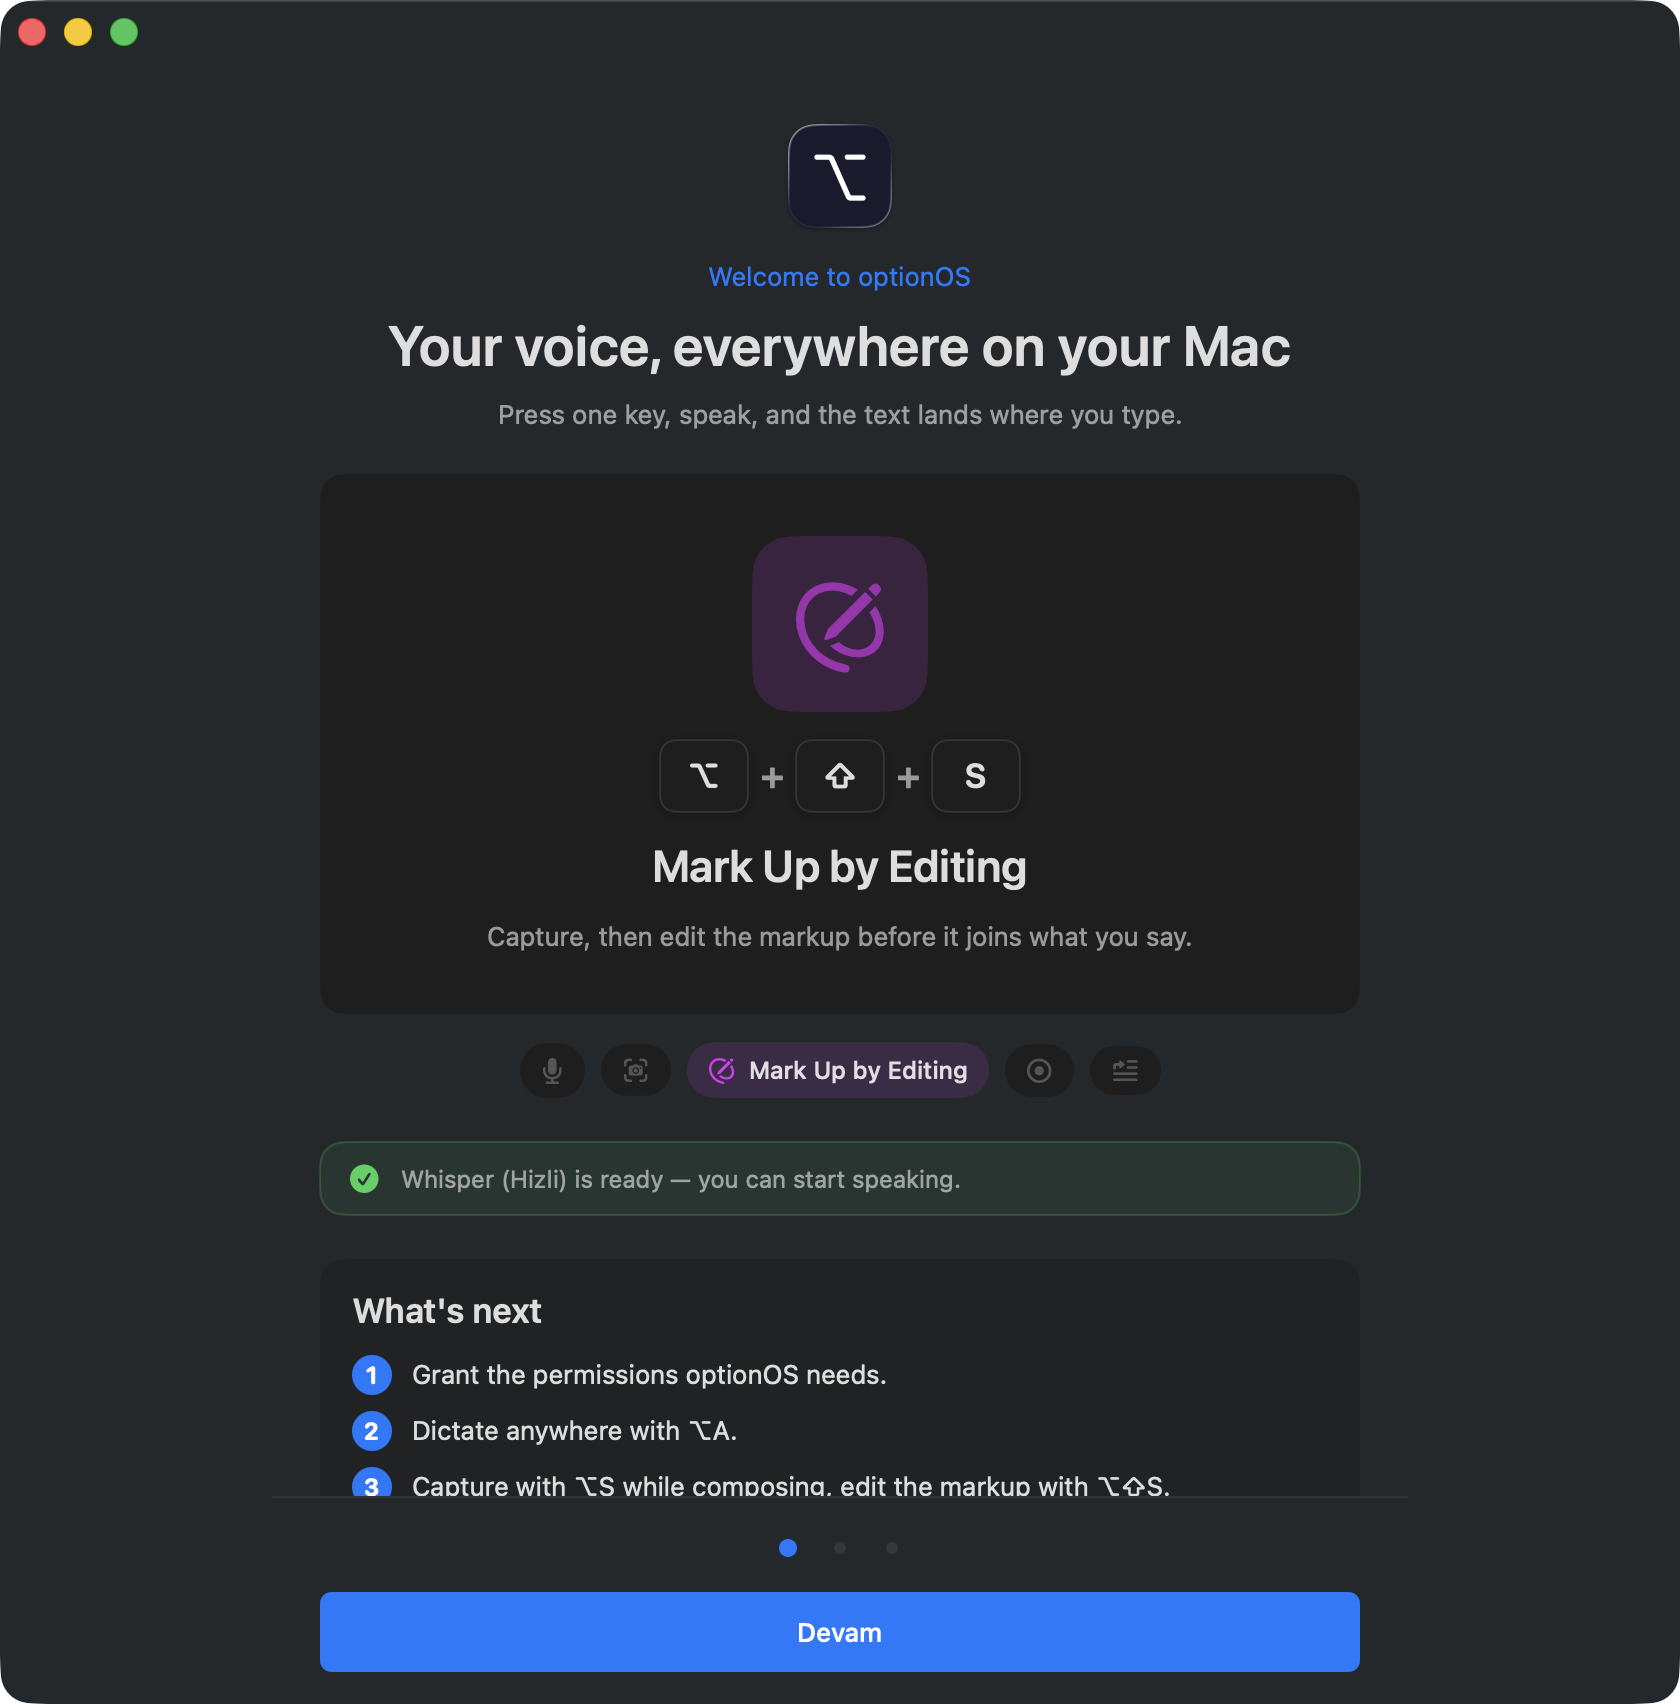
İlk açılış artık ne yapacağını gösterir
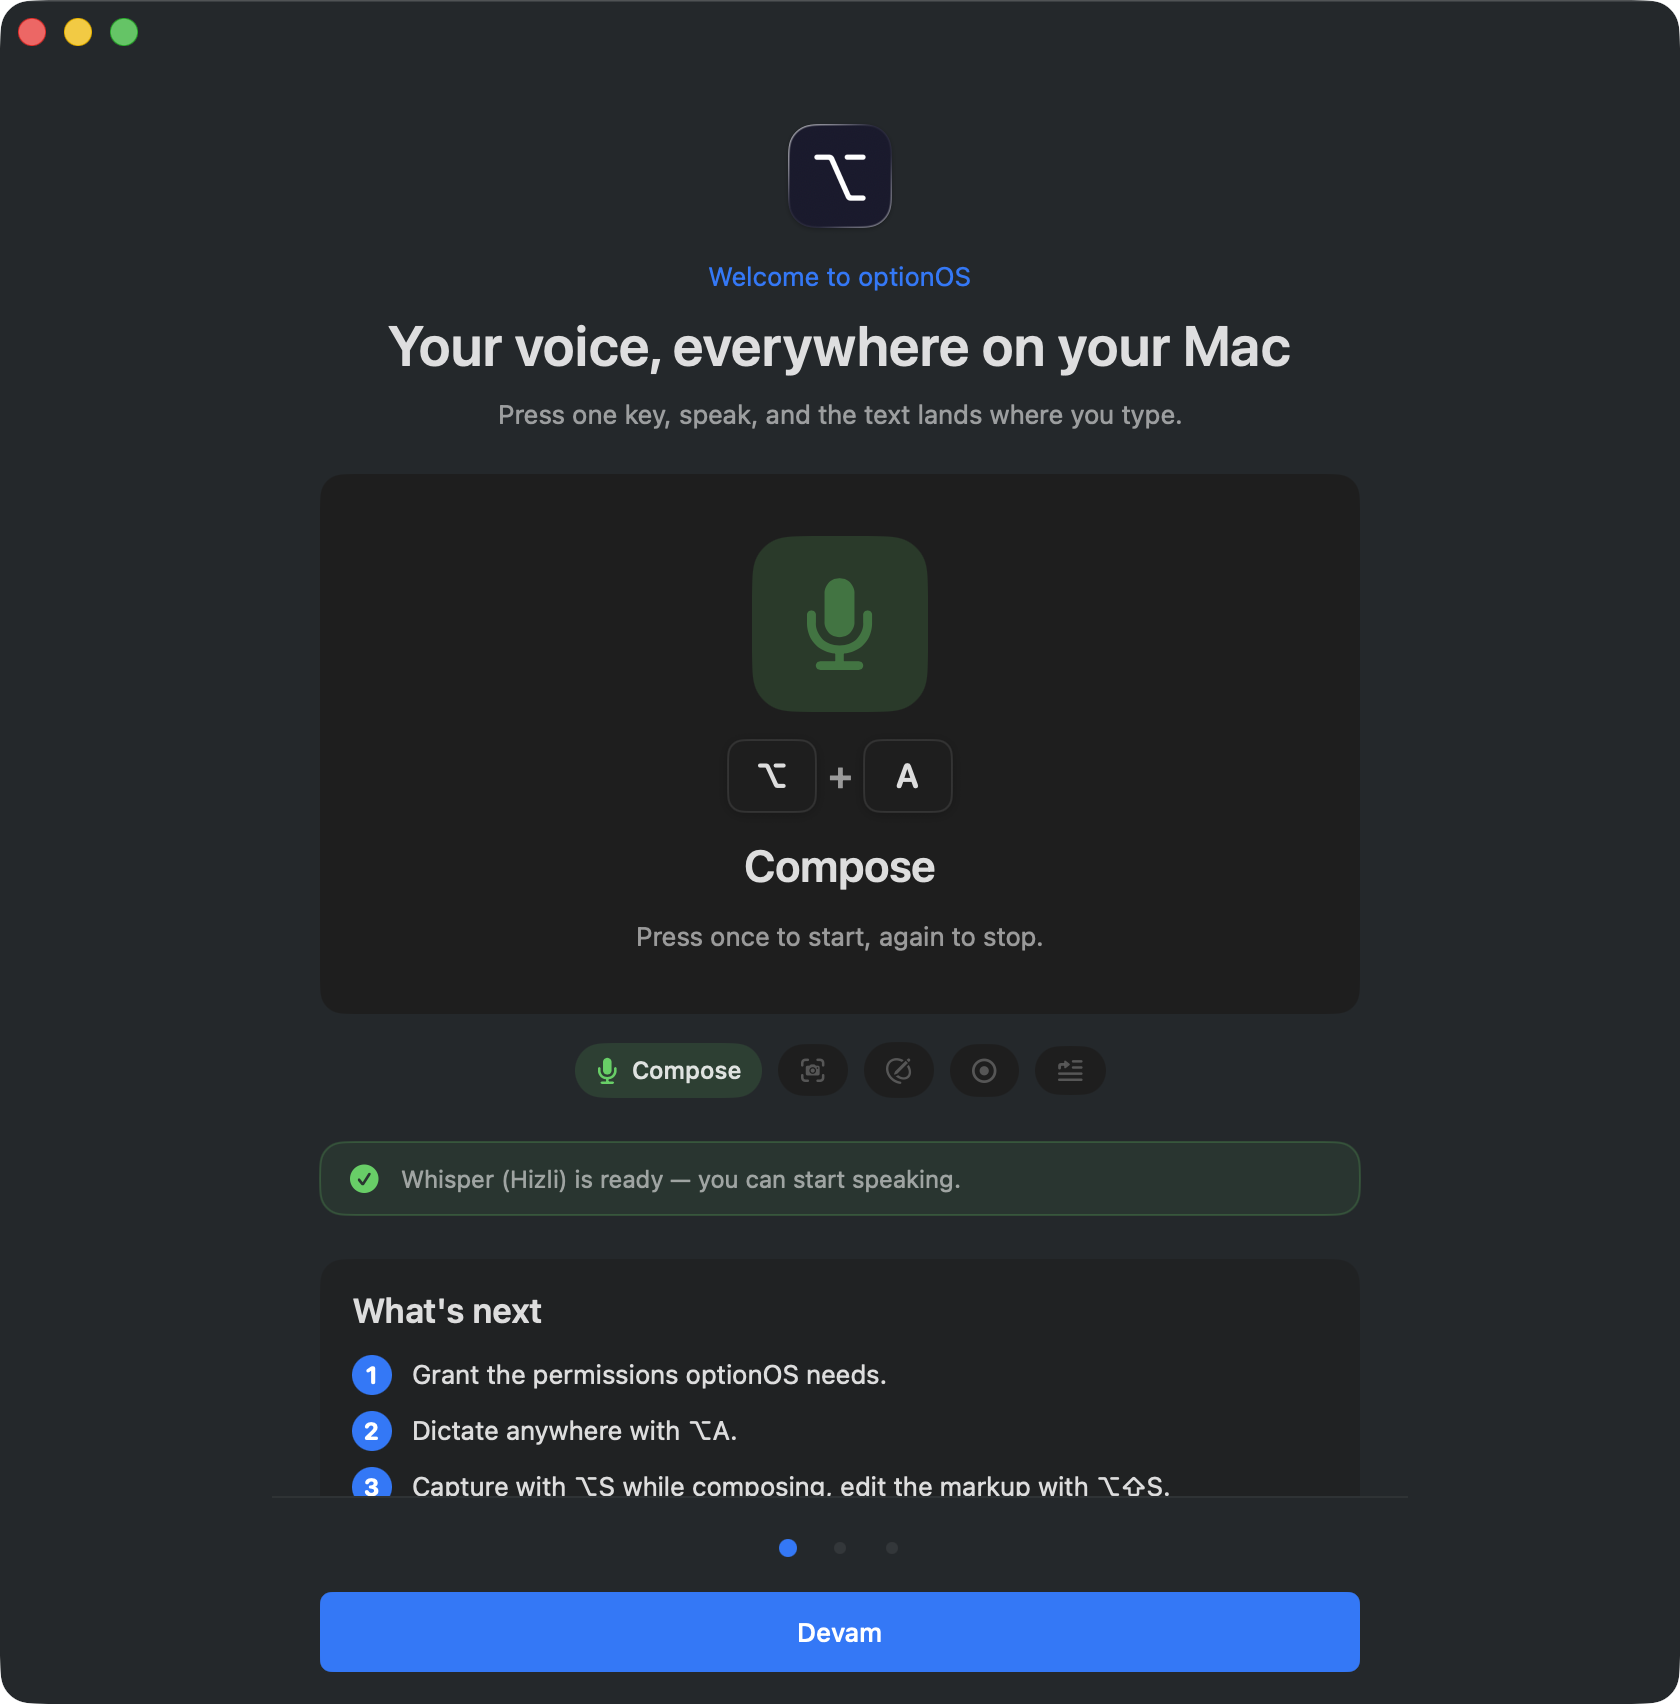
Onboarding ekranı tek tuşla konuşmayı anlatır: hangi kısayolla başlayacağını, motorun hazır olup olmadığını ve sıradaki izin adımlarını görürsün. İlk kurulumda yolunu kaybetmeden devam edersin.
İlk onboarding kartı, konuşmayı başlatma kısayolunu ve gerekli izinleri görünür yapar.
1Compose kısayolu
2Motor hazır durumu
3Sıradaki kurulum adımları
Uzun konuşma kaybolmasın diye anlık kaydedilir
20 dakikalık bir anlatımın bir anda yok olması korkunç bir şey. Bu yüzden konuşma mümkün olduğunca anlık kaydedilir. Uygulama çökerse, bilgisayar kapanırsa ya da takıldığı için kapatmak zorunda kalırsan ses kaydı korunur.
Kayıt sürerken kaydediliyor durumu görünür; uzun konuşma akışı korunur.
Geçmiş konuşmadan tekrar deneyebilirsin
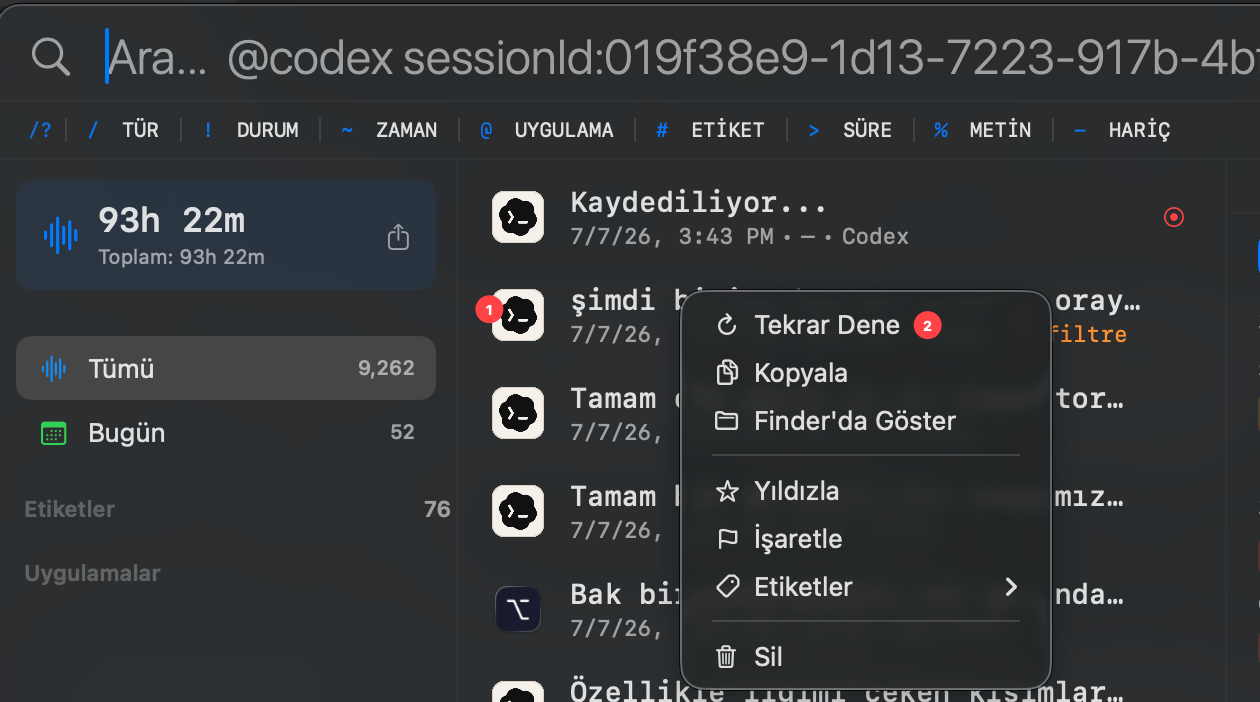
Dikte ekranında herhangi bir konuşmaya tıklayıp sağ klikten tekrar deneyebilirsin. Uzun konuşmanın içinde beklenmedik bir durum olduysa aynı kaydı geçmişten bulup tekrar akışa sokarsın.
Geçmiş konuşma menüsü, tekrar dene ve kopyala aksiyonlarını doğrudan verir.
1Geçmiş konuşma satırı
2Tekrar Dene aksiyonu
Yakalama aksiyonları konuşurken görünür
Kayıt, ekran yakalama, GIF, kaydırmalı yakalama, not ekleme, otomatik kopyalama ve pano geri al/ileri al aynı yüzeyde. Hotkey ile de tuşa basarak da ne yapabileceğini görürsün. Hangi uygulamada konuşmayı başlattığını ve hangi içeriğin yakalama listesine düştüğünü de aynı panelden okursun.
Tarayıcıdayken browser'a uygun, local uygulamadayken local app'e uygun davranır. Option+Shift+Z ve Option+Shift+Y ile son pano almayı geri/ileri taşıyabilirsin; bu akışlarda animasyon feedback'i de görünür.
Alt paneli basılı tutup sağa sola taşıyabilirsin; ekranın herhangi bir tarafına götürebilirsin. Kopyalama falan yaptıysan kapatmak yerine bir yere taşımak için faydalı.
Yakalama menüsü, hotkey'ler, hedef uygulama ve yakalanan içerikleri aynı çalışma yüzeyinde gösterir.
Yakala, işaretle, konuşmana ekle
Onboarding artık yakalama sonrası işaretleme akışını da gösterir. Ekranı yakalayıp üzerine işaret koyarsın; optionOS bu görseli konuşmanın bağlamına ekler.
Mark Up by Editing kartı, yakalama sonrası işaretleme akışını kısayoluyla anlatır.
1Yakalama ve işaretleme kısayolu
2Aktif onboarding kartı
3Kurulum sırasında görünen motor hazır durumu
Konuşman ve çizdiğin kareler senkron gider
Hareketli olaylar için GIF, uzun web siteleri için kaydırmalı yakalama öneriyoruz. GIF'in üzerine etiket koyabilirsin; ama çoğu zaman agent'a nereye bakacağını göstermek için ilk kareye işaret koymak yeterli.
Konuşurken kare çizdiğinde etiket zamanı transkriptle bağlanır. Bir numara, iki numara diye söylemek zorunda değilsin; söylesen daha stabil olur ama söylemesen de optionOS çizimi ne zaman yaptığını yakalar. Böylece akışta kalırsın, agent da değişikliği anında görür.
Konuşma metni, ekran görüntüleri ve çizilen etiketler aynı zaman çizgisinde okunur.
1Konuşmadaki ilgili an
2Görsel referans
3Çizilen rect etiketi
Konuşma geçmişi ve geri bildirim aynı arşivde
Uygulama içinde yaptığın geçmiş konuşmaları transkript gibi yakalayıp etiketleri ve badge'leriyle gösterebiliyoruz. Bir konuşmada aklına sonra bir şey gelirse, eski resmin üzerine tekrar tıklayıp etiket ekleyebilirsin; konuşma akışı kırılmaz ve agent bunu anlayabilir.
Sorun Bildir akışı da aynı mantıkta: karşılaştığın problemi ses kaydı, ekran görüntüsü ve anotasyonla gönderebilirsin. Böylece bize geri bildirim gönderirken uygulamayı birlikte geliştirmek için gereken bağlam da gider.
Geçmiş konuşmalar, referanslar ve yakalanan içerikler aynı arşivde tekrar bulunabilir.
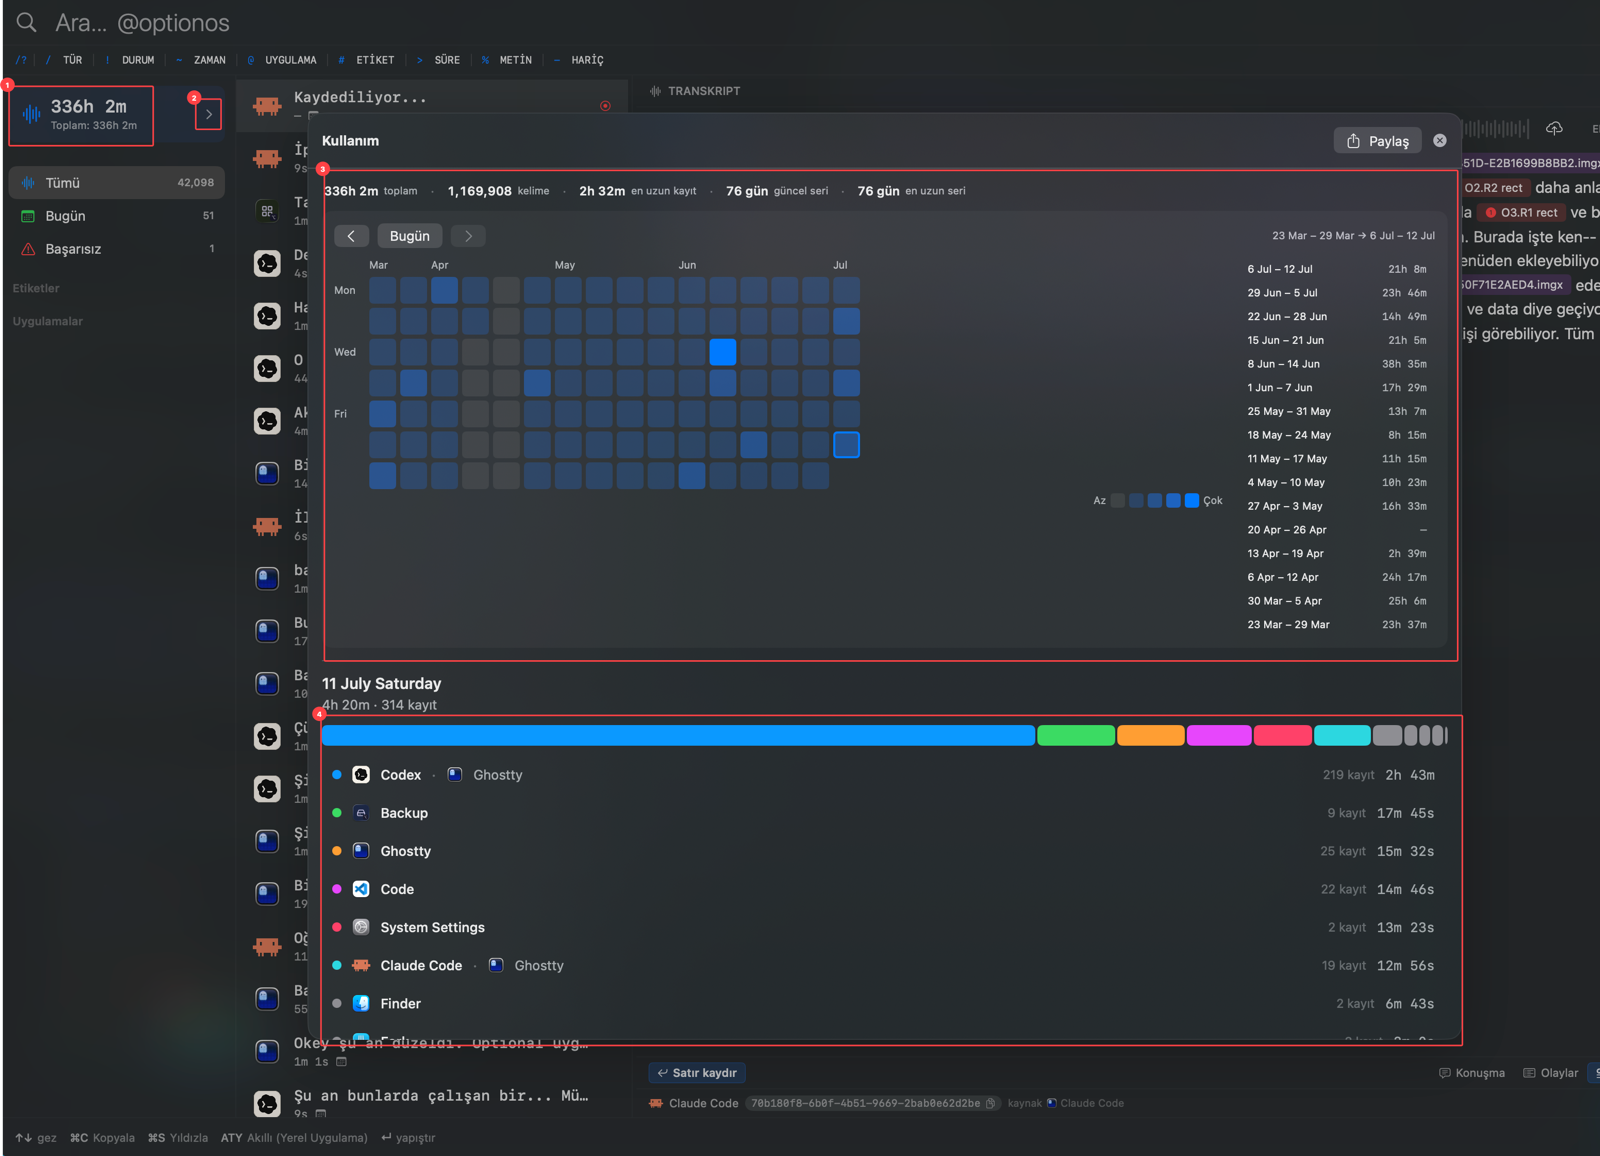
Kullanım kartı konuşma geçmişini açar
Dikte toplam kartına basınca deneysel Kullanım görünümü açılır. Isı haritası, haftalık toplamlar ve seçili günün uygulama kırılımı aynı pencerede görünür; böylece konuşma geçmişini zamana ve uygulamaya göre inceleyebilirsin.
Kullanım kartı, konuşma geçmişini takvim ve uygulama kırılımıyla birlikte açar.
1Toplam kullanım kartı
2Kullanım ve konuşma geçmişi detayı
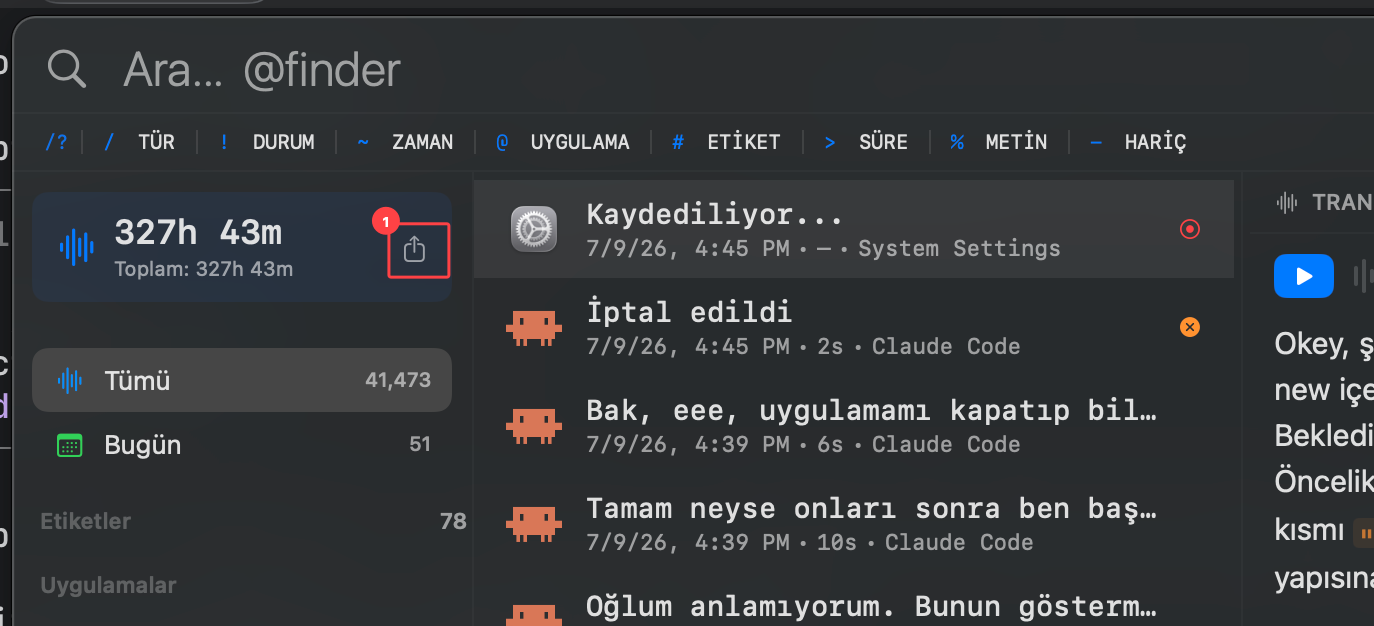
Dikte kullanım toplamını paylaşabilirsin
Dikte arşivindeki toplam kullanım kartına paylaşma aksiyonu eklendi. Toplam süreyi ve kullanım kırılımını bir paylaşım kartına dönüştürmek için aynı karttaki paylaş butonuna basarsın.
Paylaş butonu, kullanım toplamını görsel karta çeviren akışı başlatır.
1Kullanım toplamı paylaş aksiyonu
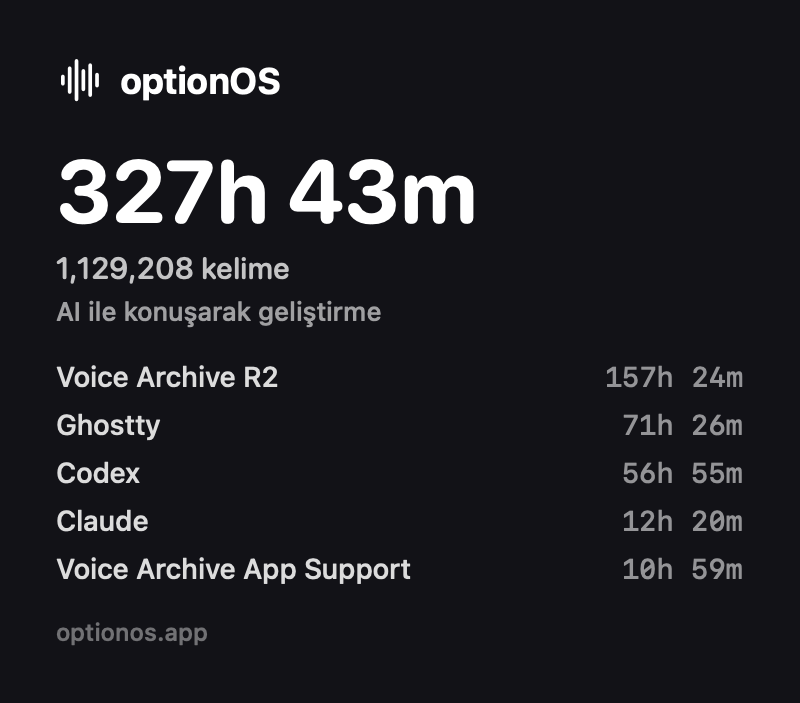
İstatistik kartı PNG olarak çıkar
Paylaşma aksiyonu optionOS markalı bir PNG üretir. Kartta toplam konuşma süresi, kelime sayısı ve en çok konuşulan uygulama kırılımı görünür; böylece kullanım istatistiğini tek görsel olarak paylaşabilirsin.
Paylaşılabilir kart, toplam konuşma süresini, kelime sayısını ve uygulama kırılımını tek görselde toplar.
HUD aksiyonları hotkey'leriyle görünür
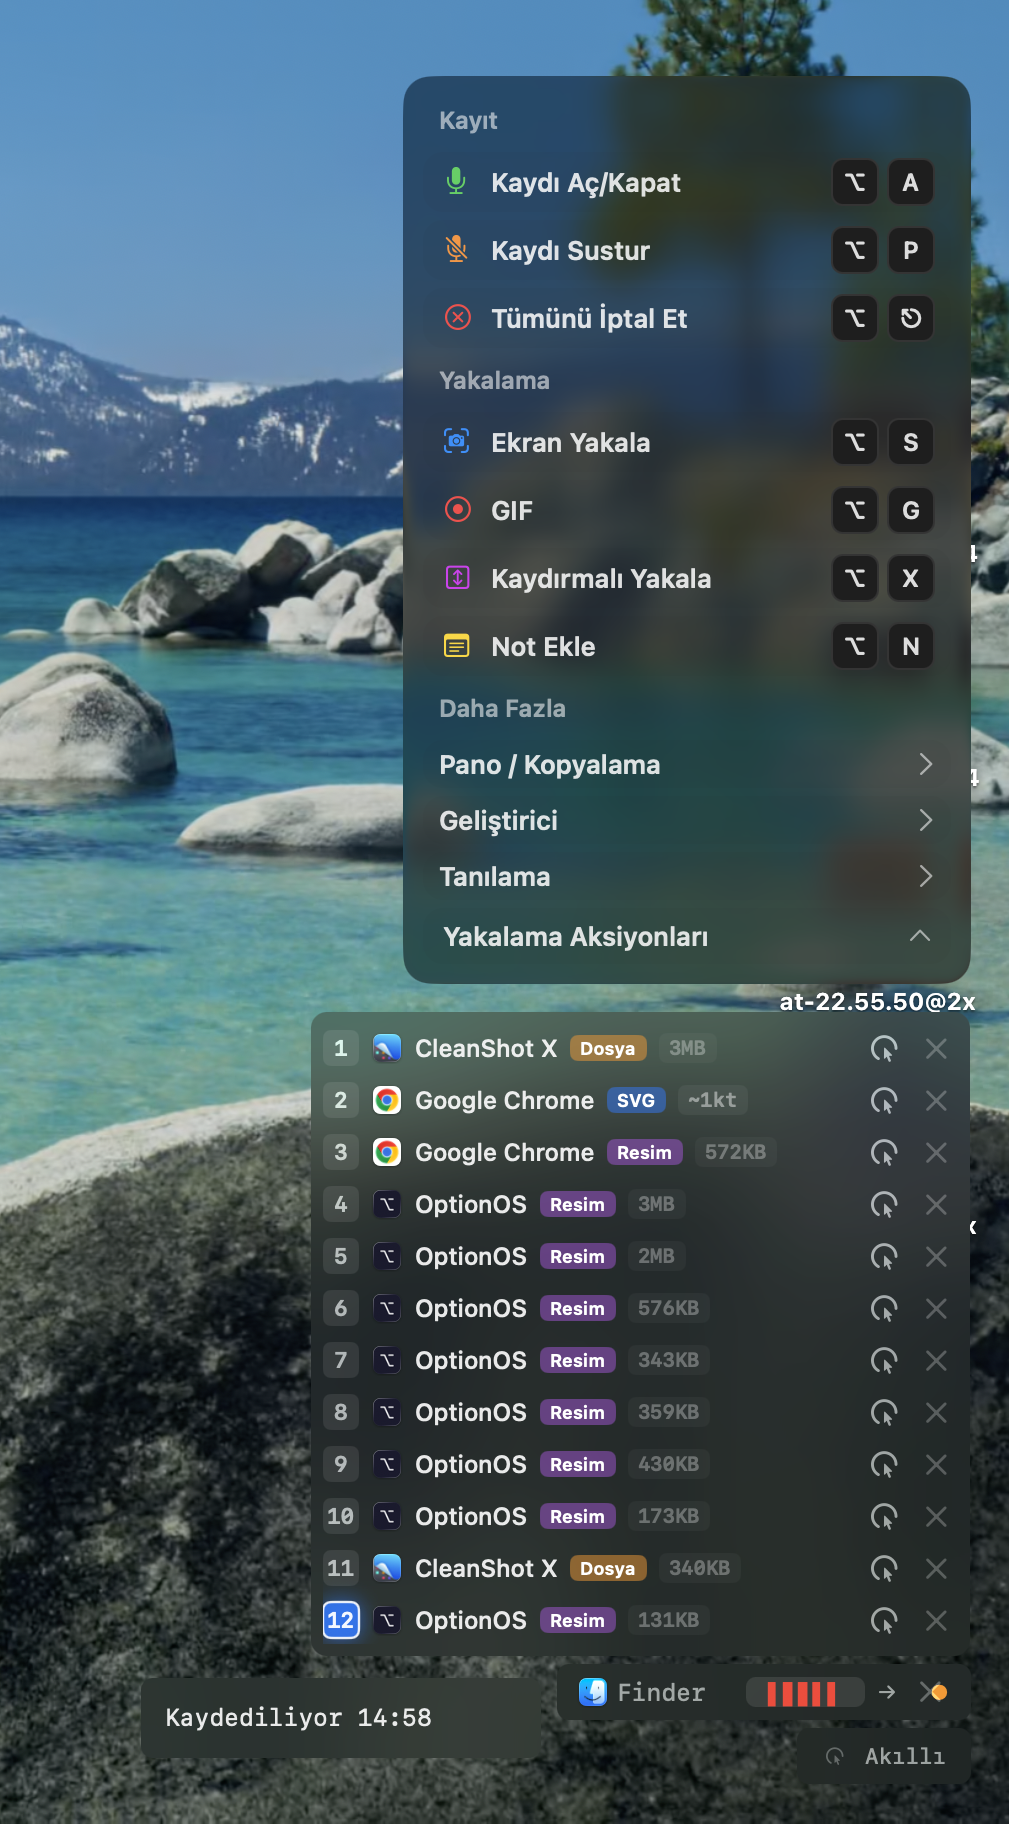
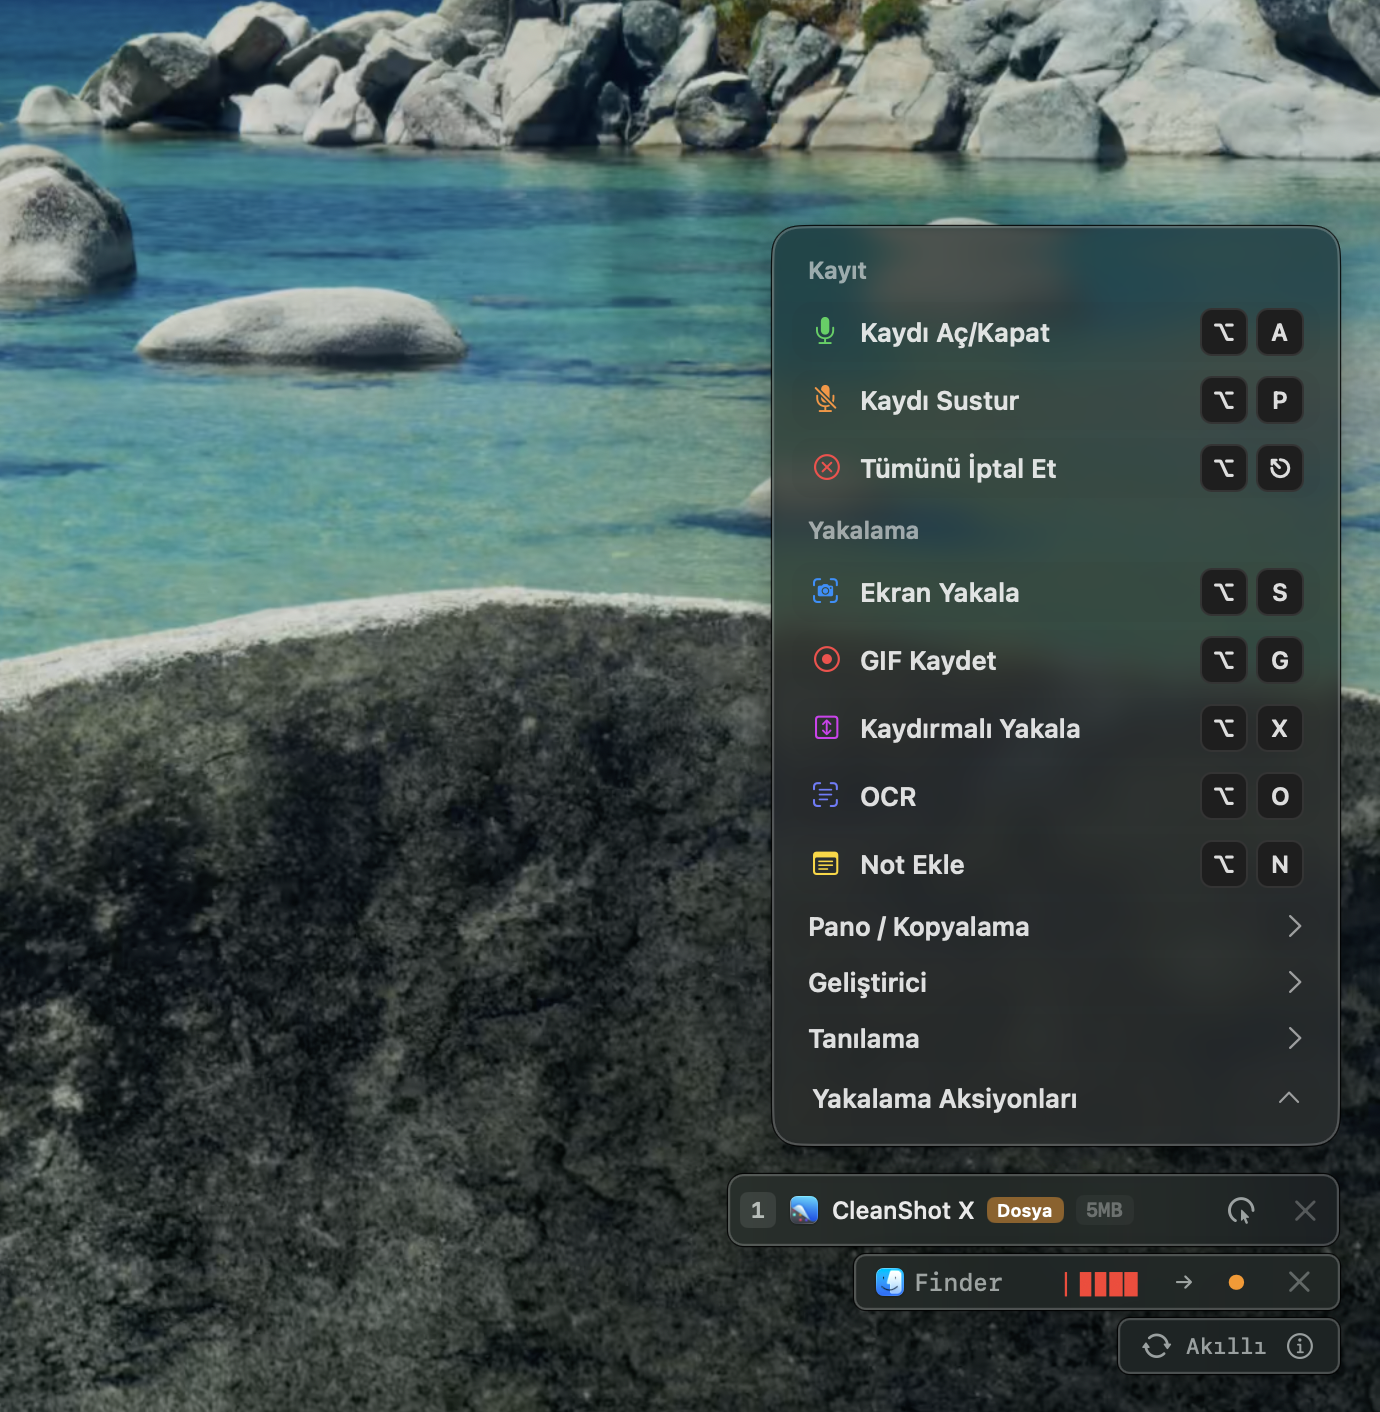
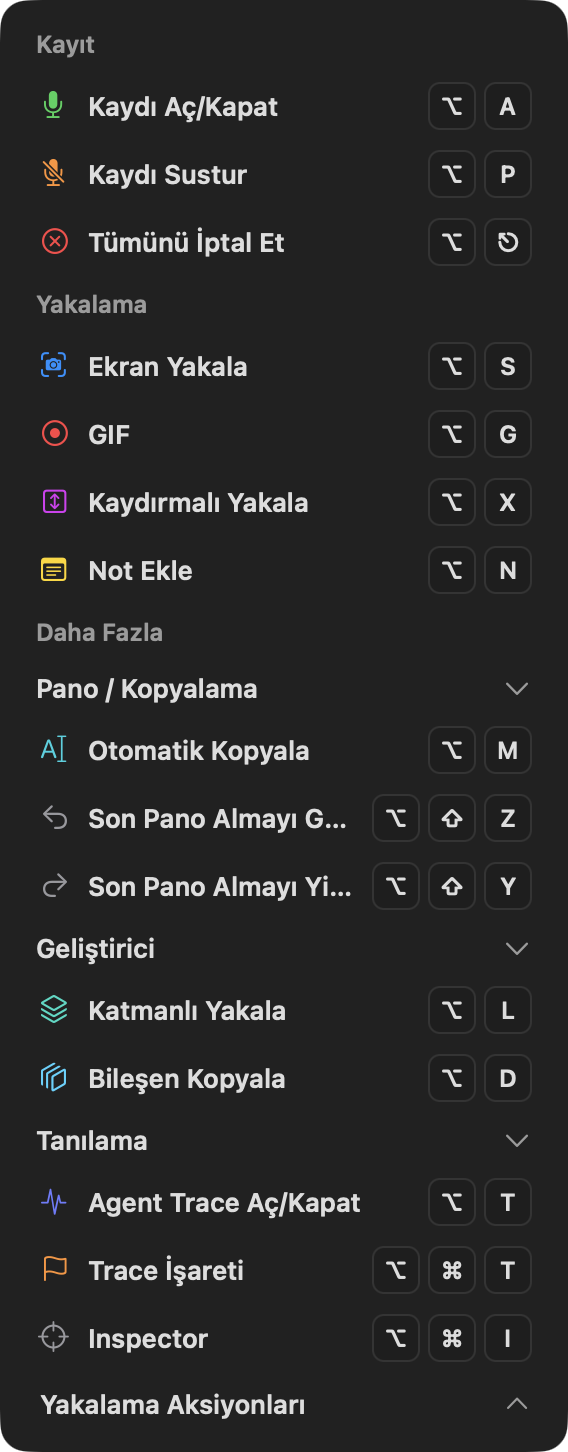
Kayıt, susturma, iptal, ekran yakalama, GIF, kaydırmalı yakalama, OCR ve not ekleme aynı HUD içinde durur. Hangi uygulamadan hangi içerik geldiği ve yakalama kuyruğunda ne biriktiği de aynı yüzeyden okunur.
HUD, konuşurken kullanabileceğin aksiyonları ve kısayolları tek yerde gösterir.
1Kayıt aksiyonları
2Yakalama aksiyonları
3Pano, geliştirici ve tanılama grupları
4Hedef uygulama ve yakalama kuyruğu
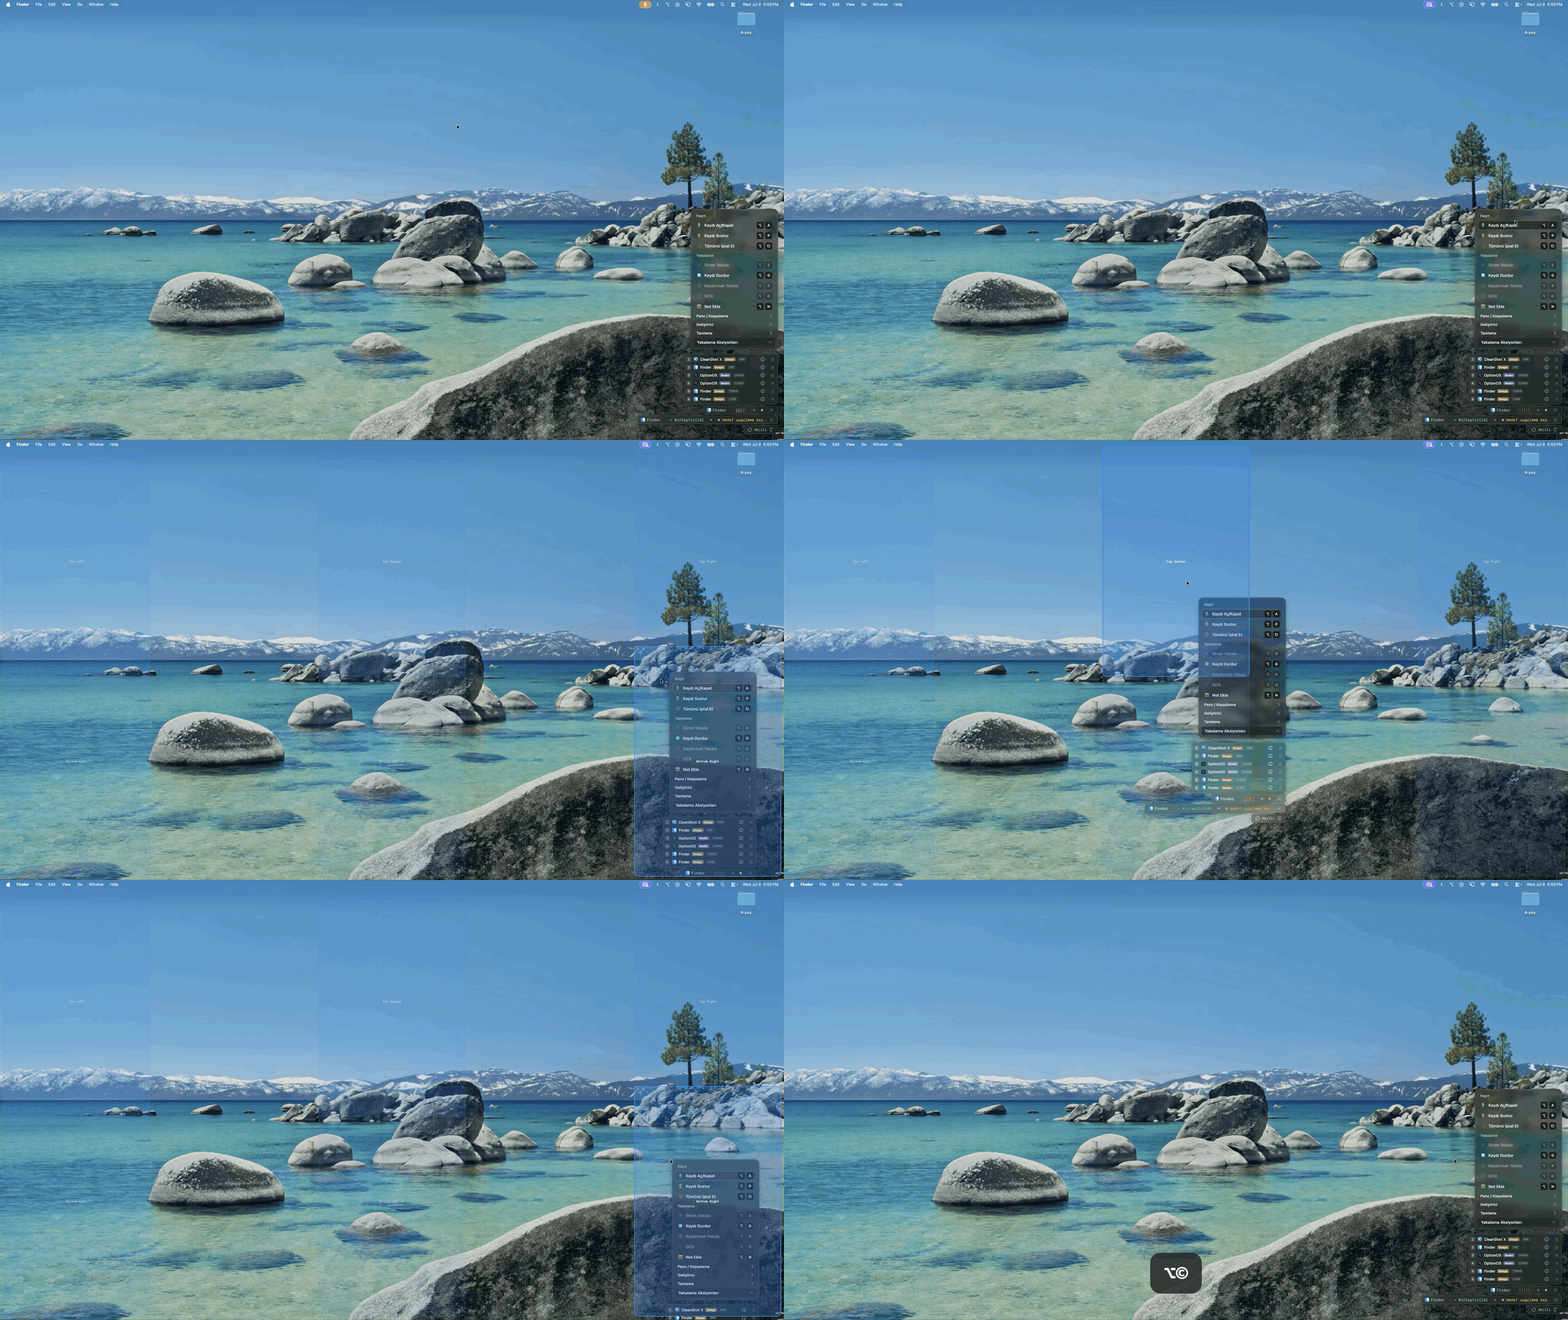
Göstergeyi istediğin yere taşı, görünümünü seç
Ayarlar → Gösterge içinden kayıt göstergesinin yüzeyini ve ekrandaki konumunu seçebilirsin. Küçük paneli doğrudan basılı tutup sürüklemek de mümkün; gösterge çalışma alanına uyum sağlar.
Gösterge ayarları, yüzeyi ve kayıt panelinin ekrandaki yerini aynı ekranda seçtirir.
Çentik görünümü daha sade bir gösterge sunar
Daha modern ve daha az yer kaplayan bir görünüm isteyenler Çentik yüzeyini seçebilir. Kayıt durumu ekranın üst kenarında, çalıştığın içeriğin önüne geçmeden görünür kalır.
Çentik görünümü, konuşma durumunu ekranın üst kenarında sade biçimde gösterir.
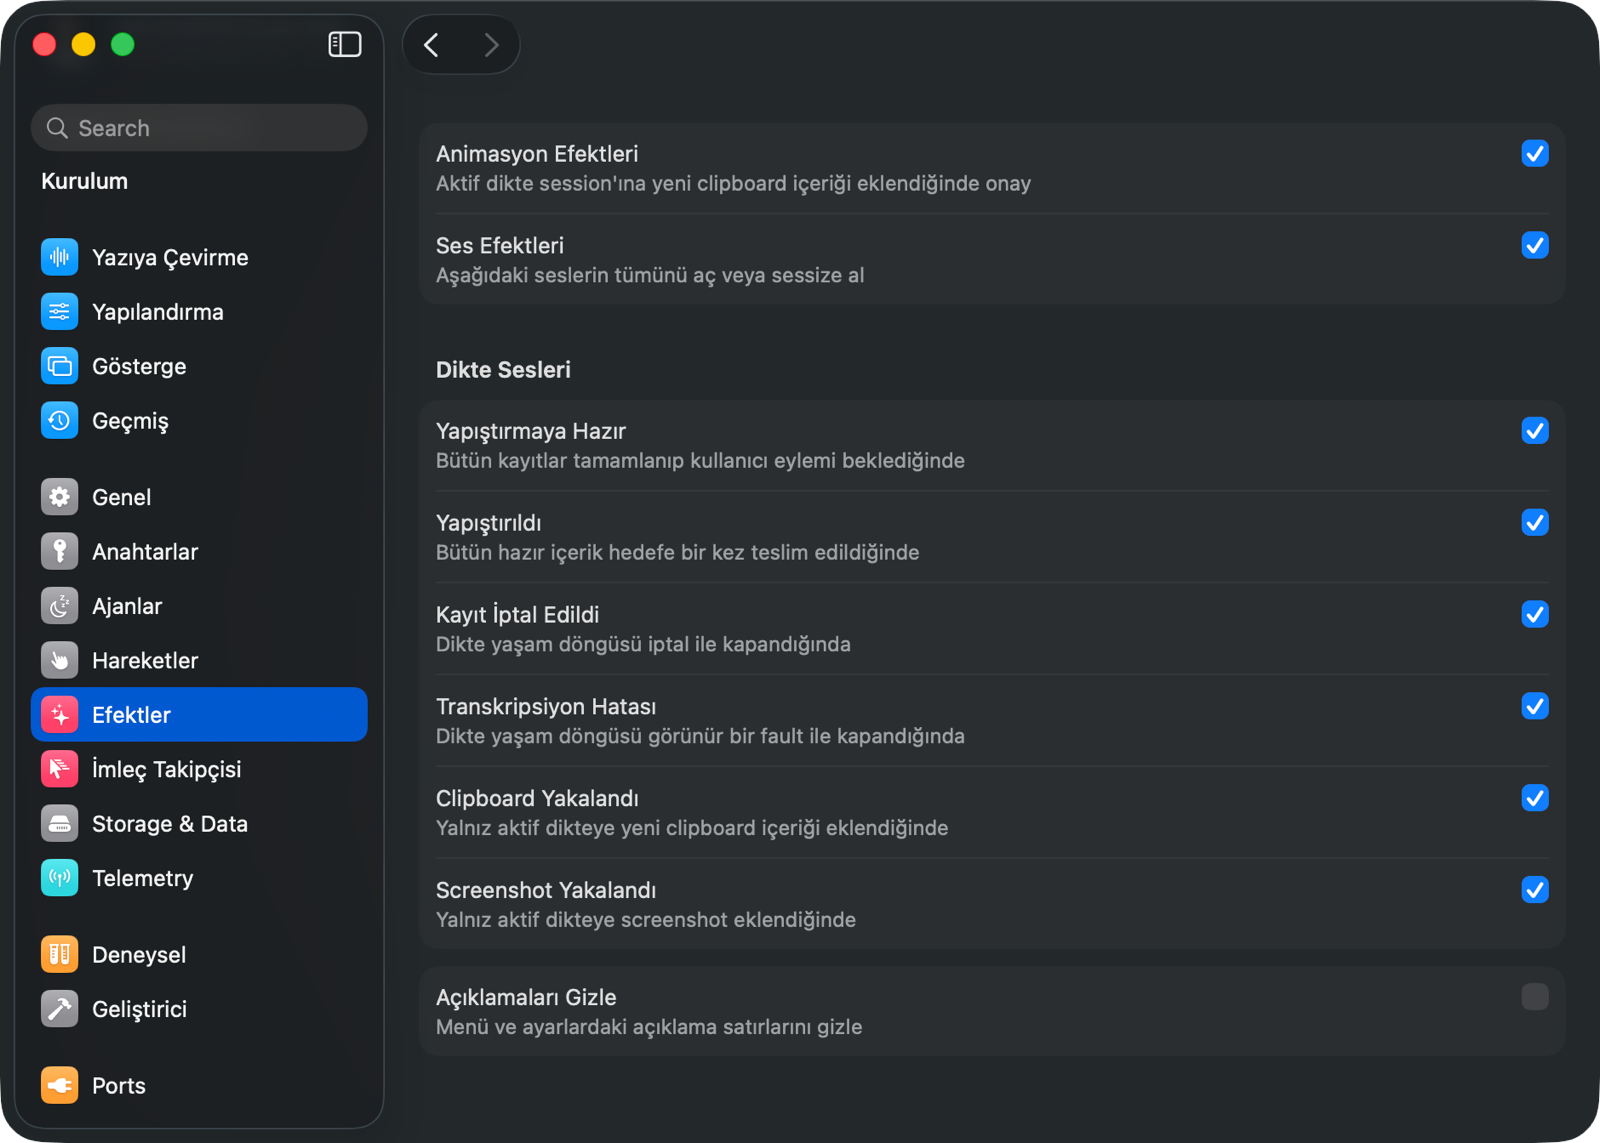
Sesleri ve görsel geri bildirimleri ayrı ayrı yönet
Görsel hareketleri ve sesleri topluca açıp kapatabilir; yapıştırmaya hazır, yapıştırıldı, kayıt iptal edildi, yazıya çevirme hatası, pano yakalandı ve ekran görüntüsü yakalandı gibi durumların seslerini ayrı ayrı seçebilirsin.
Efektler paneli, hangi durumun sesli veya görsel geri bildirim vereceğini açıkça gösterir.
Parmak hareketleri kısayolların yerini alabilir
Üç parmakla dokunarak dikteyi açıp kapatabilir; köşe tıklamalarını yapıştırma, geçmişi açma veya dikteyi iptal etme gibi işlere bağlayabilirsin. Her hareketin sonucu yanında görünür ve üstteki önizlemeden denenebilir. Bu yüzey deneysel olduğu için çalışmayan seçimler açıkça atanmadı olarak kalır.
Hareketler paneli, her parmak hareketinin hangi işi tetiklediğini gösterir.
Hareketi anlatacaksan GIF çek
Bir hareketi, animasyonu ya da panelin nasıl davrandığını uzun uzun prompt'lamak yerine Option+G ile GIF çekersin. GIF, hareketin başlangıcından bitişine kadar değişen davranışı tek kayıtta taşır.
Hareket için tek bir GIF çek: panelin sürüklenmesi gibi davranışlar başlangıçtan bitişe aynı kaydın içinde görünür.
Bileşen Kopyala: ekrandaki parçanın arkasını da yakala
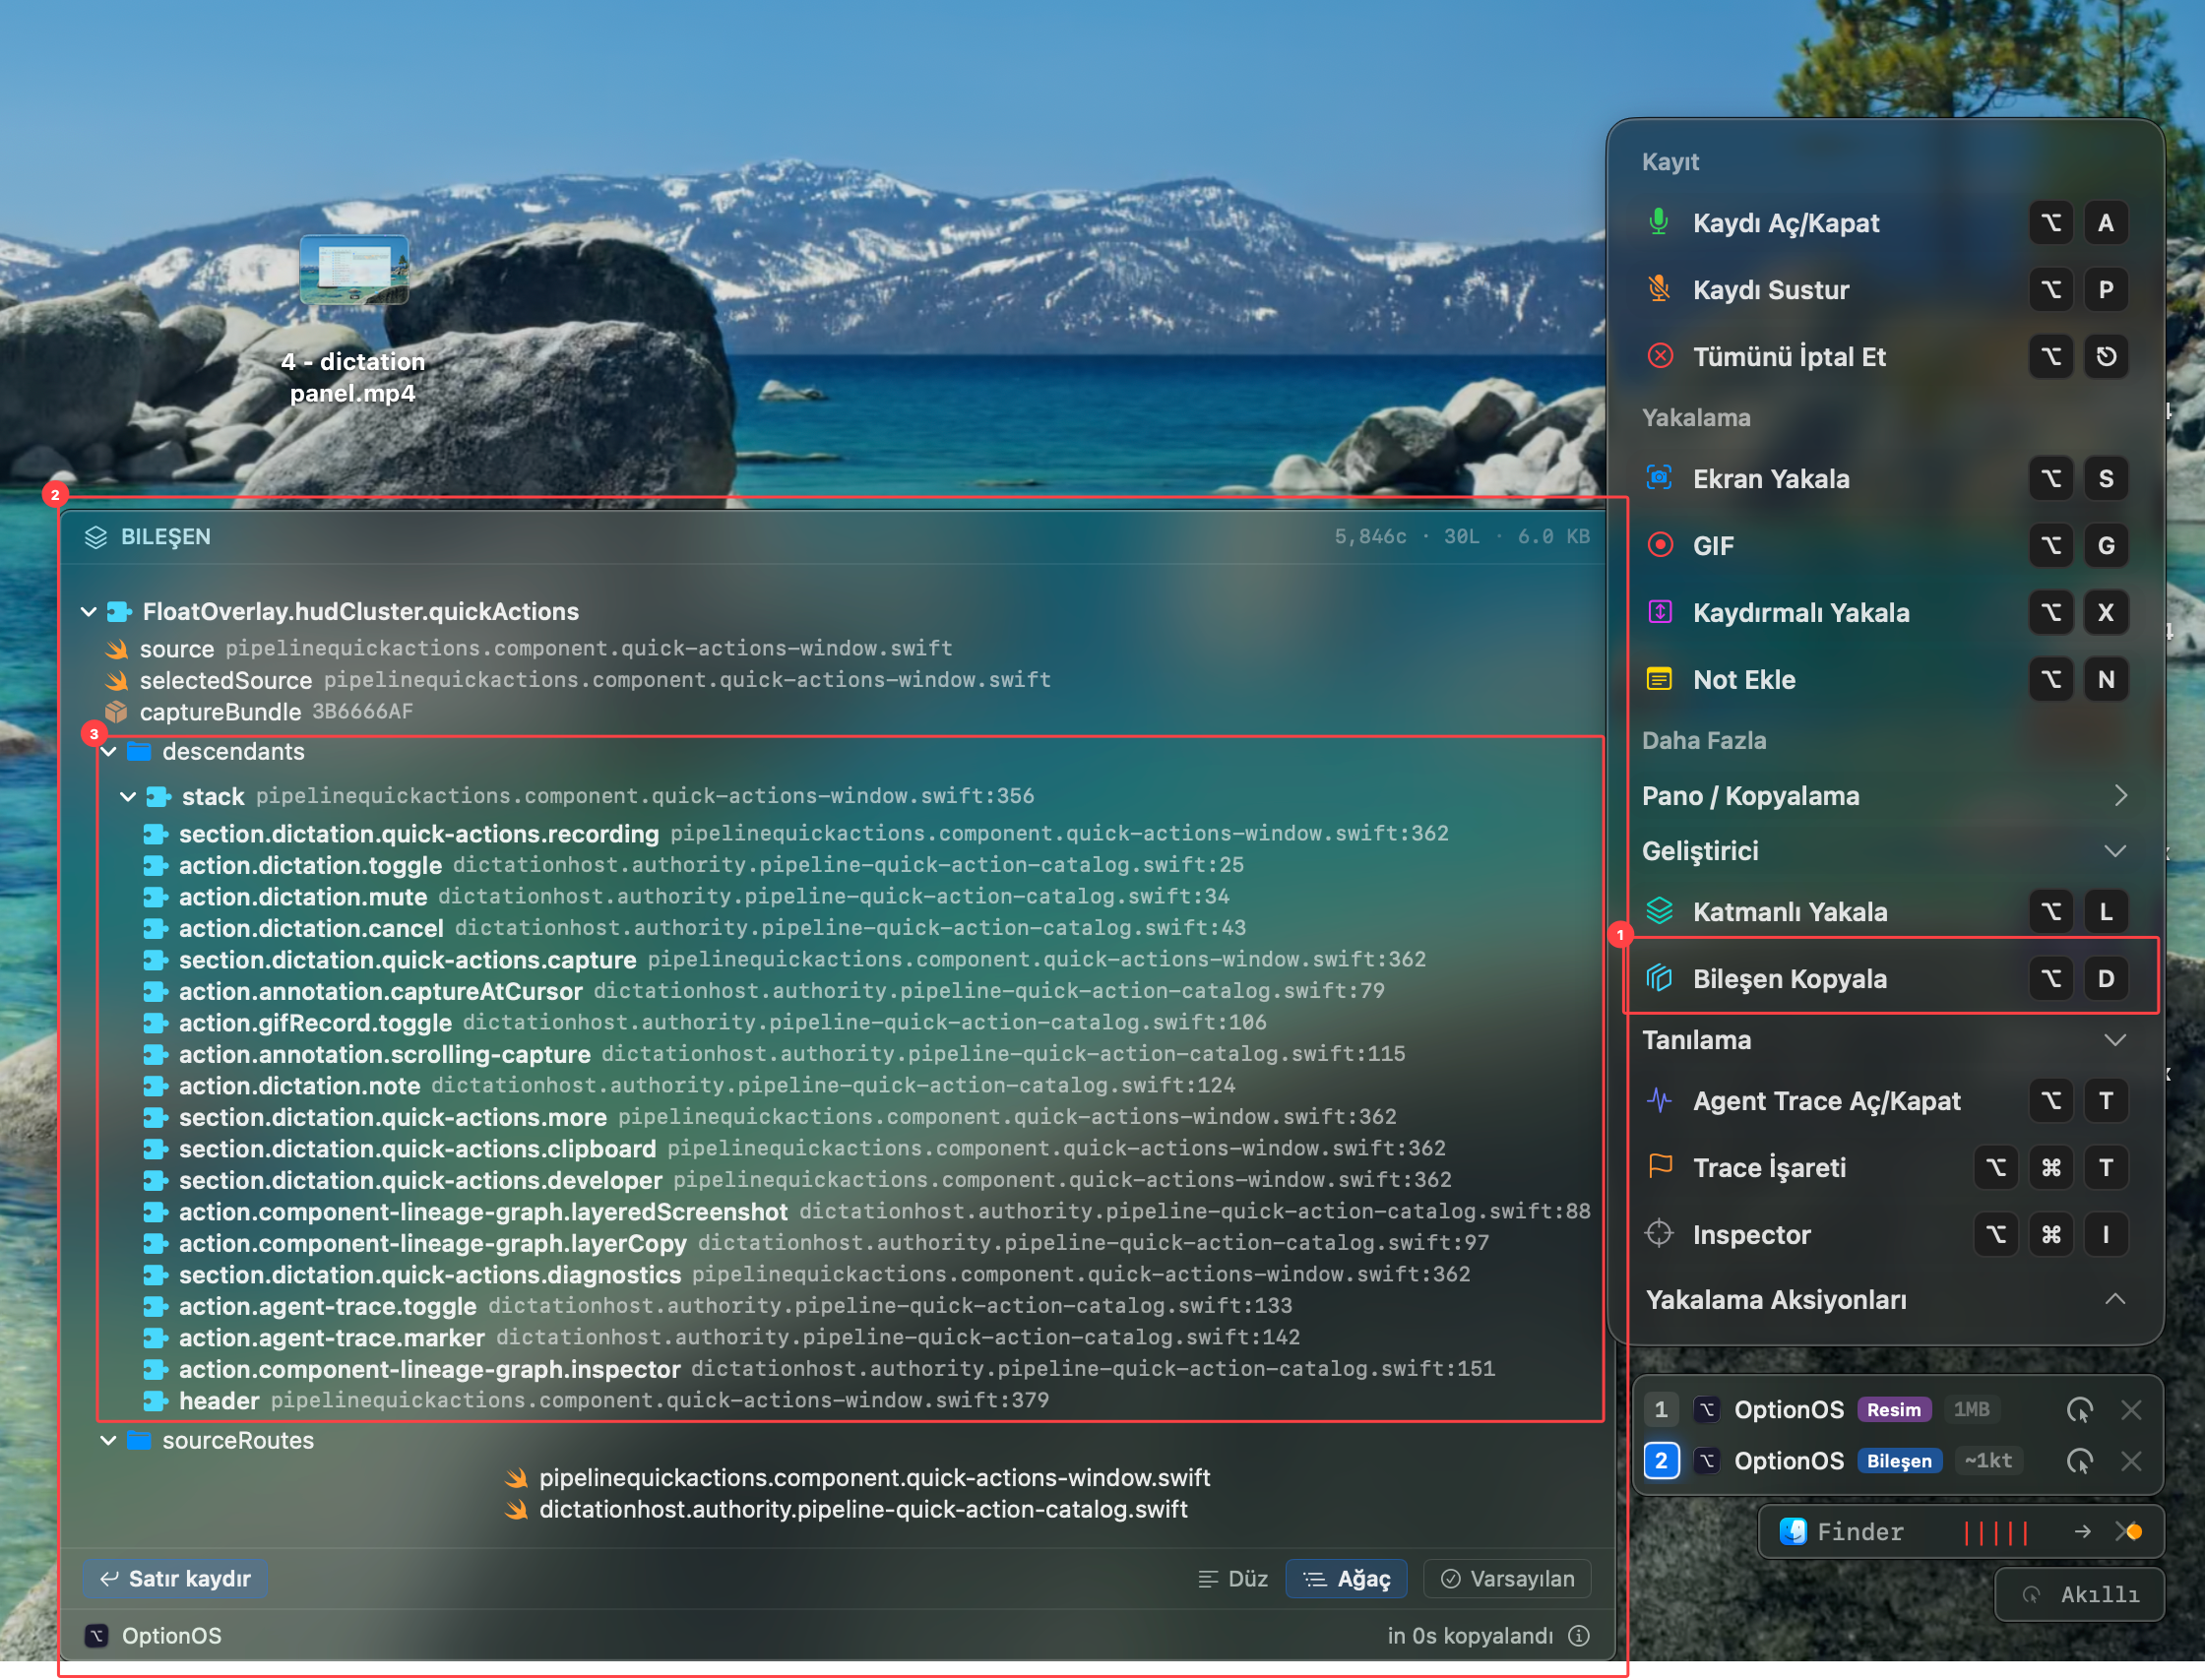
Yakalama menüsündeki Bileşen Kopyala, seçtiğin UI parçasını yalnız resim gibi değil, component/source ağacıyla birlikte kopyalar. Agent artık ekrandaki parçanın arkasında hangi source dosyaları, descendants ve route'lar olduğunu da görebilir.
Şu an bu akış optionOS tarafında çalışıyor. SDK yayınlandığında kendi Mac uygulamasını geliştiren biri de SDK'yı uygulamasına koyup kendi uygulamasını böyle tarif edebilecek: direkt nokta atışı; kaynak kodlar, modlar ve ilgili parçalar da pakete gidecek.
Bileşen Kopyala, seçili parçayı component ağacı ve source route'larıyla birlikte agent'a taşır.
1Yakalama menüsündeki Bileşen Kopyala aksiyonu
2Kopyalanan bileşen çıktısı
3Descendants/source ağacı
Menübar hızlı işlere ayrıldı
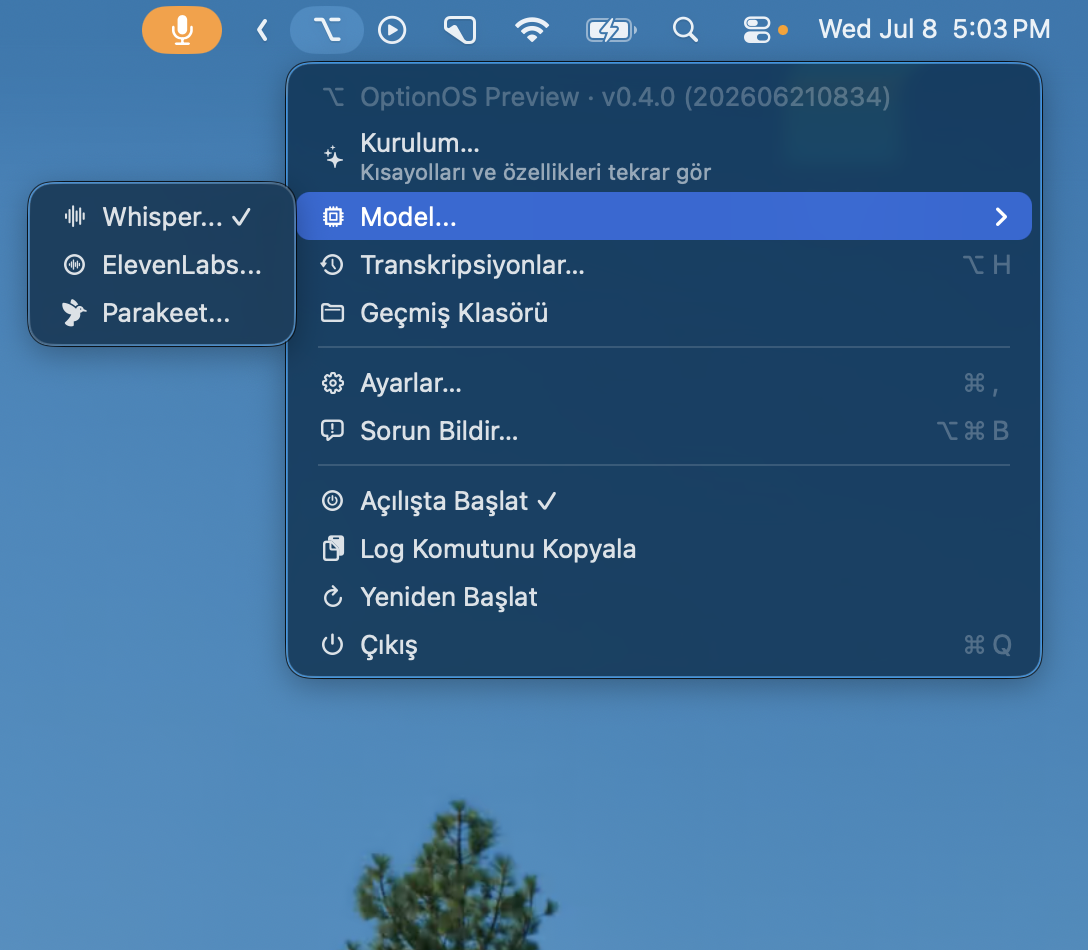
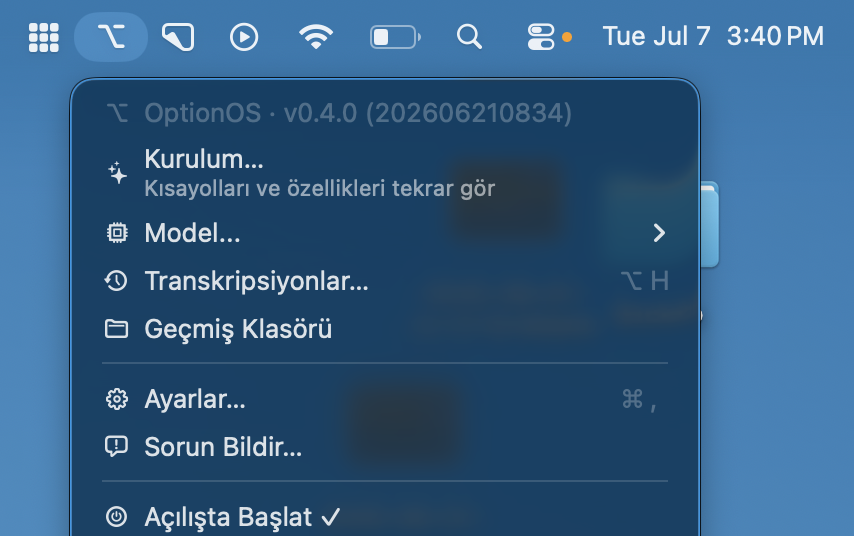
Menübar artık sık kullanılan işleri taşır: kurulum, model seçimi, transkripsiyonlar, geçmiş klasörü, ayarlar, sorun bildir, açılışta başlat ve log komutunu kopyala. Büyük kararlar ayarlar paneline taşındığı için menü daha sade kalır.
Menübar, günlük kullanılan optionOS aksiyonlarını kompakt bir listeye toplar.
1Kurulum ve kısayolları tekrar görme
2Model seçimi
3Transkripsiyonlar ve geçmiş klasörü
4Ayarlar ve sorun bildir
5Açılışta başlat, log komutu ve yeniden başlat
Ayarlar baştan aşağı yenilendi
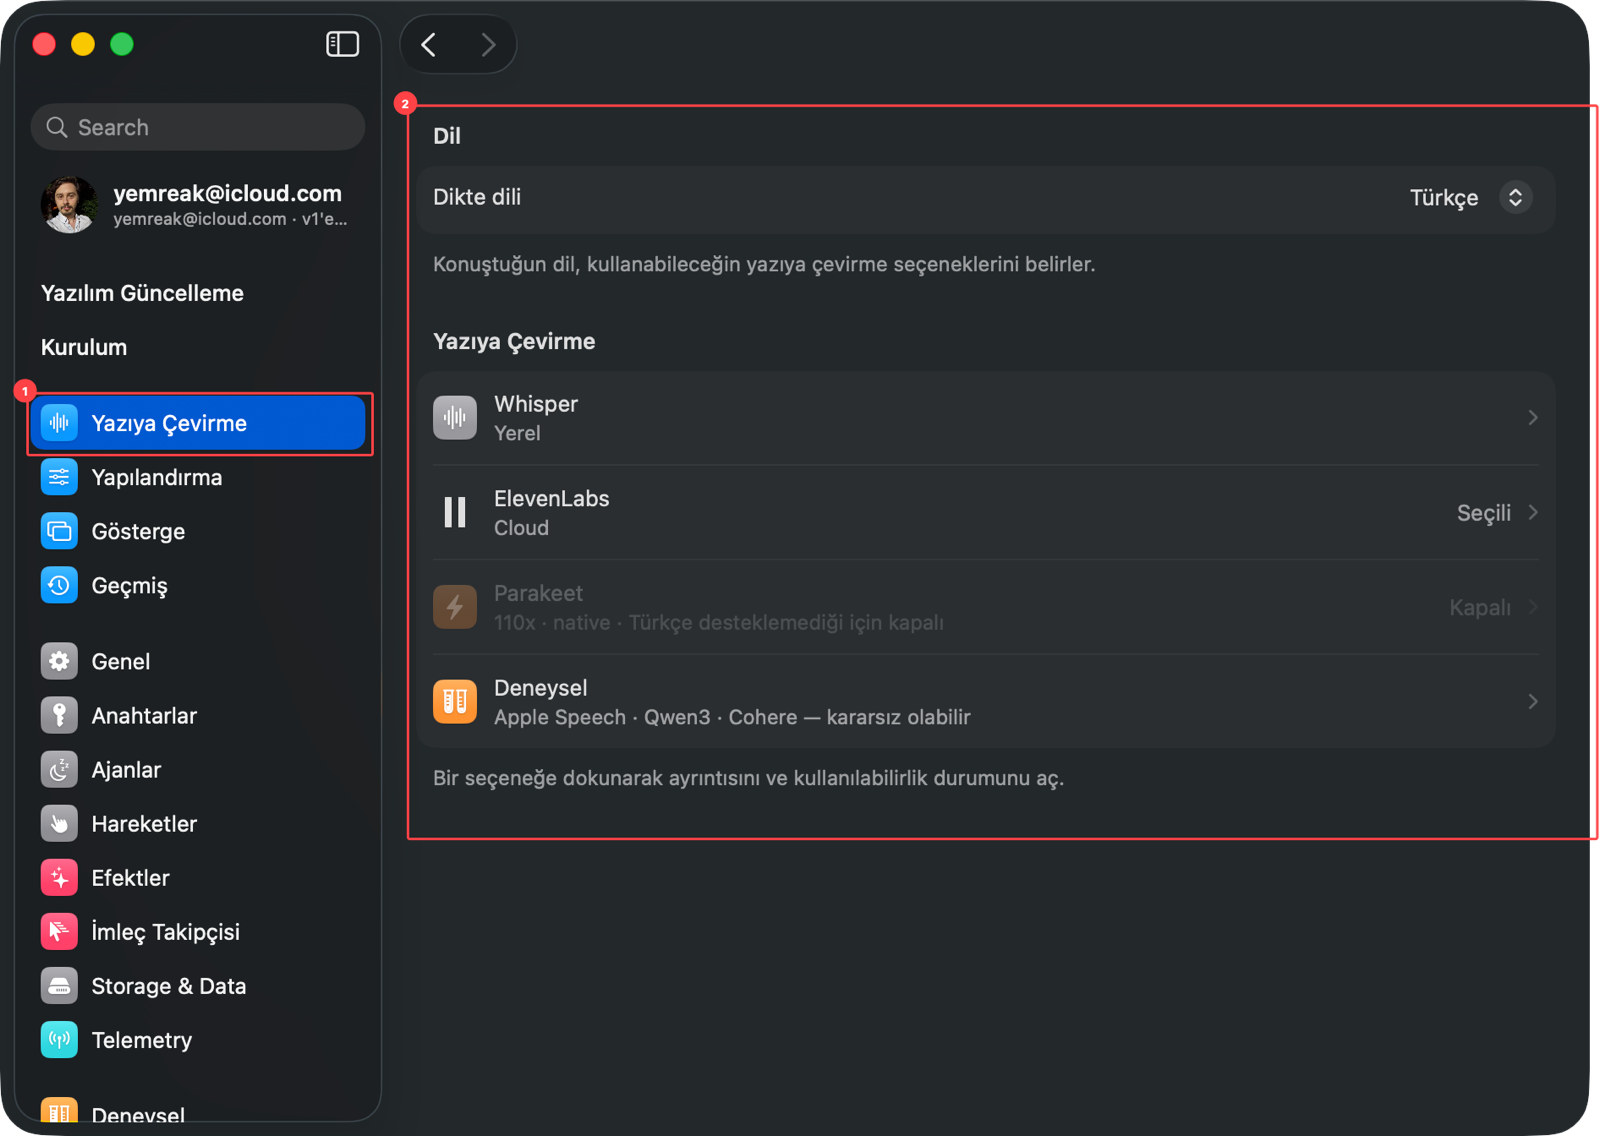
Yazıya Çevirme, Yapılandırma, Gösterge, Geçmiş, Genel, Anahtarlar, Ajanlar, Hareketler, Efektler, İmleç Takipçisi, Depolama ve Veriler ile deneysel seçenekler tek pencerede, yaptığın işe göre ayrılıyor. Her seçenek neyi değiştirdiğini yanında anlatıyor.
Yenilenen Ayarlar paneli, konuşma ve uygulama kararlarını okunabilir bölümlere ayırır.
Ayarlar artık işlere göre ayrılmış
Ayarlar tek yerde yığılmak yerine ayrı panellere bölündü. Motor, Dil, Yapılandırma, Gösterge, Kota ve Geçmiş konuşma akışını taşır; Genel, Anahtarlar, Ajanlar, Hareketler, Efektler, Storage & Data, Deneysel, Geliştirici ve Ports kendi kararlarını ayrı tutar.
Settings sidebar'ı, konuşma ayarlarını ve sistem ayarlarını okunabilir parçalara ayırır.
1Ayrı ayar panelleri
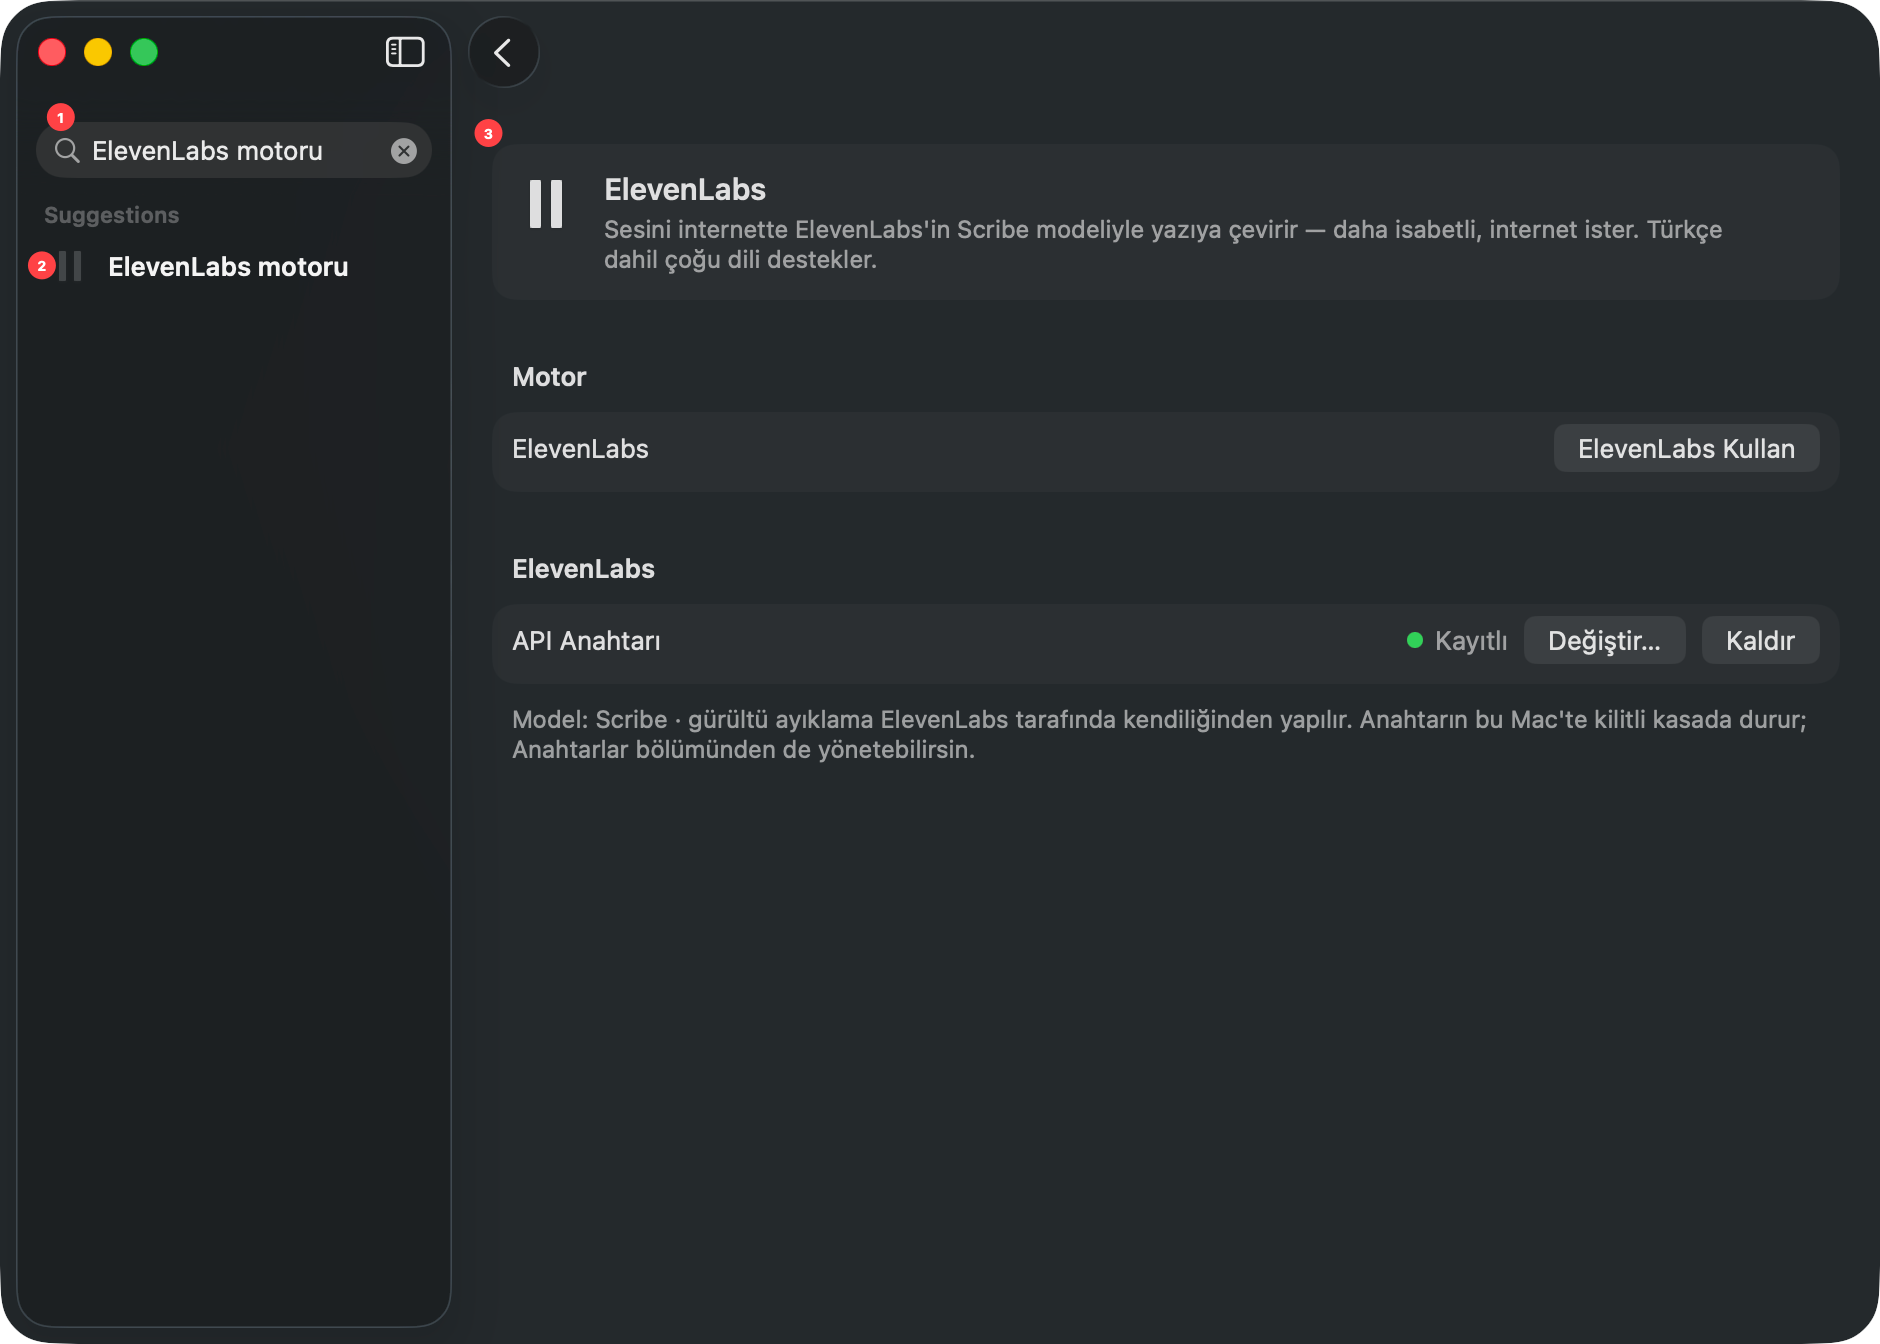
Ayar araması doğru bölümü hemen açar
Bir ayarı değiştirmek istediğinde settings bar'da arayabilirsin. Suggestion'a tıkladığında gerekli ayar bölümü açılır; kullanıcı aradığı şeyi menüler arasında kaybolmadan bulur.
Ayar araması, aranan ayarı ve ilgili detay panelini aynı akışta açar.
1Settings arama alanı
2Suggestion sonucu
3Açılan ayar detayı
Whisper ayarları artık kendi alanında
Whisper için model, çalışma biçimi ve çıktı davranışını aynı yerde seçebilirsin. Sessizlikte üretilen kapanış cümleleri gibi hatalı çıktılar ayrı listede görünür; hazır engelleri kullanabilir veya kendi örneğini ekleyebilirsin.
Whisper'a özgü kararlar ve hatalı çıktı yönetimi aynı ayrıntı alanında toplanır.
ElevenLabs hesabını ve kalan kullanımını görebilirsin
ElevenLabs kullanıyorsan hesap planın, kullanılan ve kalan karakter miktarı ile yenilenme tarihi artık aynı alanda okunur. Bilgileri yenilemek için hesaptan çıkıp yeniden eklemen gerekmez.
ElevenLabs hesap kartı, plan ve kalan kullanım bilgisini yazıya çevirme ayarlarının içinde gösterir.
Depolama ve Veriler neyin ne kadar yer tuttuğunu gösterir
Uygulamanın tuttuğu veriyi ve kapladığı alanı tek bakışta görebilirsin. Dikte, Pano Yakalama, Ekran Kaydı, Bileşen Yakalama, Yedekler ve diğer veriler ayrı ölçülür; ayrıntıya girip hangi bölümün ne kadar alan kullandığını inceleyebilirsin.
Depolama ve Veriler, optionOS verilerini kategori ve boyutlarıyla görünür yapar.
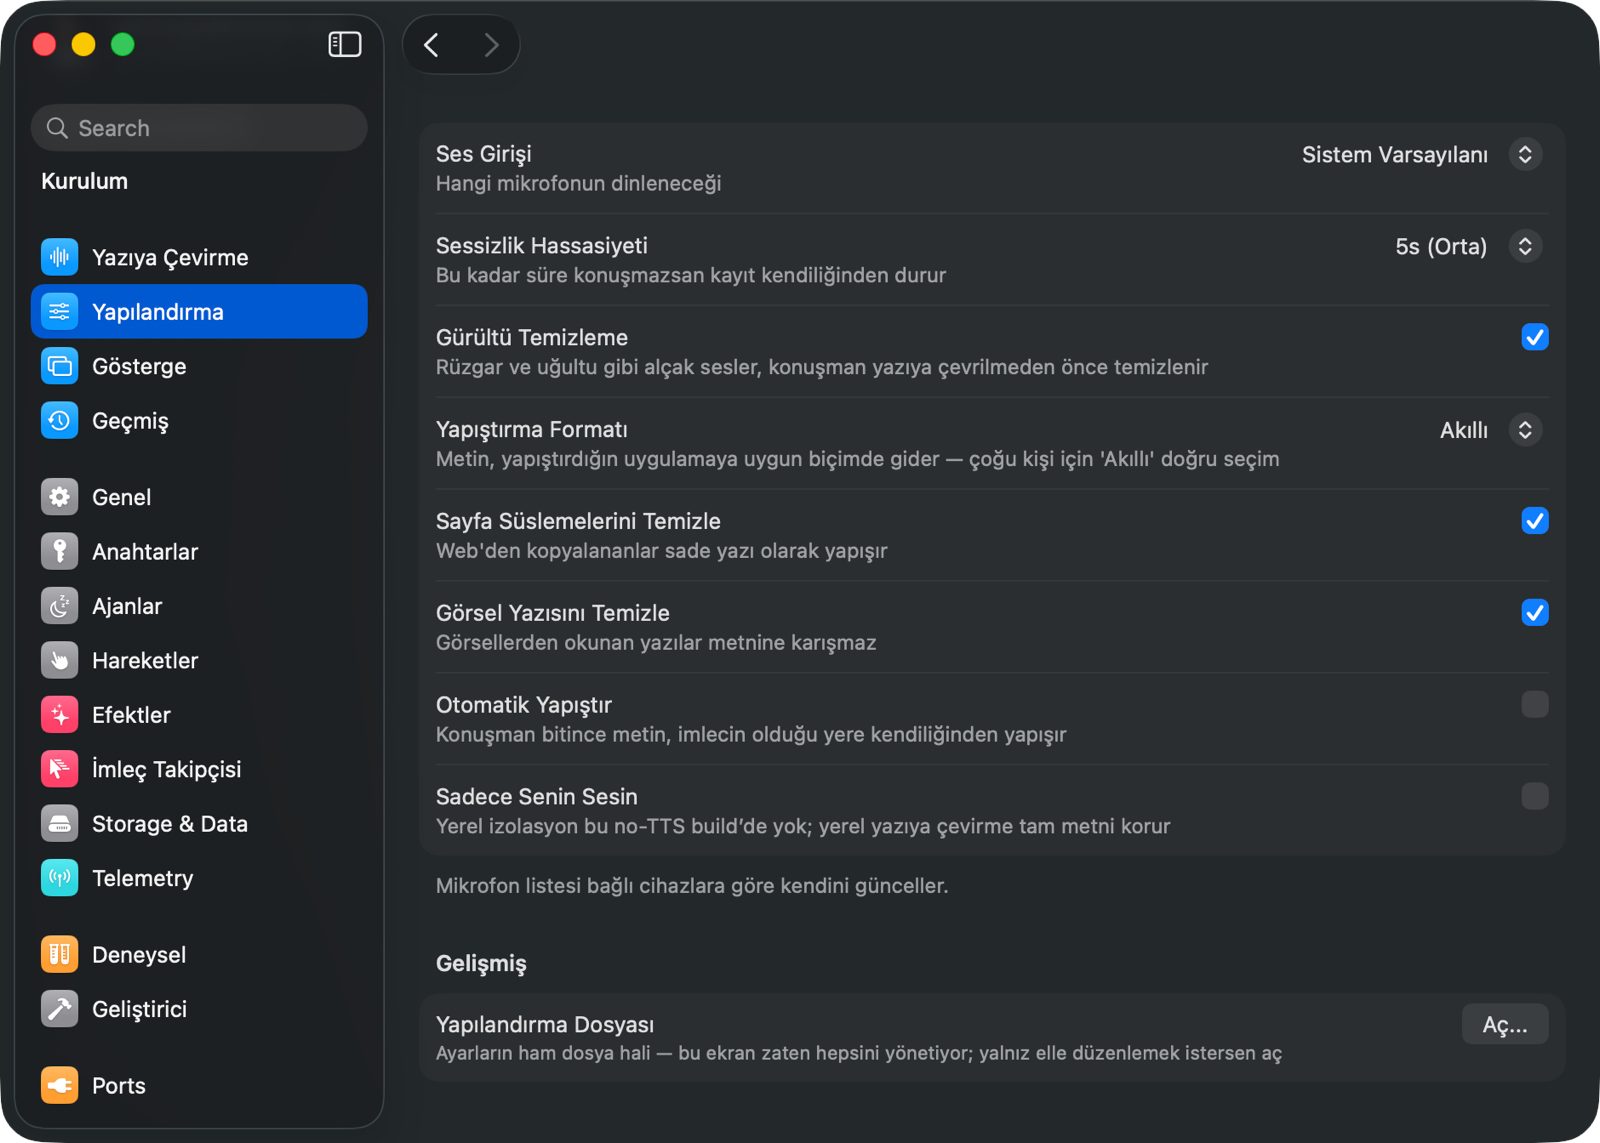
Gelişmiş yapılandırma seçimleri görünür
Mikrofon, sessizlik süresi, gürültü temizleme, yapıştırma biçimi, sayfa süslemelerini ve görsel yazılarını temizleme gibi kararlar artık açık denetimlere sahip. Deneysel seçenekler de görünür; henüz tam çalışmayan bir davranışı kullanıp kullanmayacağına sen karar verirsin.
Yapılandırma paneli, konuşmanın nasıl alınacağını ve metnin nasıl teslim edileceğini ayrı ayrı denetletir.
Yakalama ayarları gruplandı
Her şey bir anda gösterilmiyor. Pano/Kopyalama, Geliştirici ve Tanılama gibi gruplar açılıp kapanıyor; menü daha kompakt ve daha az kafa karıştırıcı duruyor.
Yakalama menüsü, sık kullanılan aksiyonları gruplar halinde gösterir.
Ekran kaydı izni artık yol gösteren kartla açılır
Screen & System Audio Recording izni gerektiğinde optionOS, System Settings'in yanında ne yapılacağını gösteren bir kart açar. App yolunu kopyalarsın, System Settings listesindeki + ile bu yolu yapıştırırsın, OptionOS.app'i seçip izni açarsın.
İzin rehberi, app yolunu ve sıradaki System Settings adımlarını aynı yüzeyde gösterir.
1optionOS izin rehberi kartı
İmleç takipçisini istediğin zaman kapatabilirsin
Kayıt veya yazma durumunu fare imlecinin yanında gösteren takipçiyi tek ayardan açıp kapatabilirsin. İstersen takipçinin ekran görüntülerinde ve ekran kayıtlarında görünüp görünmeyeceğini de ayrı seçersin.
İmleç Takipçisi, kayıt durumunu imlecin yanında gösterme kararını kullanıcıya bırakır.
Menübar sadeleşti: hızlı işler burada, ayarlar panelde
Görsel minibar yapısı kalktı. Menübar artık hızlı kullanılan içerikleri tutuyor: kurulum, model, transkripsiyonlar, geçmiş klasörü, ayarlar ve sorun bildir gibi aksiyonlar burada. Daha büyük kararlar yeni ayarlar paneline taşındı.
Menübar hızlı aksiyonlara ayrıldı; ayar ve geri bildirim akışları buradan açılır.
Uzun ajan işleri sırasında Mac uyanık kalabilir
Ajan Güvenli Çalışma'yı açtığında Mac uykuya geçmez; uzun bir istemden sonra arka plandaki ajanlar çalışmayı sürdürebilir. Ekranın uyumasına izin verebilir, durumu yeniden ölçebilir veya engeli tek düğmeyle kaldırabilirsin.
Ajan Güvenli Çalışma, uzun görevlerde Mac'in uyanıklık durumunu görünür ve denetlenebilir tutar.
SVG'yi SVG ya da PNG olarak gönderebilirsin
Bir SVG kopyaladığında optionOS bunu yakalama listesine alır. İstersen AI'a SVG olarak, istersen PNG olarak gönderirsin. Kod ve görsel arasında seçim kaybolmaz; aynı içerik iki biçimde de akışa girebilir.
SVG içeriği hem kod olarak okunur hem de PNG görsele çevrilip gönderilebilir.
v0.5: The system behind speech is now visible
Recording, transcription, capture, paste, storage and agent flows used to run mostly in the background; only the person building the system could see what it was doing. v0.5 brings states, choices, errors, usage and history onto surfaces that everyone can read and control.
This single release brings together every visible change completed between 7 and 11 July 2026.
The Notch surface is beta in this release. It is experimental and may lag on some machines. If you want the stable path, use HUD; HUD can already be dragged to the part of the screen where it stays out of your way.
There is also a Promise area where we say what we will build: on the Promises page you can see the work we plan, and later you will be able to vote on it. The voting structure is not built in this release; for now it is a promise.
Speech, settings and capture share one workspace
The Settings panel, target-app selector and capture queue can be visible at the same time. You choose where your speech goes, while settings, history and captured items stay in the same flow.
The v0.5 workspace keeps speech, target app, settings and the capture queue together.
1Target app selector
2New Settings panel
3Captured item queue
This What's New page was made by talking to optionOS
The text and visual decisions on this page were collected while talking to optionOS. Speech, on-screen marks, copied content and preview stayed in one flow; the release story you are reading came directly from that conversation.
Speech, capture actions and the content list feeding this page share one working surface.
First launch now shows the next action
The onboarding screen explains one-key dictation: which shortcut starts speech, whether the engine is ready and which permissions come next. Setup becomes a guided path instead of a hidden checklist.
The first onboarding card makes the speech shortcut and required permissions visible.
1Compose shortcut
2Engine readiness state
3Next setup steps
Long speech is saved continuously so it does not disappear
Losing a 20-minute explanation is terrible. Speech is now saved as continuously as possible. If the app crashes, the computer shuts down, or you have to force quit because something got stuck, the audio recording is preserved.
The saving state stays visible while recording, protecting long speech sessions.
Retry from a past conversation
In the dictation screen, click a past conversation and use the context menu to try again. If something unexpected happened in a long speech session, you can find the same recording in history and put it back into the flow.
The past-conversation menu gives direct retry and copy actions.
1Past conversation row
2Retry action
Capture actions stay visible while you talk
Recording, screenshot capture, GIF, scrolling capture, notes, automatic copy and clipboard undo/redo live on one surface. You can see what is available by hotkey or by button. The panel also shows which app the conversation started in and which content landed in the capture list.
In a browser it behaves like a browser flow; in a local app it behaves like a local app flow. Option+Shift+Z and Option+Shift+Y move the last clipboard action backward and forward, with animated feedback.
You can hold the bottom panel and drag it left or right — carry it to any side of the screen. If you have been copying things, moving it somewhere is more useful than closing it.
The capture menu keeps hotkeys, target app and captured items on the same working surface.
Capture, mark up and attach it to what you say
Onboarding now teaches the capture-and-markup flow too. Capture the screen, mark the important area and optionOS adds that visual context to your speech.
The Mark Up by Editing card explains the capture-and-markup flow with its shortcut.
1Capture and markup shortcut
2Active onboarding card
3Engine readiness during setup
Your speech and rectangles stay in sync
For motion, use GIF. For long web pages, use scrolling capture. You can annotate a GIF, but most of the time marking the first frame is enough to show the agent where to look.
When you draw a rectangle while speaking, the label time is attached to the transcript. You do not have to say “one, two, three”; saying it can help, but optionOS already knows when the drawing happened. You stay in the flow and the agent sees the change immediately.
Speech, screenshots and drawn labels are readable on the same timeline.
1The relevant speech moment
2Visual reference
3Drawn rectangle label
Conversation history and feedback share the same archive
Past conversations inside the app can be shown like transcripts, with tags and badges. If you think of something later, you can click an old image and add a label on top of it; the speech flow stays intact and the agent can understand it.
Issue reporting follows the same idea: send the problem with voice, screenshots and annotations from inside the app. The feedback arrives with the context needed to improve the app together.
Past conversations, references and captured items can be found again in the same archive.
The usage card opens speech history
Pressing the Dictation total card now opens an experimental Usage view. The heatmap, weekly totals and selected-day app breakdown stay in one window, so you can inspect speech history by time and app.
The usage card opens speech history with a calendar and app breakdown.
1Total-usage card
2Usage and speech-history detail
You can share the Dictation usage total
The total-usage card in the Dictation archive now has a share action. Use the share button on that card to turn total time and usage breakdown into a visual share card.
The share button starts the flow that turns usage totals into a visual card.
1Usage total share action
The stats card exports as PNG
The share action creates an optionOS-branded PNG. It shows total speaking time, word count and the top app breakdown, so you can share the usage stat as one image.
The share card keeps total speaking time, word count and app breakdown in one image.
HUD actions are visible with their hotkeys
Record, mute, cancel, screenshot, GIF, scrolling capture, OCR and note all live in the HUD. The same surface shows the target app and what has entered the capture queue.
The HUD shows the actions and shortcuts you can use while speaking.
1Recording actions
2Capture actions
3Clipboard, developer and diagnostics groups
4Target app and capture queue
Move the indicator where you want and choose its surface
In Settings → Indicator, you can choose the recording indicator surface and its position on screen. You can also press and drag the small panel directly, so the indicator adapts to your workspace.
Indicator settings keep the surface and recording-panel position controls together.
The Notch surface gives you a quieter indicator
Choose the Notch surface when you want a more modern indicator that takes up less space. Recording state stays at the top edge of the display without covering the content you are working on.
The Notch surface keeps speech state visible in a compact top-edge indicator.
Control sounds and visual feedback separately
Turn visual motion and sound on or off together, then choose individual sounds for ready to paste, pasted, recording cancelled, transcription error, clipboard captured and screenshot captured states.
The Effects panel shows which state will produce sound or visual feedback.
Trackpad gestures can replace keyboard shortcuts
Use a three-finger tap to start or stop dictation, then map corner clicks to paste, open history or cancel dictation. Each result stays visible beside the gesture and can be tried in the preview above. Because this surface is experimental, unsupported choices remain visibly unassigned.
The Gestures panel shows which job each trackpad gesture triggers.
Use GIF when you need to show motion
Instead of over-prompting an animation, movement or panel behavior, press Option+G and record a GIF. The GIF carries the changing behavior from start to finish in one recording.
Use one GIF for motion: behavior such as dragging a panel stays visible from start to finish in the same recording.
Component Copy captures what is behind the UI
Component Copy in the capture menu copies the selected UI piece with its component/source tree, not only as a screenshot. The agent can now see which source files, descendants and routes sit behind the thing on screen.
This currently works for optionOS. When the SDK is published, a developer building their own Mac app will be able to add the SDK and describe their own app this way: precise context, with the relevant source code, modes and pieces in the packet.
Component Copy carries the selected UI piece together with its component tree and source routes.
1Component Copy in the capture menu
2The copied component output
3The descendants/source tree
The menu bar is reserved for fast actions
The menu bar now holds frequent actions: setup, model selection, transcripts, history folder, settings, issue report, start at login and copy log command. Bigger decisions moved into Settings, so the menu stays compact.
The menu bar keeps everyday optionOS actions in a compact list.
1Setup and shortcut replay
2Model selection
3Transcripts and history folder
4Settings and issue reporting
5Start at login, copy log command and restart
Settings has been rebuilt from top to bottom
Transcription, Configuration, Indicator, History, General, Keys, Agents, Gestures, Effects, Cursor Follower, Storage & Data and experimental choices now live in one window, separated by the job they affect. Each choice explains what it changes beside the control.
The rebuilt Settings panel separates speech and app decisions into readable sections.
Settings is split by job
Settings is no longer one crowded surface. Motor, Language, Configuration, Display, Quota and History carry the speech workflow; General, Keys, Agents, Gestures, Effects, Storage & Data, Experimental, Developer and Ports keep their own decisions separate.
The Settings sidebar separates speech settings from system-level decisions.
1Separate Settings panes
Settings search opens the right section
When you want to change a setting, search for it in the settings bar. Click the suggestion and the matching settings detail opens, without hunting through menus.
Settings search opens the matching setting and its detail panel in one flow.
1Settings search field
2Suggestion result
3Opened setting detail
Whisper settings now live in their own section
Choose the Whisper model, processing mode and output behavior in one place. Incorrect outputs such as closing phrases produced during silence have their own list; use the built-in entries or add your own example.
Whisper-specific decisions and incorrect-output handling share one detail surface.
See your ElevenLabs account and remaining usage
When you use ElevenLabs, your account plan, used and remaining character allowance, and renewal date are visible in one place. Refresh the account details without removing and adding the account again.
The ElevenLabs account card keeps plan and remaining-usage details inside transcription settings.
Storage & Data shows what takes space
See the data kept by the app and the space it uses at a glance. Dictation, Clipboard Capture, Screen Record, Component Capture, Backups and other data are measured separately; open a category to inspect its footprint.
Storage & Data makes optionOS data visible by category and size.
Advanced configuration choices are visible
Microphone, silence duration, noise cleanup, paste formatting, page-decoration cleanup and image-text cleanup now have explicit controls. Experimental choices remain visible too, so you decide whether to use a behavior that is not fully reliable yet.
Configuration separates how speech is captured from how text is delivered.
Capture settings are grouped
Everything is no longer shown at once. Clipboard/Copying, Developer and Diagnostics groups open and close, so the menu looks compact and less confusing.
The capture menu groups frequently used actions instead of showing every detail at once.
Screen recording permission now opens with a guide card
When Screen & System Audio Recording permission is needed, optionOS opens a card next to System Settings that shows what to do. Copy the app path, use + in the System Settings list, paste the path, choose OptionOS.app and turn the permission on.
The permission guide keeps the app path and the next System Settings steps on the same surface.
1optionOS permission guide card
Turn the cursor follower off whenever you want
Enable or disable the follower that shows recording or writing state beside the pointer from one setting. Separately choose whether it should appear in screenshots and screen recordings.
Cursor Follower leaves the pointer-side recording indicator under your control.
The menu bar is simpler: fast actions here, settings in the panel
The visual minibar structure is gone. The menu bar now keeps fast actions such as setup, model, transcriptions, history folder, settings and issue reporting. Bigger decisions moved into the new settings panel.
The menu bar is reserved for quick actions; settings and feedback open from here.
Keep your Mac awake during long agent jobs
Turn on Agent Safe Work to prevent the Mac from sleeping while background agents continue after a long prompt. You can still let the display sleep, measure the state again or release the assertion with one action.
Agent Safe Work keeps wakefulness during long tasks visible and controllable.
Send SVG as SVG or PNG
When you copy an SVG, optionOS keeps it in the capture list. You can send it to AI as SVG, or turn it into a PNG image. The code form and the visual form stay connected instead of becoming two separate flows.
SVG content can be read as code or converted into a PNG image before it is sent.
optionOS ekosistemi tek çalışma yüzeyinde
optionOS artık ayrı ayrı araçlar gibi değil, aynı AI çalışma ekosisteminin üyeleri gibi okunur: Dictation konuşmayı ve yakalamayı taşır, Clipboard/Pano görsel ve paste akışını yönetir, Cockpit ise Mac ve VS Code tarafında agent'ları izler.
Dictation, Clipboard ve VS Code Cockpit birlikte
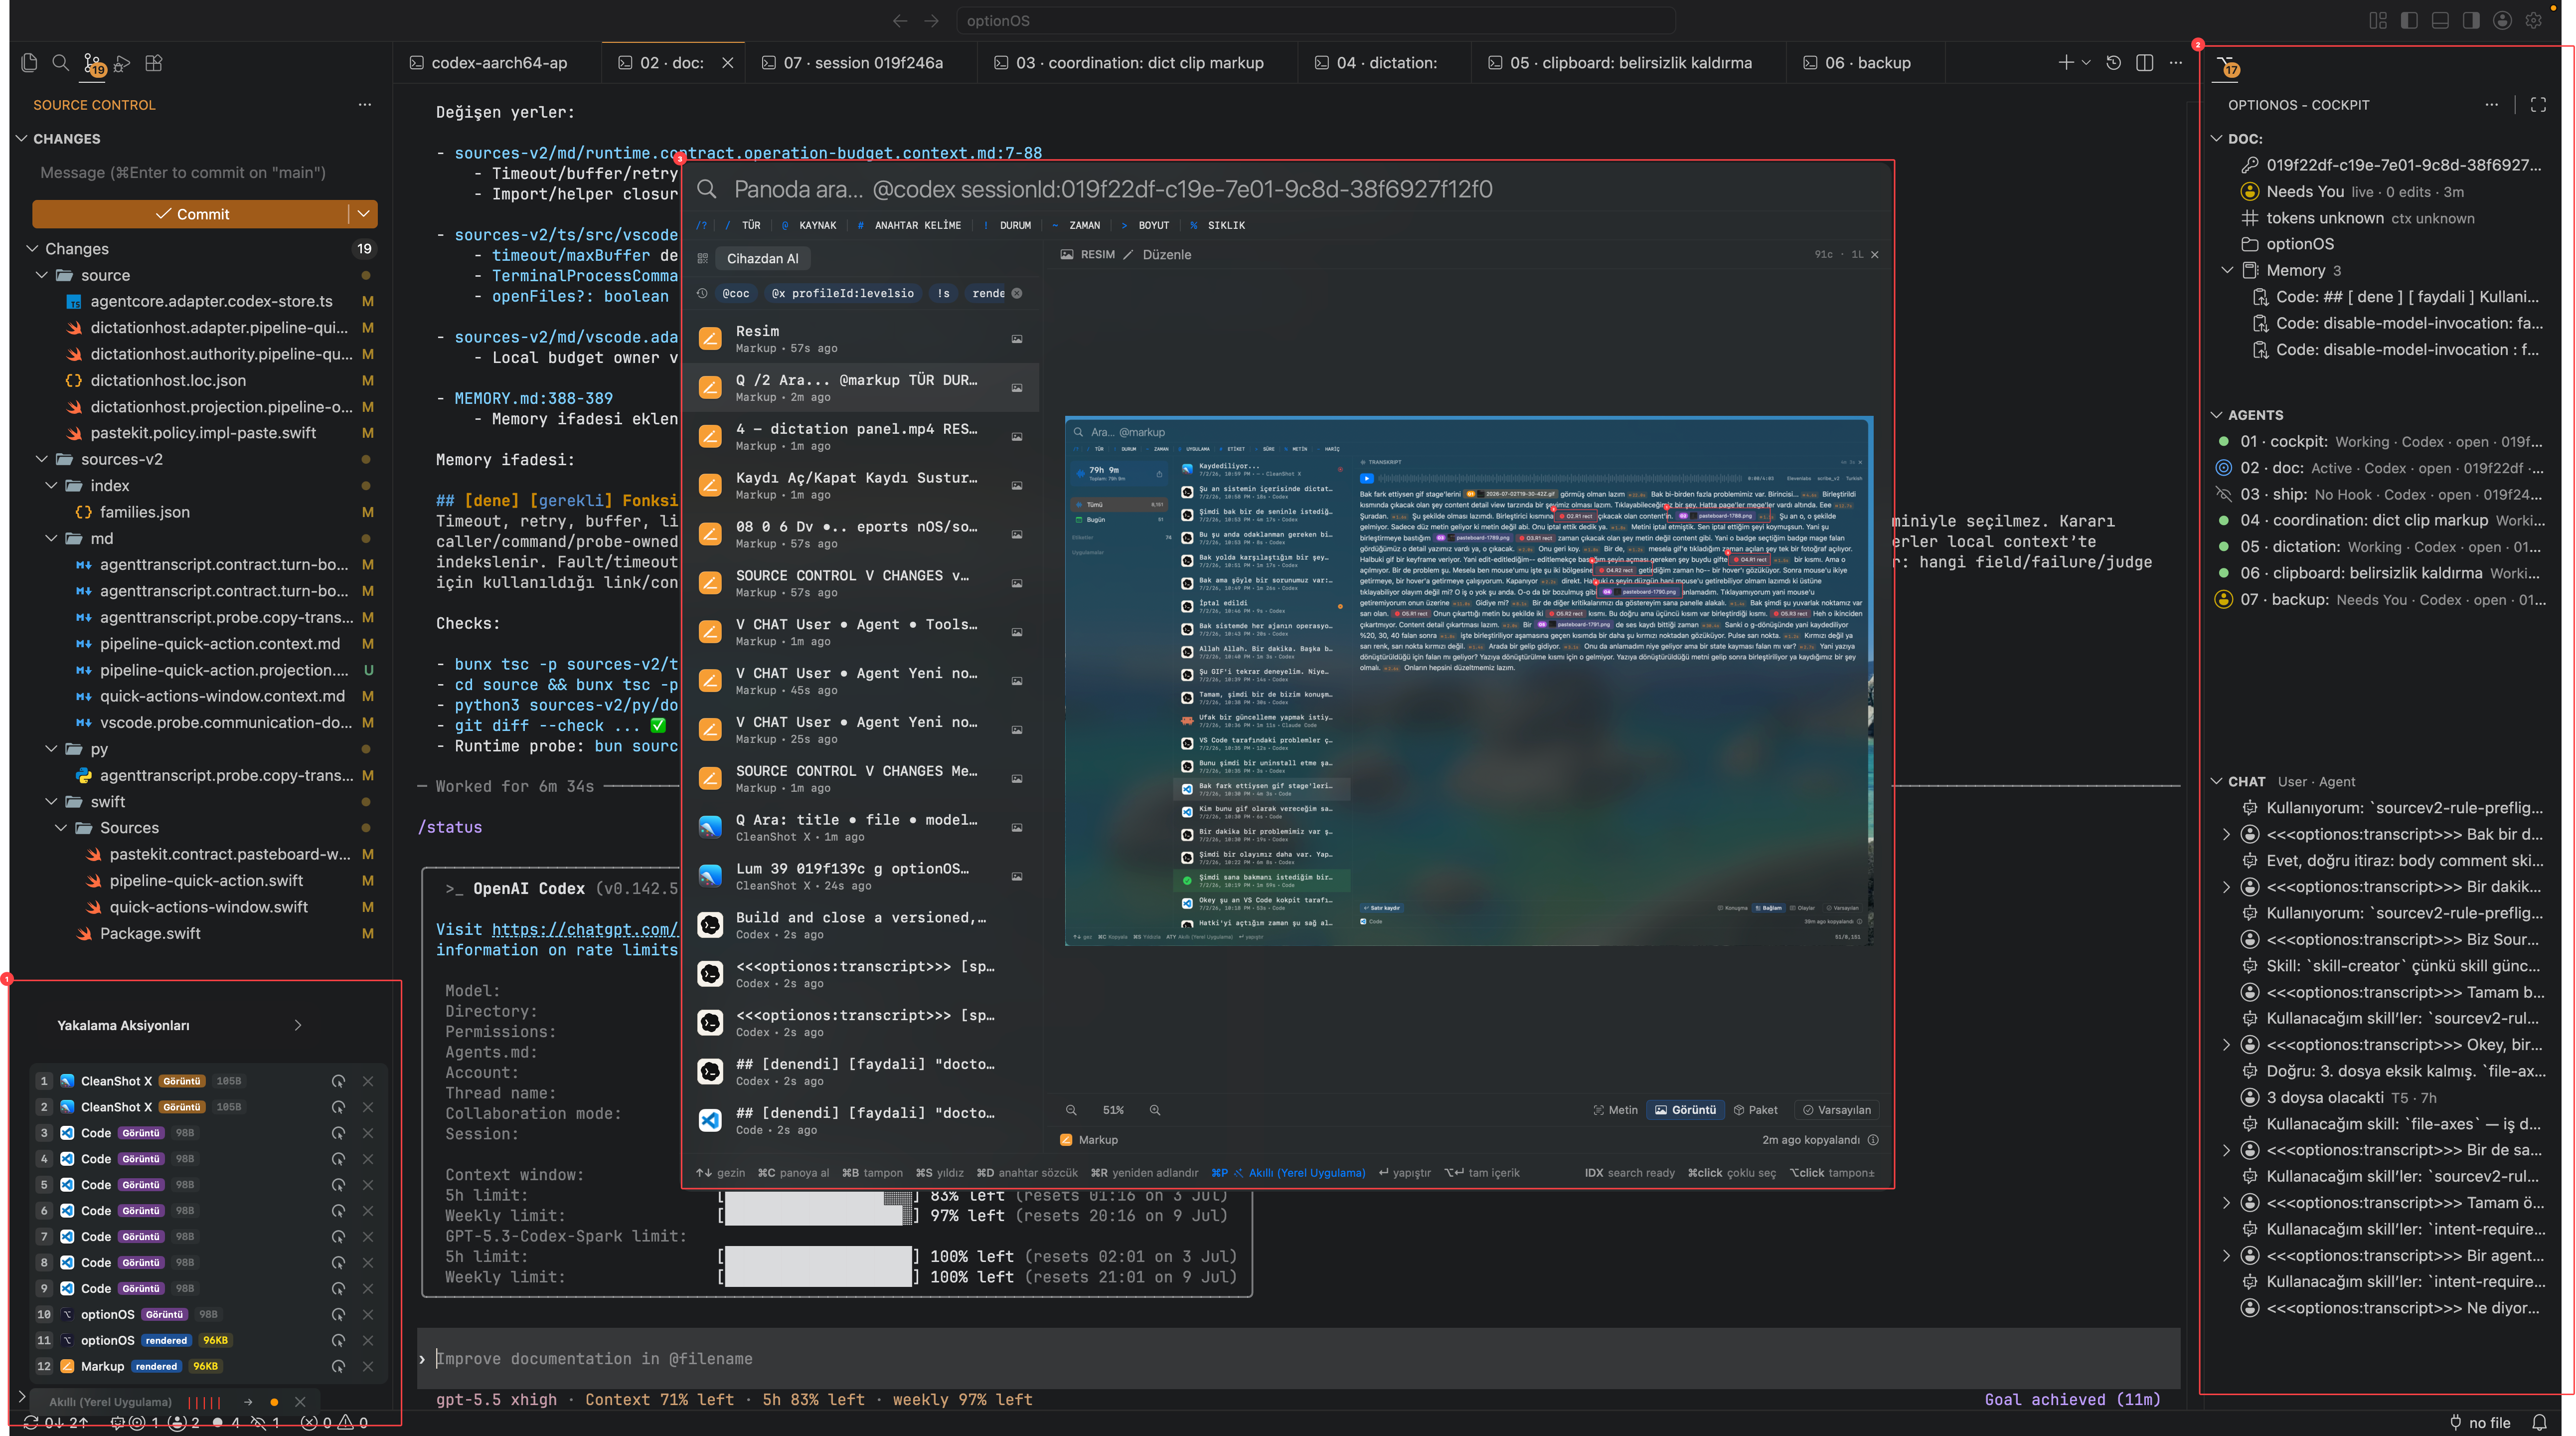
Bir çalışma ekranında Dictation yakalama aksiyonlarını, Clipboard/Pano içeriğini ve VS Code Cockpit panelini aynı anda görebilirsin. Bu düzen, “ne söyledim, ne kopyaladım, hangi agent bekliyor?” sorularını tek bağlamda toplar.
Dictation, Clipboard/Pano ve VS Code Cockpit aynı çalışma ekranında birbirini tamamlar.
1Dictation ve yakalama aksiyonları
2VS Code Cockpit paneli
3Clipboard/Pano çalışma yüzeyi
Mac Cockpit ve VS Code Cockpit aynı agent ailesini gösterir
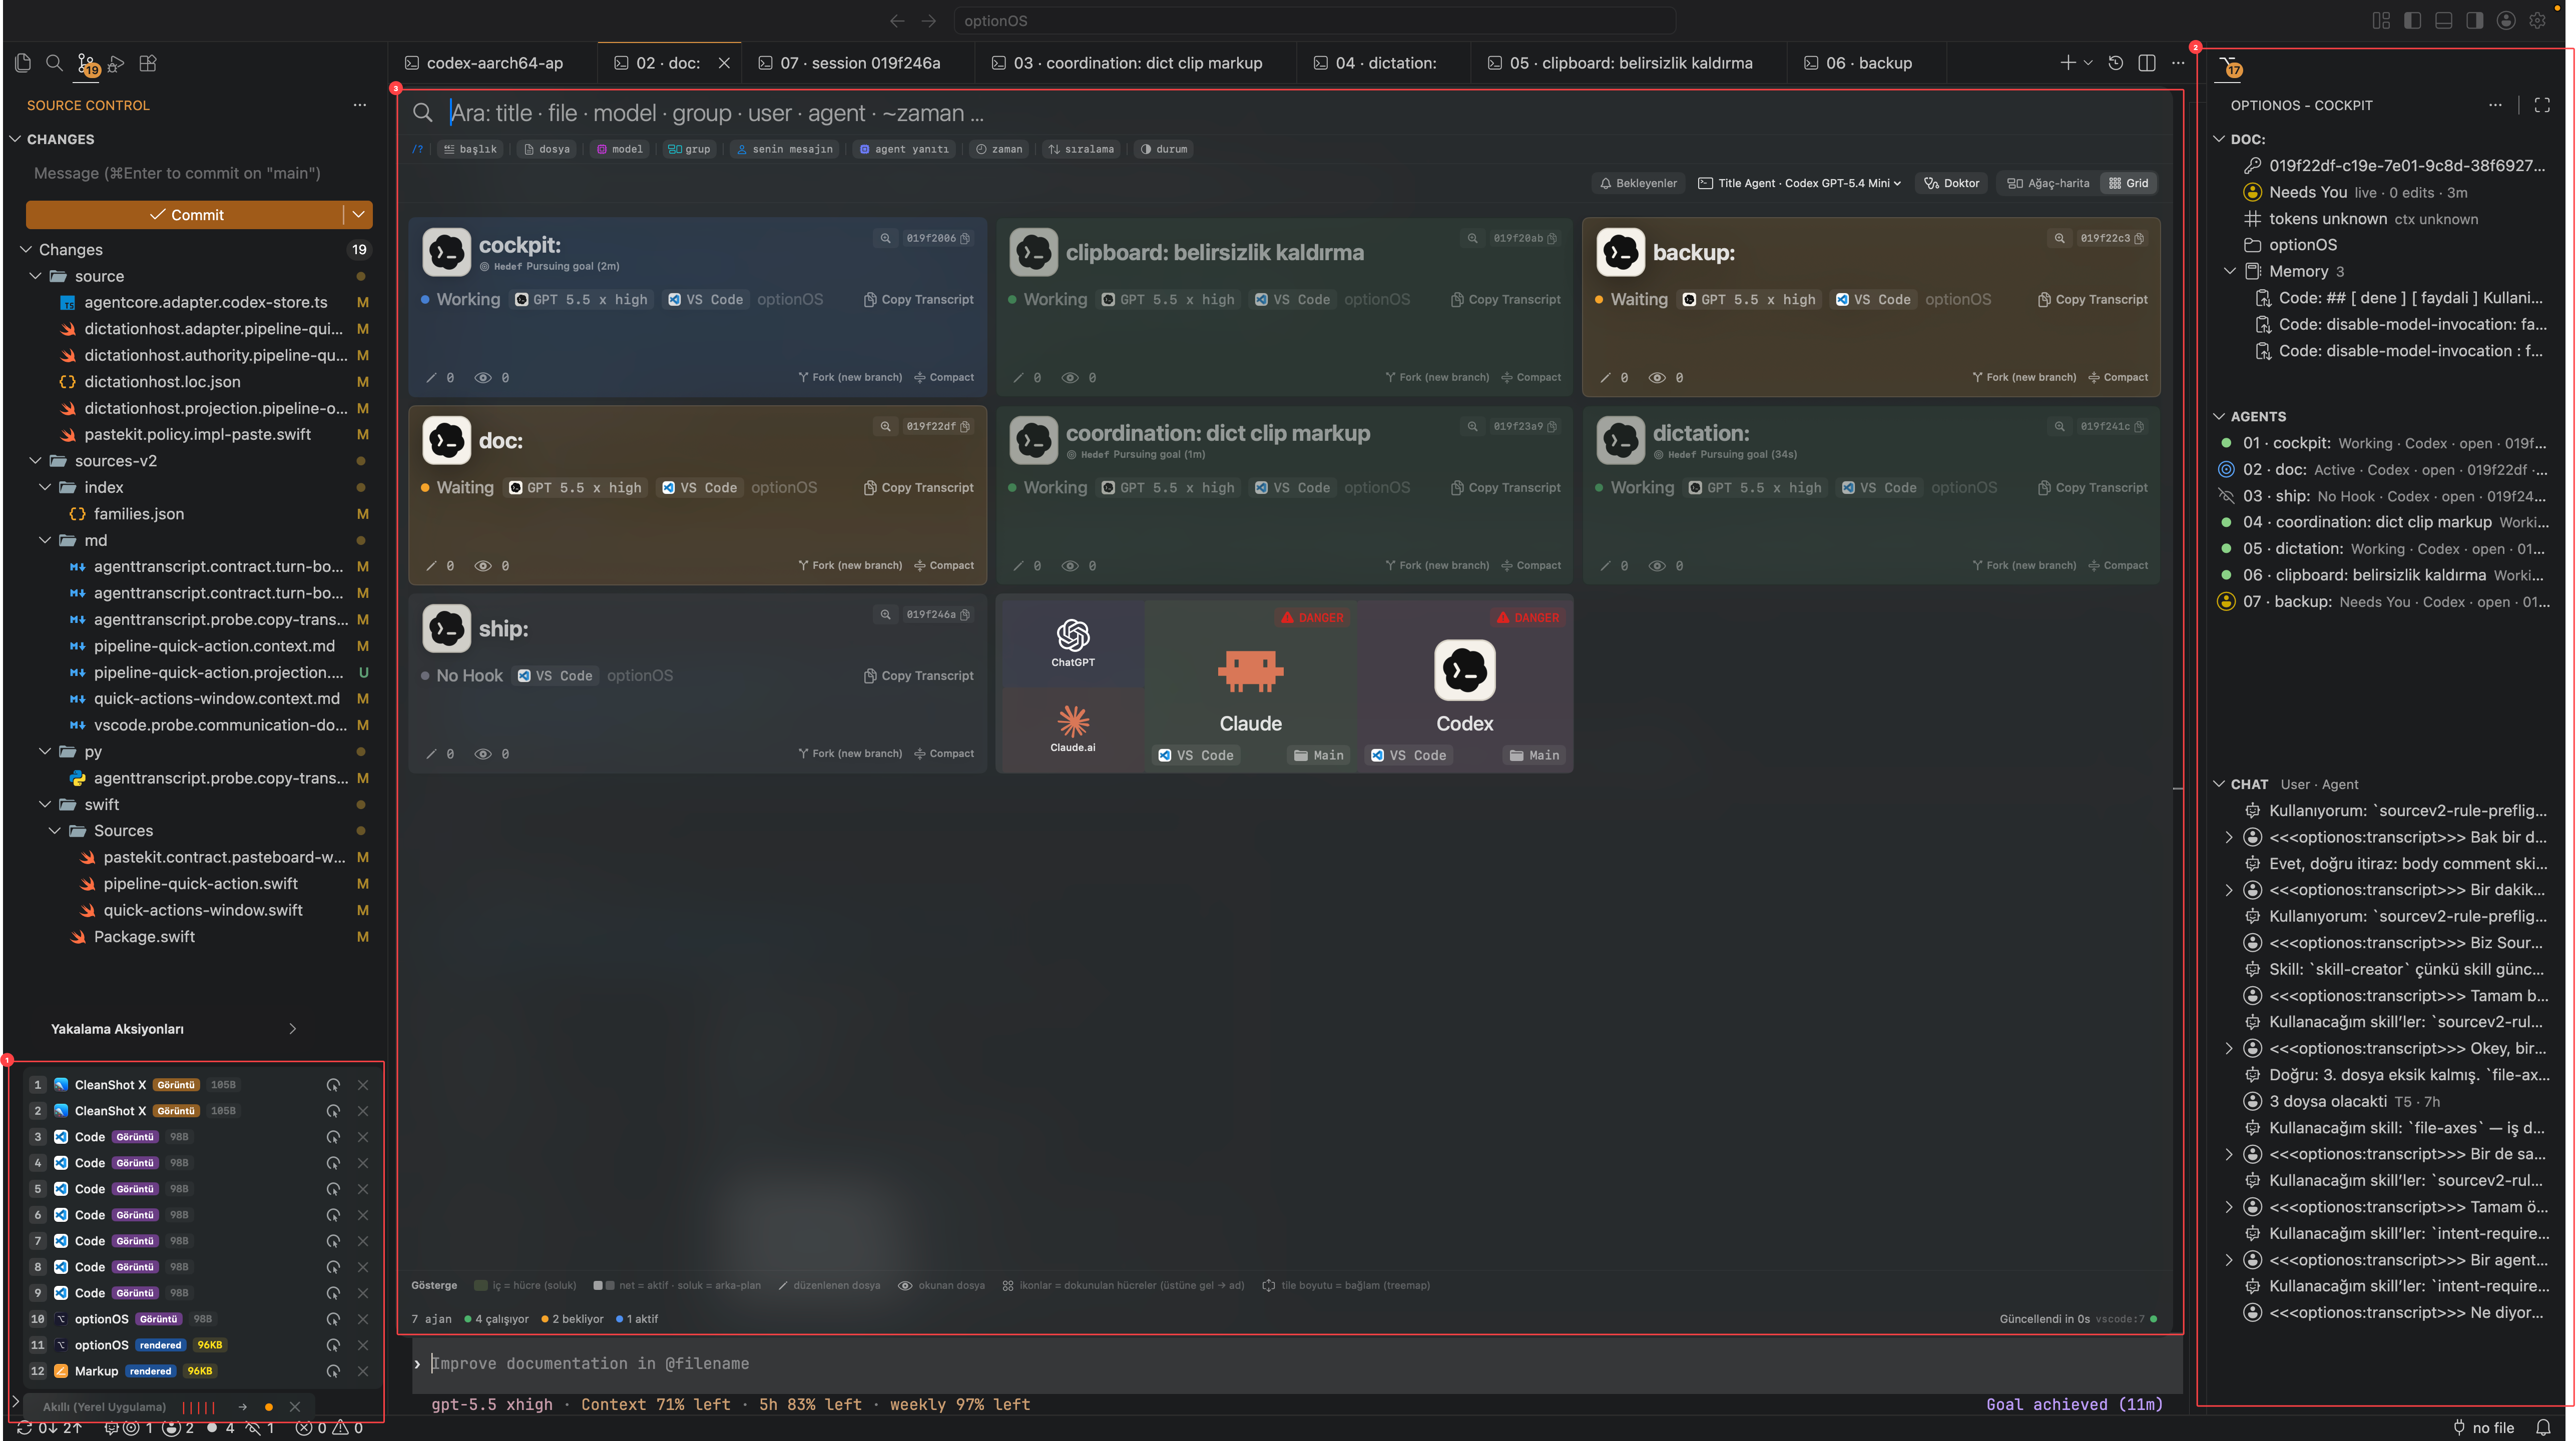
Mac Cockpit grid'i tüm agent oturumlarını geniş görünümde verir; VS Code Cockpit ise seçili workspace'in session, memory, agents ve chat bilgisini aynı editör içinde tutar. Dictation ve capture listesi bu iki yüzeye konuşma ve görsel bağlam sağlar.
Mac Cockpit grid'i ve VS Code Cockpit paneli, aynı agent ailesini iki farklı çalışma yüzeyinde gösterir.
1Dictation yakalama listesi
2VS Code Cockpit paneli
3Mac Cockpit agent grid'i
The optionOS ecosystem in one working surface
optionOS now reads less like separate tools and more like members of the same AI work ecosystem: Dictation carries speech and capture, Clipboard/Pano manages visuals and paste flow, and Cockpit watches agents on Mac and in VS Code.
Dictation, Clipboard and VS Code Cockpit together
In one working screen you can see Dictation capture actions, Clipboard/Pano content and the VS Code Cockpit panel at the same time. This layout keeps “what did I say, what did I copy, which agent is waiting?” in one context.
Dictation, Clipboard/Pano and VS Code Cockpit complement each other on the same working screen.
1Dictation and capture actions
2VS Code Cockpit panel
3Clipboard/Pano working surface
Mac Cockpit and VS Code Cockpit show the same agent family
The Mac Cockpit grid gives a wide view of all agent cards; VS Code Cockpit keeps the selected workspace's session, memory, agents and chat inside the editor. Dictation and the capture list supply speech and visual context to both surfaces.
The Mac Cockpit grid and VS Code Cockpit panel show the same agent family in two working surfaces.
1Dictation capture list
2VS Code Cockpit panel
3Mac Cockpit agent grid
v0.1.0
Rehberi kendi sayfasında aç; dilini değiştir veya tam adımı paylaş
Website v0.1 yayında. Her rehber artık Türkçe ve İngilizce için ayrı, doğrudan açılan bir sayfaya sahip. Dil düğmesi aynı rehberin diğer dildeki kardeş sayfasına götürüyor.
Bir rehberin içindekiler alanından sahneye ve numaralı adıma kadar ilerleyebilirsin. Rehberin tamamını göndermek zorunda değilsin: açık sahnenin veya seçili adımın bağlantısını kopyaladığında paylaştığın kişi doğrudan aynı yere gelir.
Bağımsız sayfalar sayesinde aradığın rehberi doğrudan açabiliyorsun; rehberler arama ve AI sistemleri tarafından da tek tek bulunabiliyor.
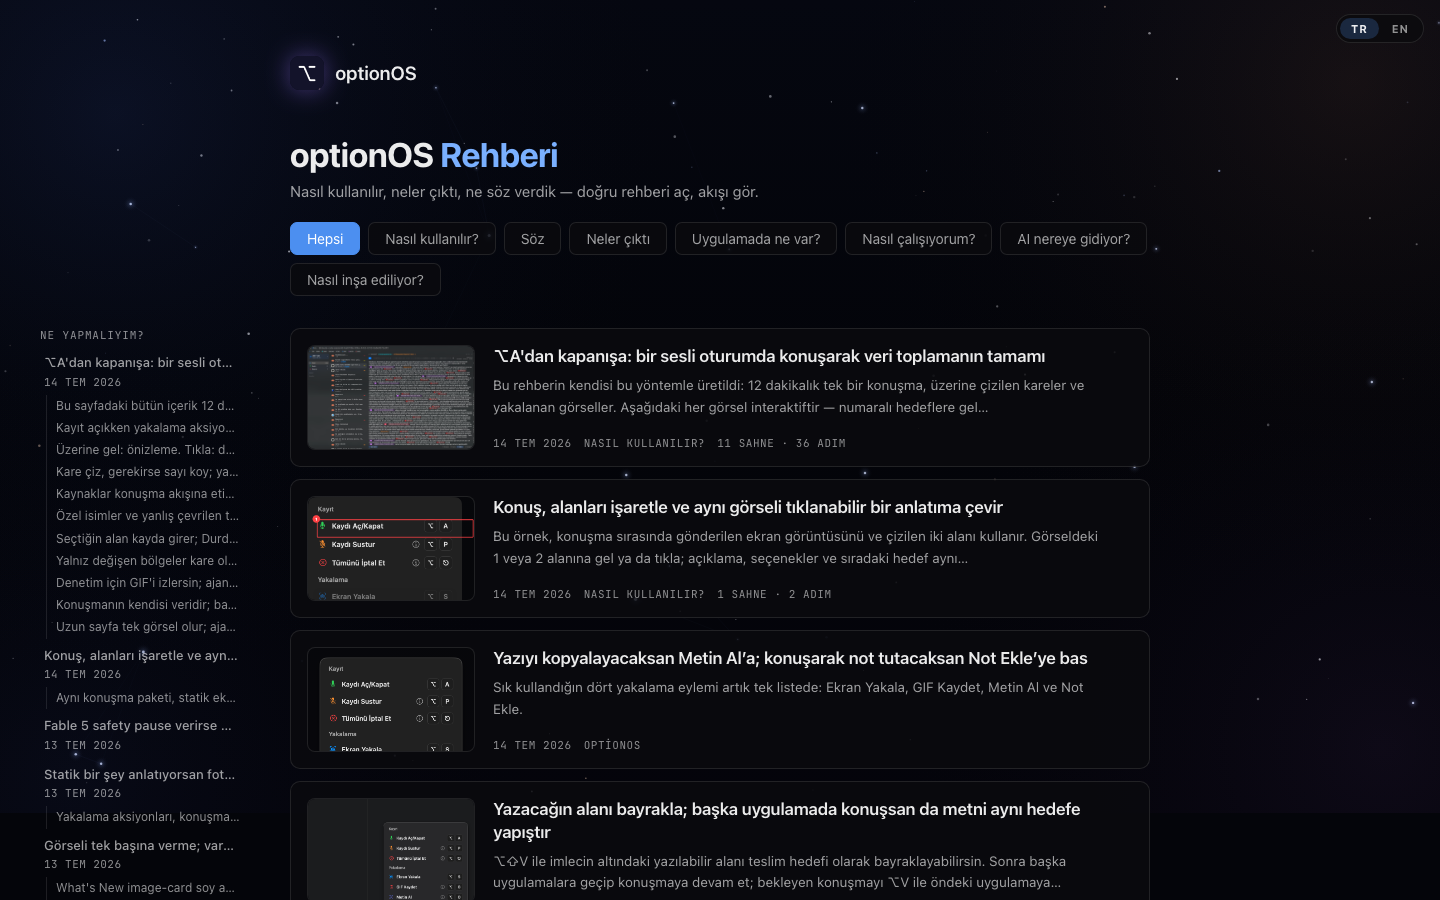
Aradığın rehberi içerik ağacından bul
Üstteki karar filtreleri hangi soruya cevap aradığını seçtirir. Soldaki içerik ağacı rehberleri, sahneleri ve adımları gösterir; ortadaki kartlar ise seçtiğin sonuca göre daralır.
Filtreler, içerik ağacı ve rehber kartları aynı bulma yüzeyinde.
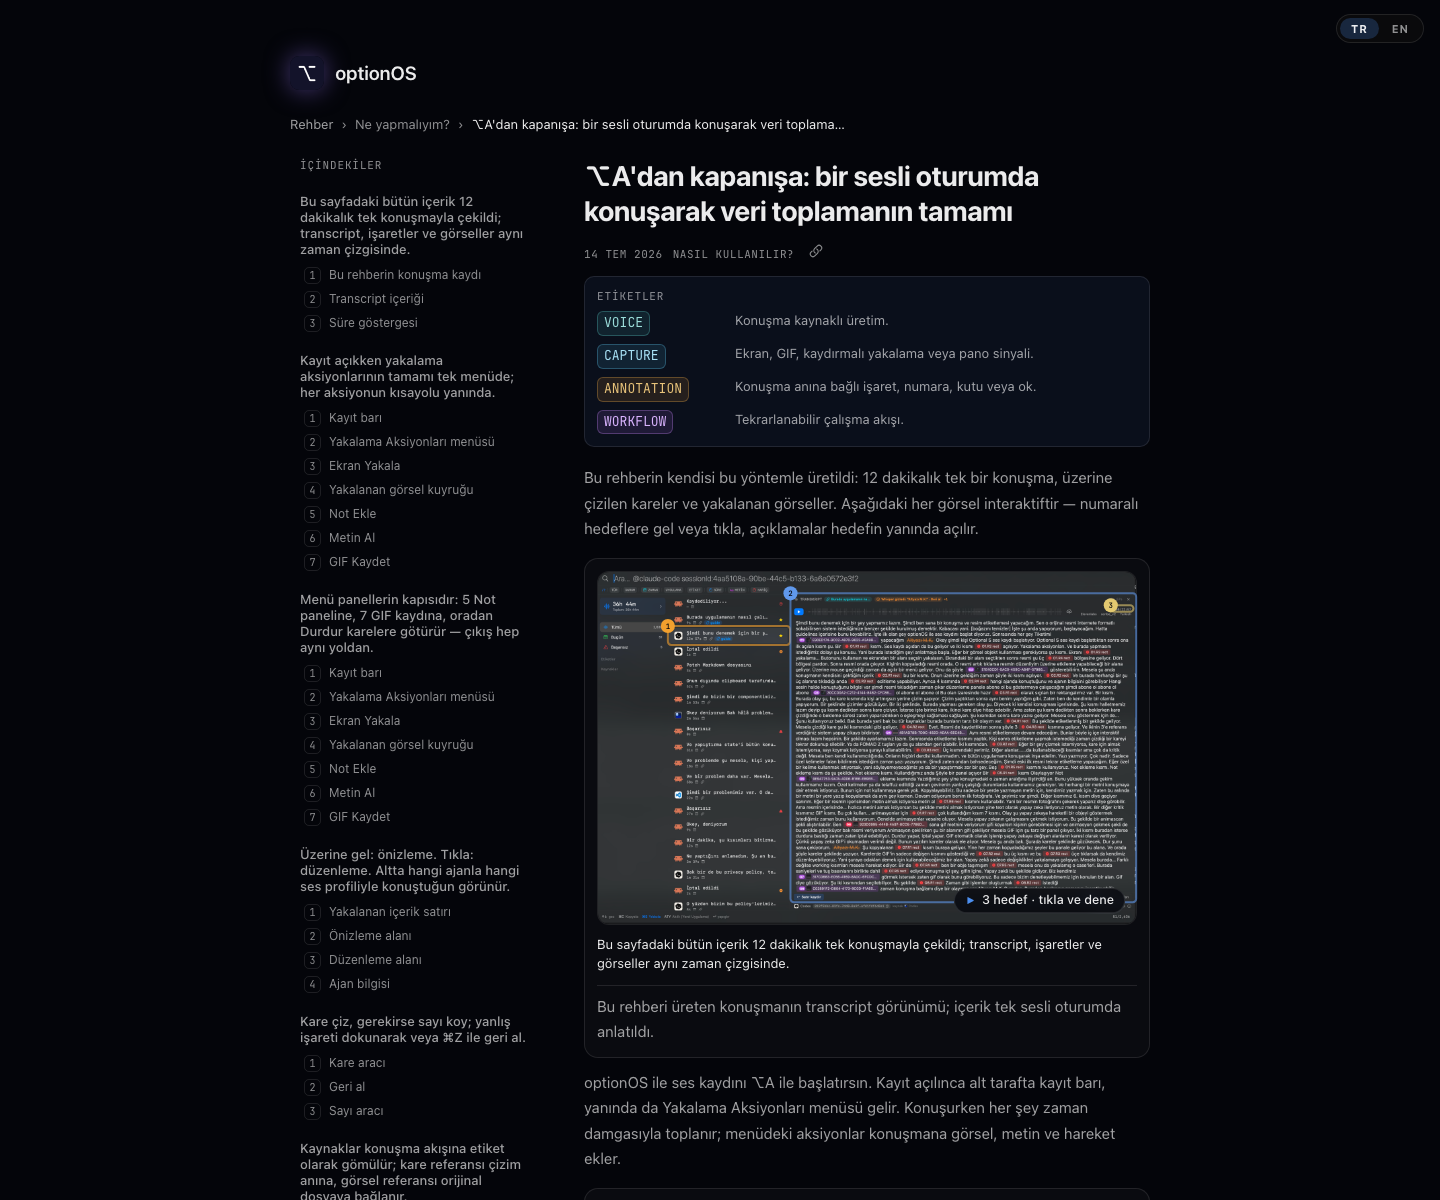
Rehberi okumakla kalma; sahneye ve tam adıma geç
Bağımsız rehber sayfasının içindekiler alanı sahneleri ve numaralı adımları doğrudan açar. Başlığın yanındaki bağlantı aksiyonuyla sayfayı; sahne ve adım bağlantılarıyla da baktığın kesin noktayı paylaşabilirsin.
İçindekilerden hedefe git; rehberi, sahneyi veya numaralı adımı doğrudan aç.
Open a guide on its own page; switch language or share the exact step
Website v0.1 is live. Every guide now has a directly accessible page in Turkish and English. The language control moves to the sibling page for the same guide.
Use a guide's contents to move from the scene to a numbered step. You do not have to send the entire guide: copy the link for the open scene or selected step and the person you share it with lands in the same place.
Standalone pages let you open the guide you need directly and allow search and AI systems to discover each guide individually.
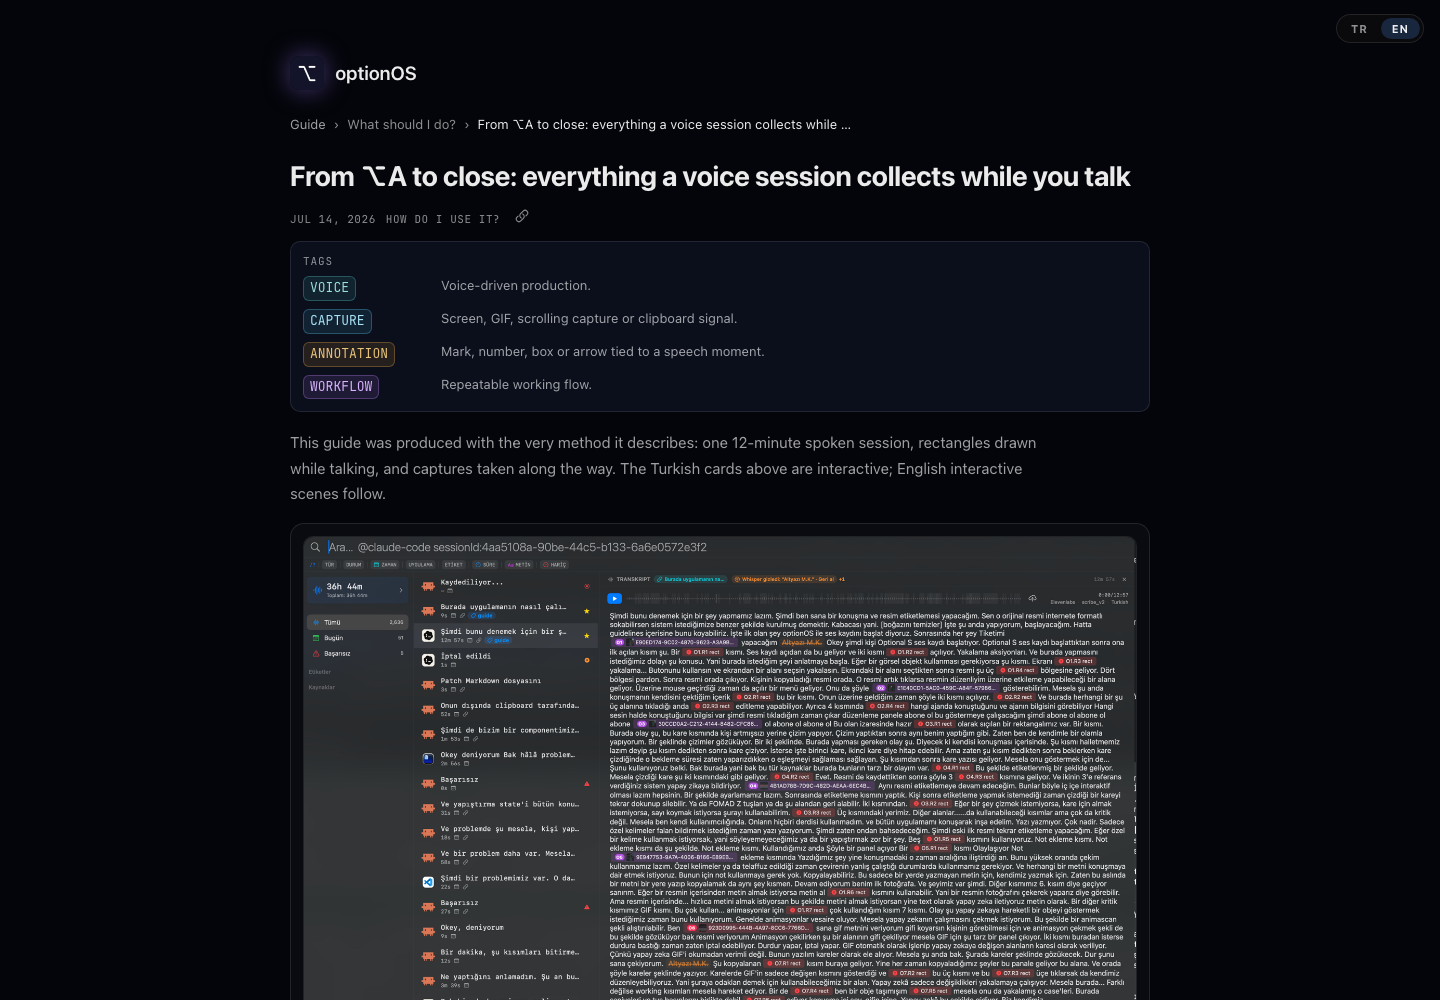
Switch language and stay with the same guide
The TR and EN controls open independent sibling pages for the same guide. The page keeps its own title, tags, permanent link, and content instead of mixing both languages into one reading surface.
Select EN to open the same guide as a clean, independent English page.
Numaralı alanı seç; görsel odaklansın, açıklama yanında açılsın
Rehberdeki tek görsel artık konuşma sırasında işaretlenen alanları tıklanabilir adımlara dönüştürüyor. Her adım doğru bölgeyi öne çıkarıp açıklamasını yanında açıyor; özelliğin akışını uzun bir metin okumadan aynı görsel üzerinde takip ediyorsun.
Sıraya bağlı değilsin: soluk hedeflerden istediğine tıklayabilir, ← ve → ile geri ya da ileri gidebilir ve son adımdan genel görünüme dönebilirsin. Sayfa seçtiğin alana yaklaşırken işaretler ve kontrol yüzeyi okunur boyutta kalır.
İçerik de konuşmayla oluşuyor: anlatırken alanı işaretliyoruz, web sitesi sözü ve görseli aynı adımda birbirine bağlıyor. Böylece yeni bir özelliği ayrı bir uzun anlatı yerine tek, odaklı bir görselle aktarabiliyoruz.
Numarayı seç; ilgili alanı ve açıklamasını birlikte gör
Görseldeki numaralar arasında ilerlediğinde odak doğru alana taşınır ve o adımın açıklaması yanında açılır. Aynı ekran içinde hem nereden söz edildiğini hem de ne yapacağını görürsün; istersen sırayı izler, istersen başka bir hedefe doğrudan geçersin.
Bir numarayı seçtiğinde görsel ilgili alana odaklanır ve o adımın açıklamasını yanında açar.
Tek konuşma, bütün rehber

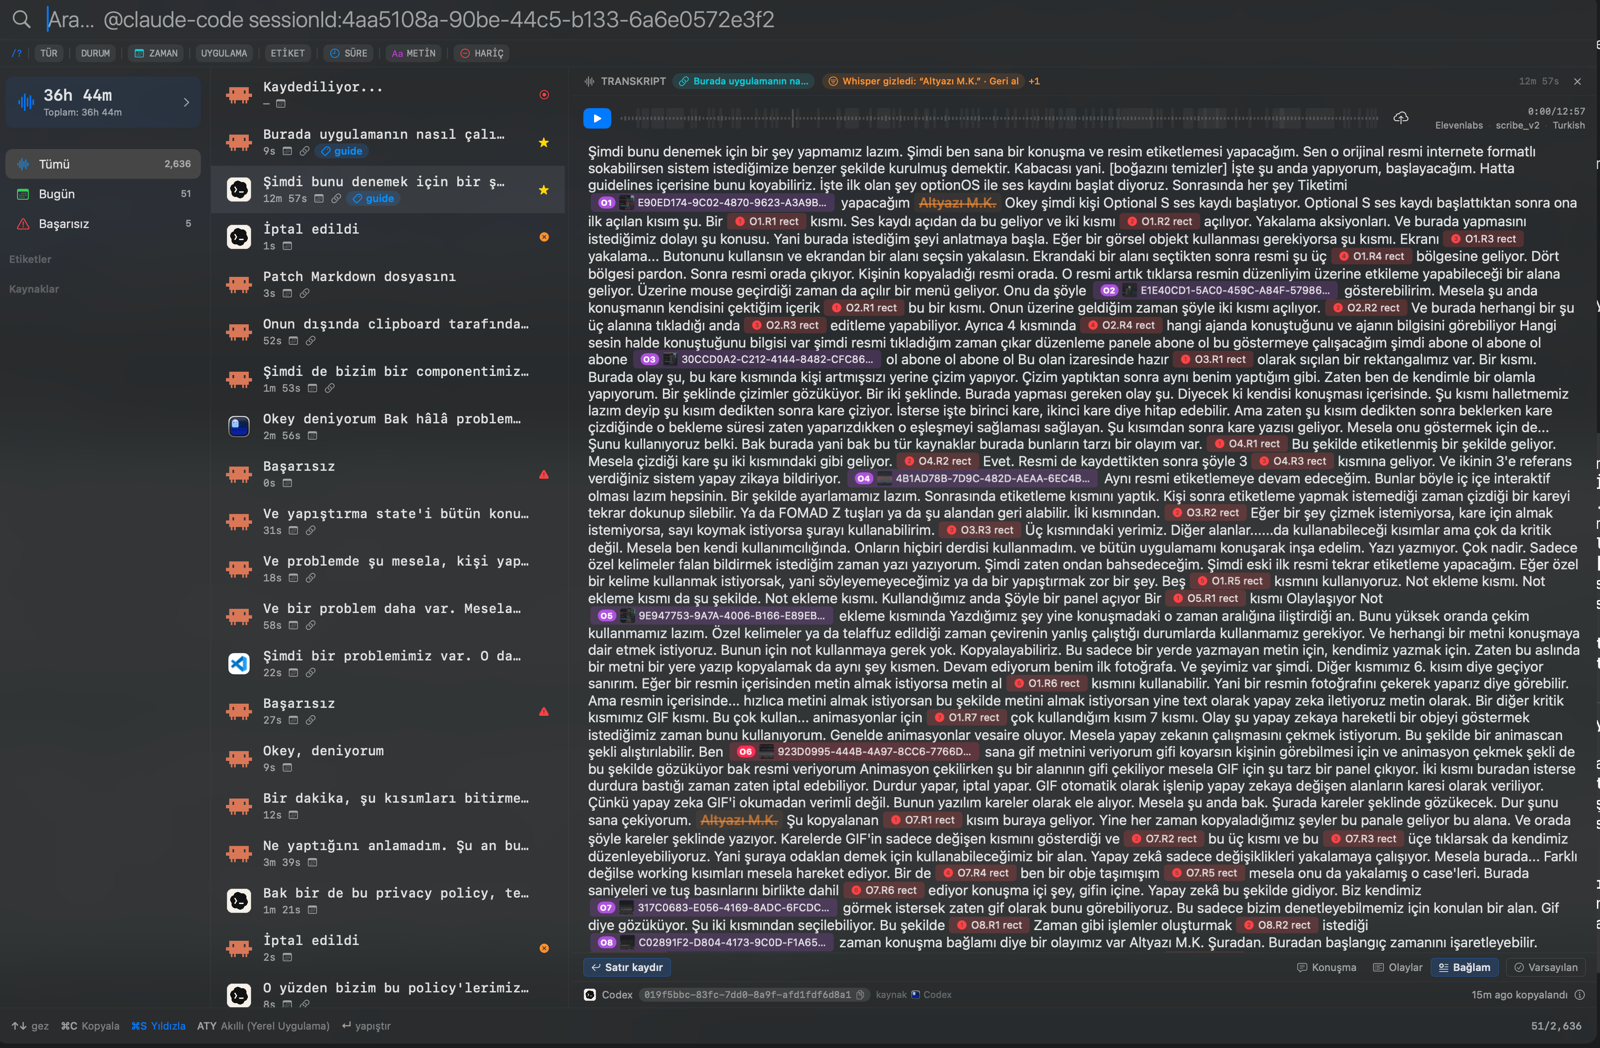
Yaklaşık 12 dakikalık gerçek bir sesli oturum; transkript, konuşurken yakalanan görseller, çizilen işaretler, GIF ve dosya referanslarıyla birlikte tek rehbere dönüştü. Rehberi açtığında yalnız sonucu değil, anlatımın hangi kanıtlarla kurulduğunu da aynı akışta görürsün.
Gerçek oturum; konuşma, görseller ve işaretler aynı zaman çizgisindeyken rehbere dönüştürüldü.
Select a numbered area; let the visual focus and open its explanation beside it
A single Guide visual now turns the areas marked during a spoken explanation into clickable steps. Each step focuses the right region and opens its explanation beside it, so you can follow how a feature works on one visual instead of reading a long block of text.
You are not locked into the sequence: select any dimmed target, move backward or forward with ← and →, and return to the overview after the final step. The page moves closer to the selected area while keeping markers and controls readable.
The content is created through speech too: we mark an area while explaining it, and the website connects the words and the visual in the same step. This lets us explain a new feature with one focused visual instead of a separate wall of text.
Select a number to see the relevant area and explanation together
Move between the numbered areas to shift focus to the right place and open that step's explanation beside it. You see both what the explanation refers to and what to do without leaving the screen; follow the sequence or jump directly to another target.
Select a number to focus the relevant area and open that step's explanation beside it.
One conversation, the complete guide
A real spoken session of about 12 minutes became one guide with its transcript, captured visuals, drawn marks, GIF, and file references intact. Open it to see not only the result, but also the evidence that shaped each part of the explanation.
The Turkish walkthrough exposes its marked areas as interactive targets; the English companion page carries the same lesson with static cards.
A real session became a guide while its speech, visuals, and marks remained on the same timeline.