optionOS optionOS

What’s New

Every visible change, as it ships.

Unreleased

Mac

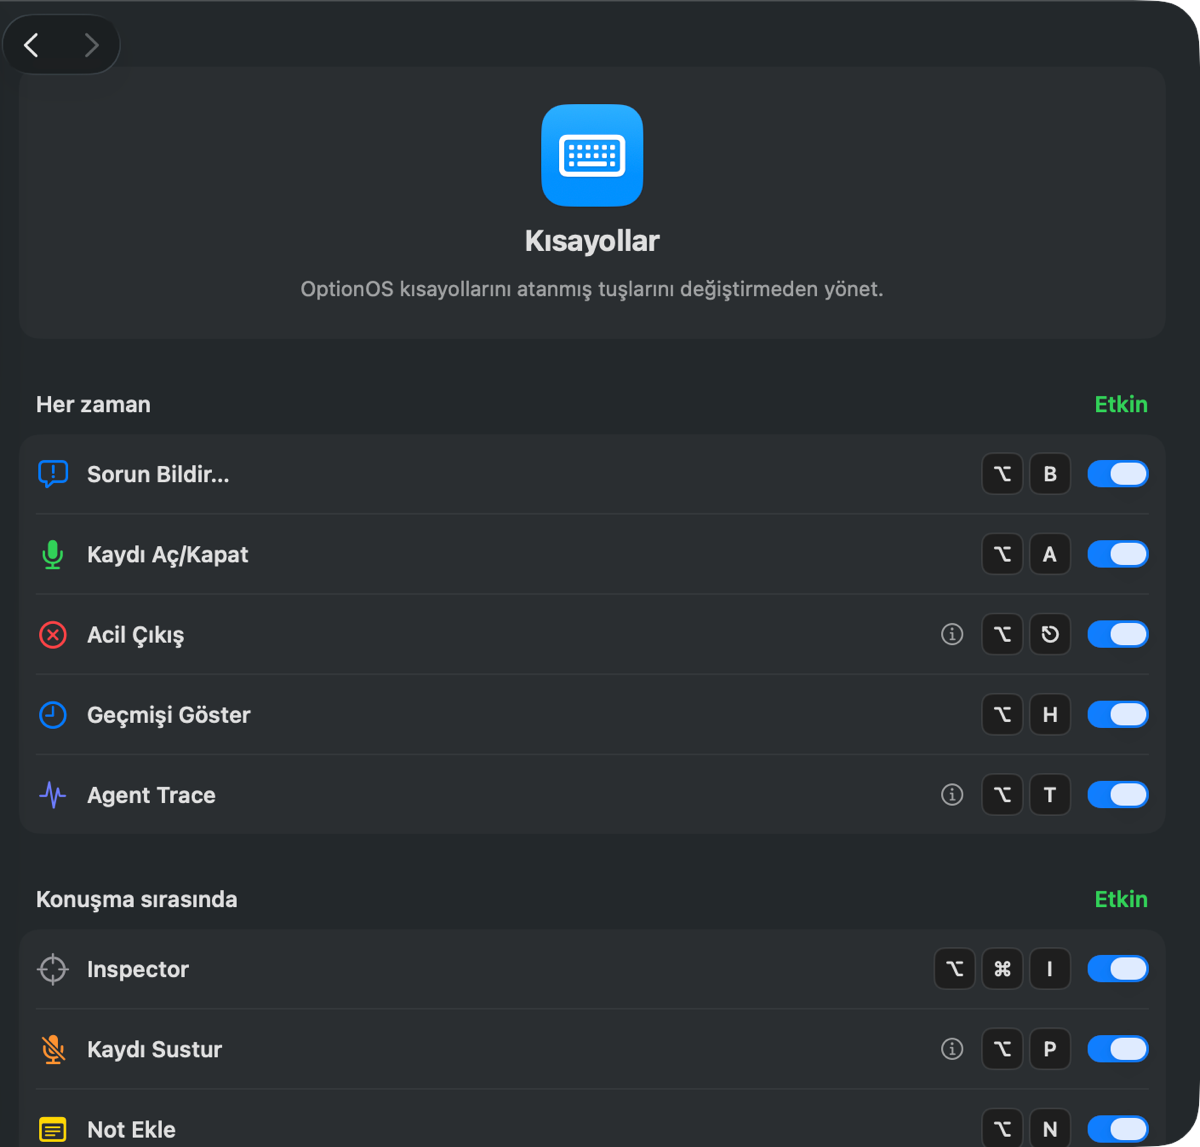
Open Shortcuts from Settings and see when each one works from its category

Shortcuts now live on one Settings surface. Each row shows the action, assigned keys, and enabled state, while its category tells you whether it works at all times, during a conversation, or in tools used outside a conversation or session.

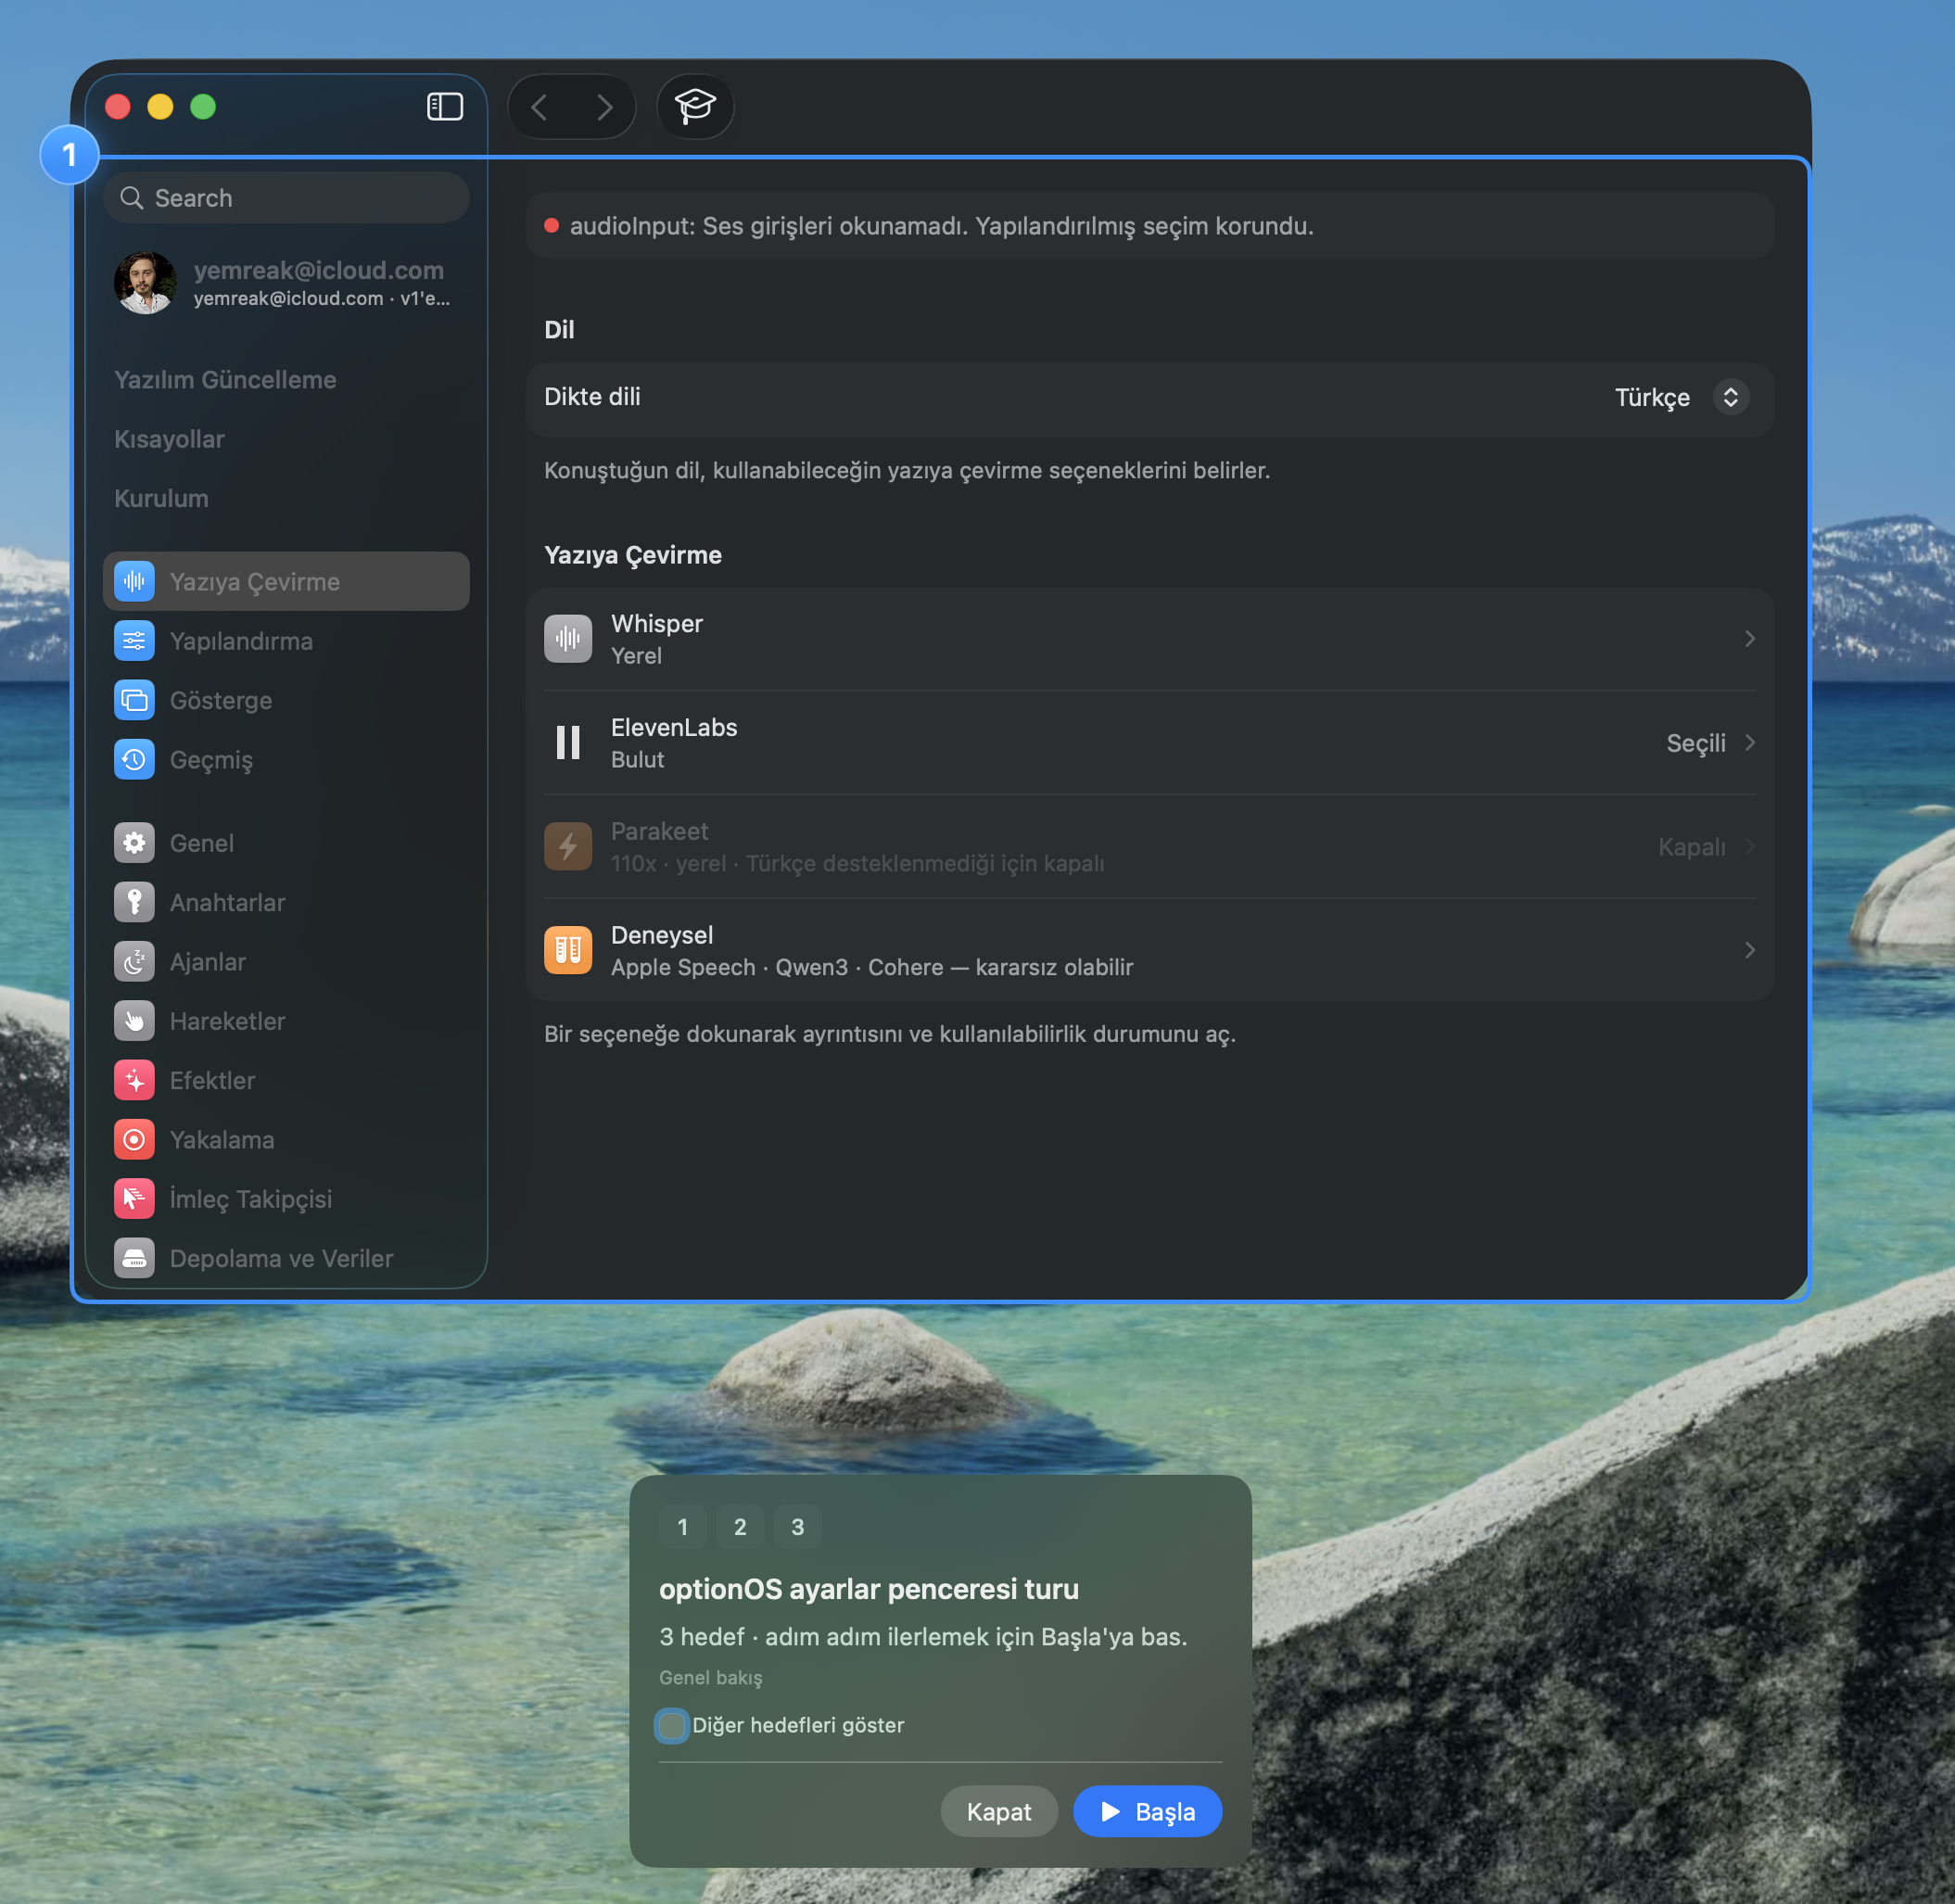
Open Shortcuts and continue to conversation-only actions in one flow

The Always and During conversation groups make each shortcut’s usage condition visible in the list. The first two steps open Shortcuts and show the complete list; the next two continue to conversation-dependent actions and Paste Pending Speech, which is available only while a conversation exists.

optionOS Shortcuts settings showing Always and During conversation groups with actions, assigned keys, and enable controls Shortcuts section in SettingsAll shortcuts and their usage contexts
·

Open Shortcuts from Settings
Open Shortcuts in 1–2, then continue to the conversation group and ⌥V in 3–4.
Mac

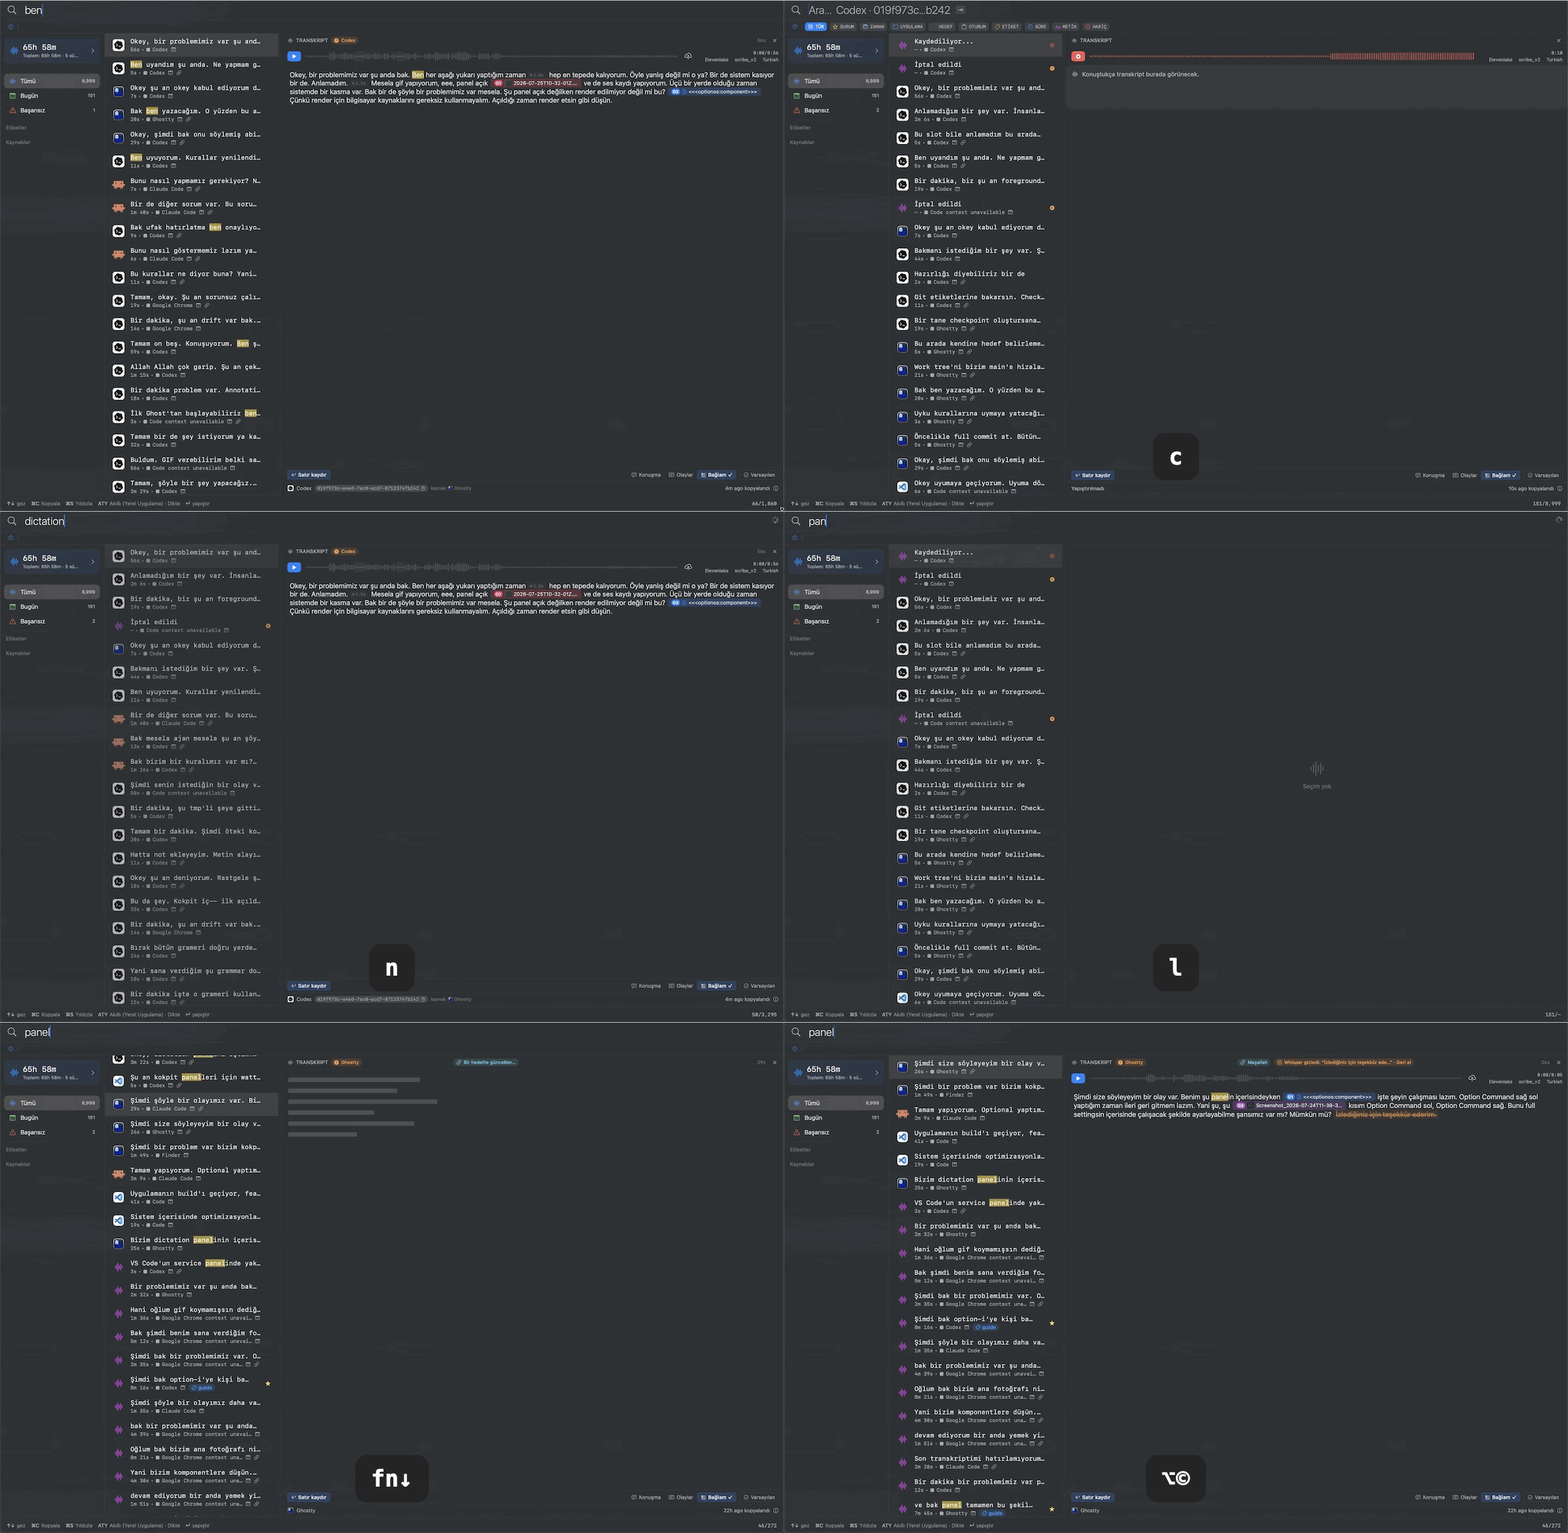
Type the start of a word; find the right recording and every transcript match together

Type a beginning such as si, and optionOS suggests a matching search token such as signal. Once selected, matches are highlighted both in the recording list and inside the open transcript.

Type the start of a word and select the matching search token

Type a beginning such as si, and optionOS suggests a matching search token such as signal. Select the suggestion to continue the search with that meaning.

The signal token being suggested as si is typed in optionOS voice-recording search and the results update
Type the start of a word to get a matching search token and update the results with your selection.

See which recording matches and where the phrase appears in its transcript

The selected search finds matching recordings in the list and highlights every occurrence inside the open transcript at the same time. You can identify the right recording and the phrase’s location in one search.

The query, a matching recording-list row and highlighted matches inside the optionOS transcript Typed text and suggested search tokenMatch in the recording listMatches inside the transcript
·

Typed text and suggested search token
One search shows both the matching recording and every occurrence inside its transcript.
Mac

Images prepare faster, language issues are fixed, and long conversations feel smoother

This release improves media delivery, Turkish–English text, and long-session performance together.

Lighter images. Large images are resized before delivery. GIF preparation uses frame and width budgets for the selected quality and runs separately from the main interface work.

More consistent language. Missing or mismatched Turkish and English action and status text has been completed.

Smoother long conversations. Long-transcript rendering now scales, while media processing and heavier observation work move into the background to block the interface less often.

Mac

Flag the field first, then paste back to it even after speaking in another app

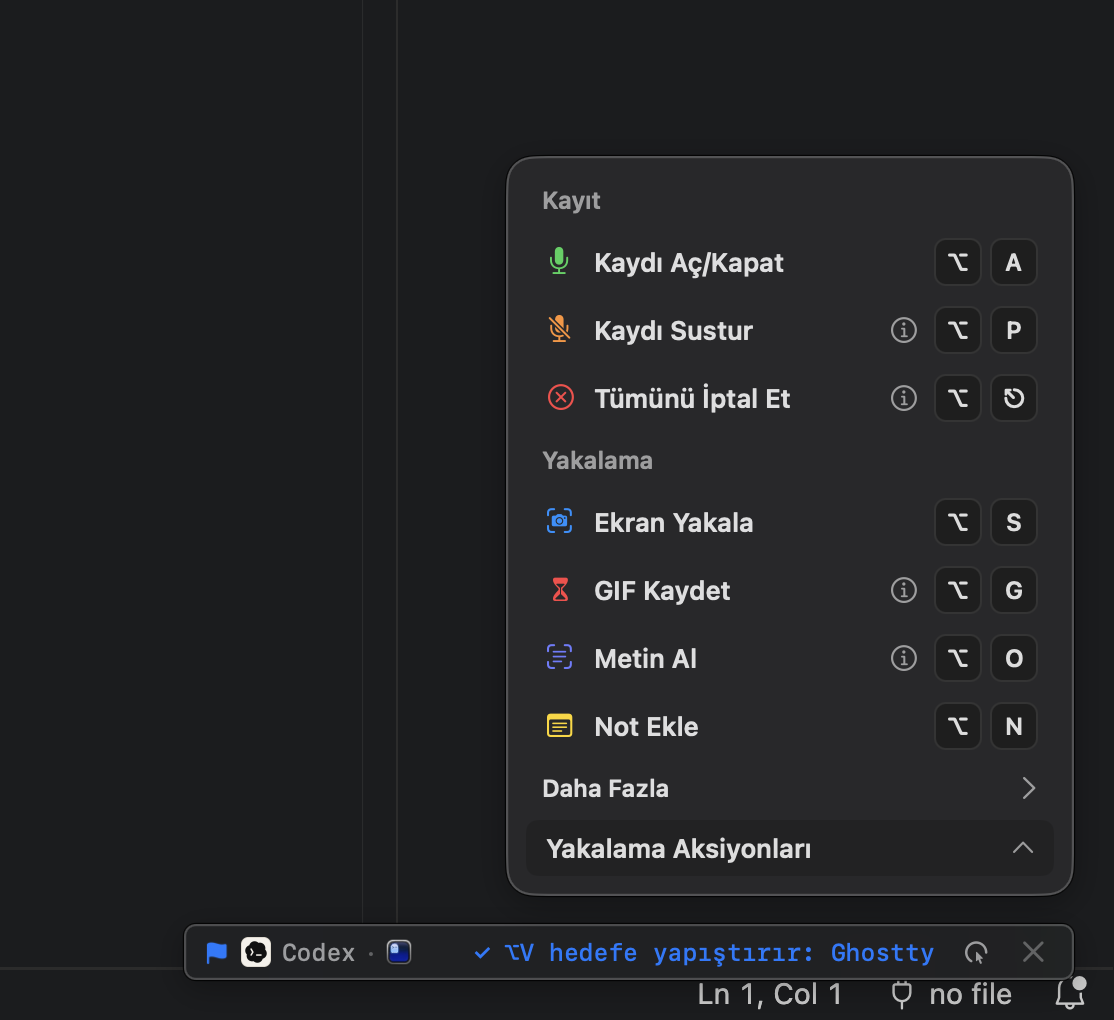
Press ⌥⇧V over a writable field to flag it as the delivery target. You can move through other apps while speaking, then press ⌥V to paste the pending dictation into the flagged field instead of the frontmost app.
Flag the destination once, then move between apps while you speak

The flag keeps the destination field fixed while you work elsewhere. The bottom bar shows the target app and the ⌥V delivery action, so you do not lose where the dictation will go when several apps or agents are open.

The optionOS bottom bar showing a flagged Ghostty delivery target and the Option V paste-to-target message
The flag and target app remain visible in the bottom bar; `⌥V` delivers pending dictation to that field.
Mac

Use Capture Text to copy words on screen; use Add Note to start a spoken note

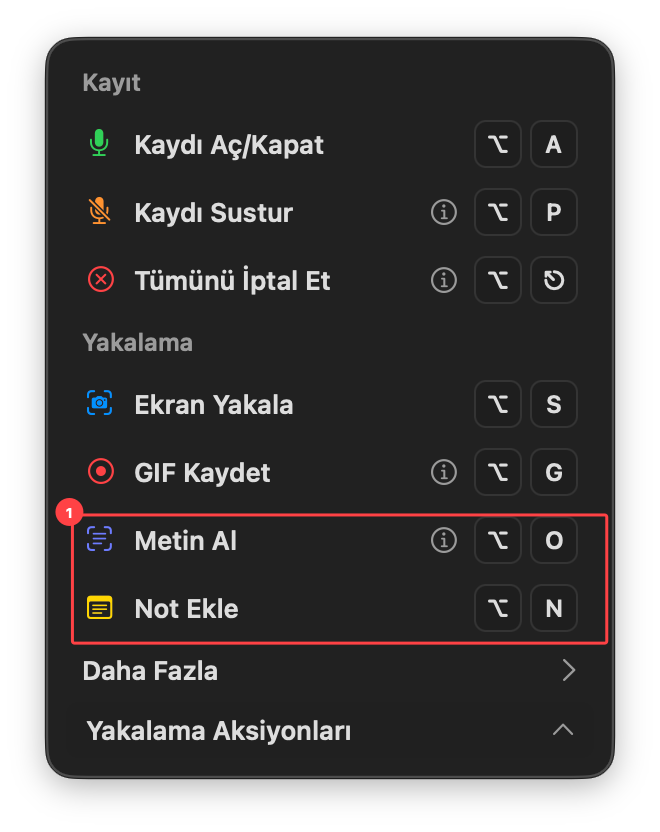
Your four frequent capture actions now share one list: Screen Capture, Record GIF, Capture Text, and Add Note.

Capture Text and Add Note now appear in the primary Capture menu

Use Capture Text to select an area and copy the recognized words. Use Add Note to start a note directly from speech; both actions now appear beside Screen Capture and Record GIF.

Capture Text and Add Note appearing beside Screen Capture and Record GIF in the primary optionOS Capture menu Capture Text and Add Note moved into the primary menu
·

Capture Text and Add Note moved into the primary menu
Capture Text and Add Note can now be selected from the primary Capture menu without opening More.
Mac

Speech flow and the source of captured content are now visible

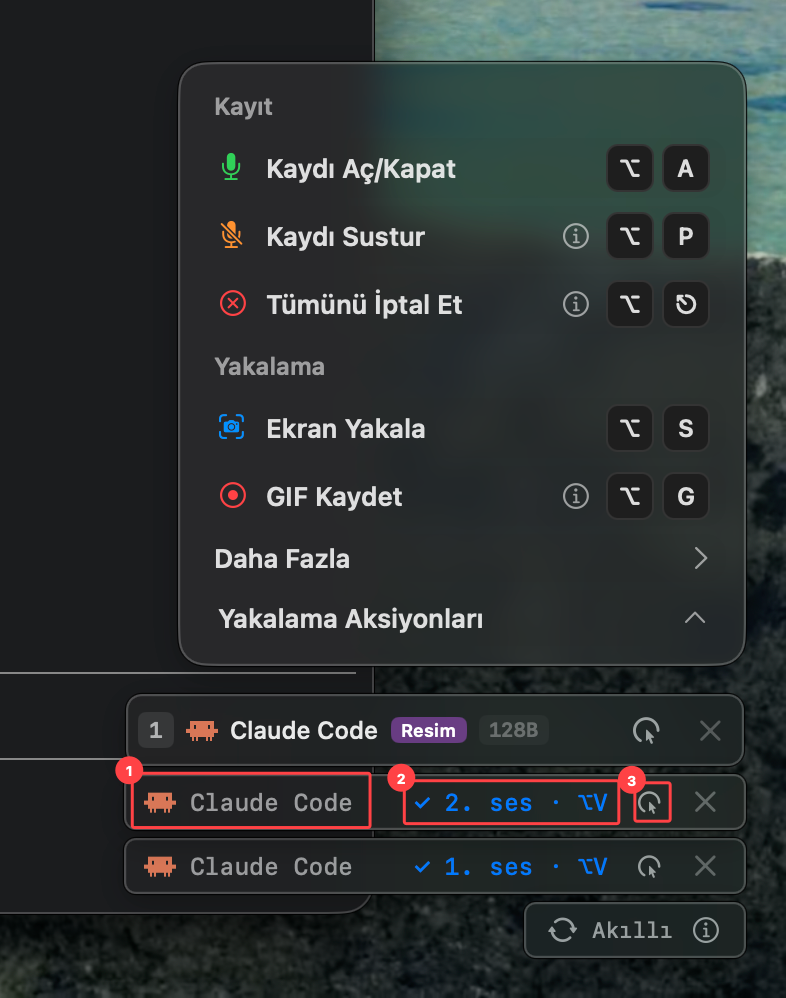
optionOS now shows conversation order, the current word during playback and the source of captured content directly. The terminal agent and voice turns remain separate targets, the played word advances through the transcript, and a captured agent or file appears with the app it came from.

The terminal agent and every voice turn have separate rows

The terminal agent keeps its own identity, while each conversation turn is separated as voice 1 or voice 2. Click the editing action beside a voice turn to open and edit that voice in the editor. The bar stays simpler, and the action you want no longer sits behind a combined intermediate layer.

The optionOS bar showing a Claude Code terminal agent, separate voice 1 and voice 2 rows, and the voice editing action Terminal agent — the detected agent identity has its own rowVoice turn — voice 1 and voice 2 are separate targetsEdit — opens the selected voice in the editor
·
Terminal agent

the detected agent identity has its own row

Terminal agent — the detected agent identity has its own row
The terminal agent, conversation order and editing action are now readable as separate targets in the same bar.

The transcript follows each word while a recording plays

When you play a voice recording, the word you are hearing is highlighted in the transcript. The highlight advances word by word with playback, so you do not lose your place in the text during a long conversation.

Blue highlight following the currently spoken word in the optionOS transcript player
As audio advances, the transcript highlight follows the word being heard.

A terminal agent appears with its source app

When optionOS captures an agent running in Ghostty, the agent identity and terminal source appear in the same row. You can read which terminal session the captured agent came from directly in the panel.

Agent session in Ghostty and an optionOS capture row showing Codex with its Ghostty source Agent session in the terminalAgent identity and Ghostty source
·

Agent session in the terminal
The captured agent appears with its identity and source terminal app.

A captured file appears with its name and editor

Content captured from VS Code appears in the same row as its filename and VS Code source. Markdown, Package.swift and JSON filenames carry the same source relation. For now this information is visible only in the interface; it is not sent to AI as additional file context.

The open 13-july.md file in VS Code and an optionOS capture row showing the filename with its VS Code source File open in VS CodeFilename and VS Code source
·

File open in VS Code
A captured file appears with its name and the editor it came from.
Mac

Stop choosing a paste format; optionOS now selects it for the target app

You no longer need to read a separate format card or choose a mode before pasting.
The separate format card is gone; pasting follows the target app

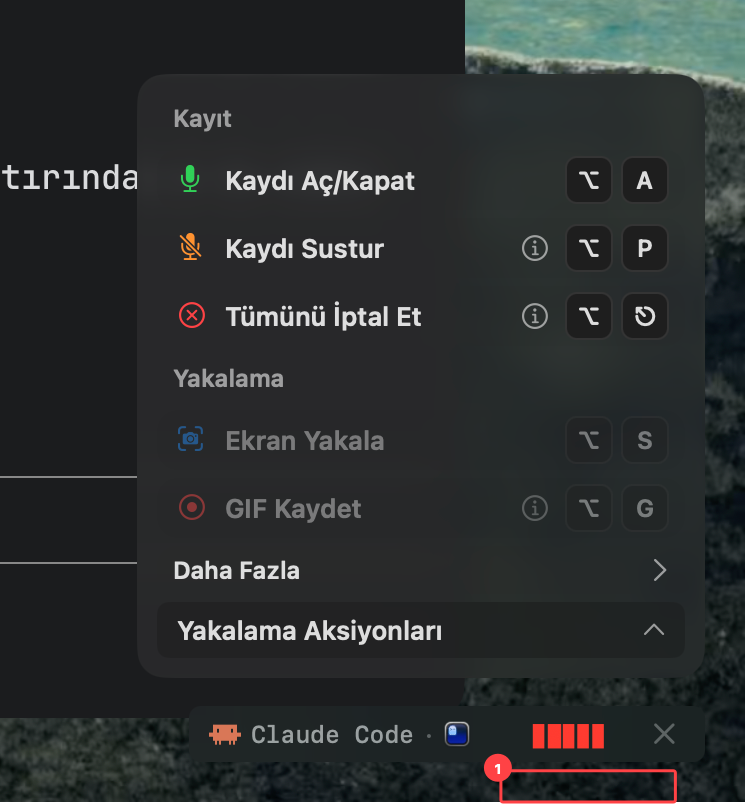
The separate Smart format area beneath the recording bar has been removed. optionOS reads the target app and selects the appropriate paste route automatically. Unknown targets use referenced text.

The area below the optionOS recording bar after the separate Smart format card was removed
Paste format is no longer selected from a separate card; optionOS selects it for the target app.
  1. 1Area where the separate Smart format card was removed
Mac

Screen-recording permission now leads to the right Settings page from one card

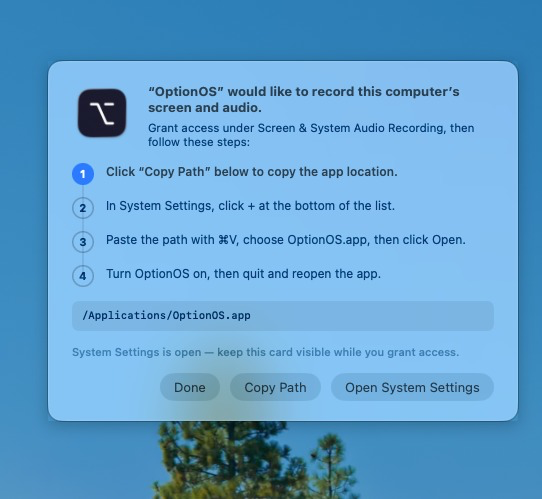
When screen-recording access is needed, the correct System Settings destination and every required step remain in one guide card.
Open the right Settings page from one card to grant screen-recording access

We’re listening. This change came from a user request.

Instead of stacking handoff windows, one guide stays visible throughout the screen-recording permission flow. It now carries standard Mac window controls, while Open System Settings opens Screen & System Audio Recording directly. If OptionOS is missing, Copy Path and all four steps remain on the same card.

One guide card showing four screen-recording permission steps, the OptionOS app path and the System Settings action
Permission steps, the app path and the correct System Settings handoff remain on one card.
Mac

Sign in to an account once on this Mac; Cockpit keeps its usage beside your other accounts

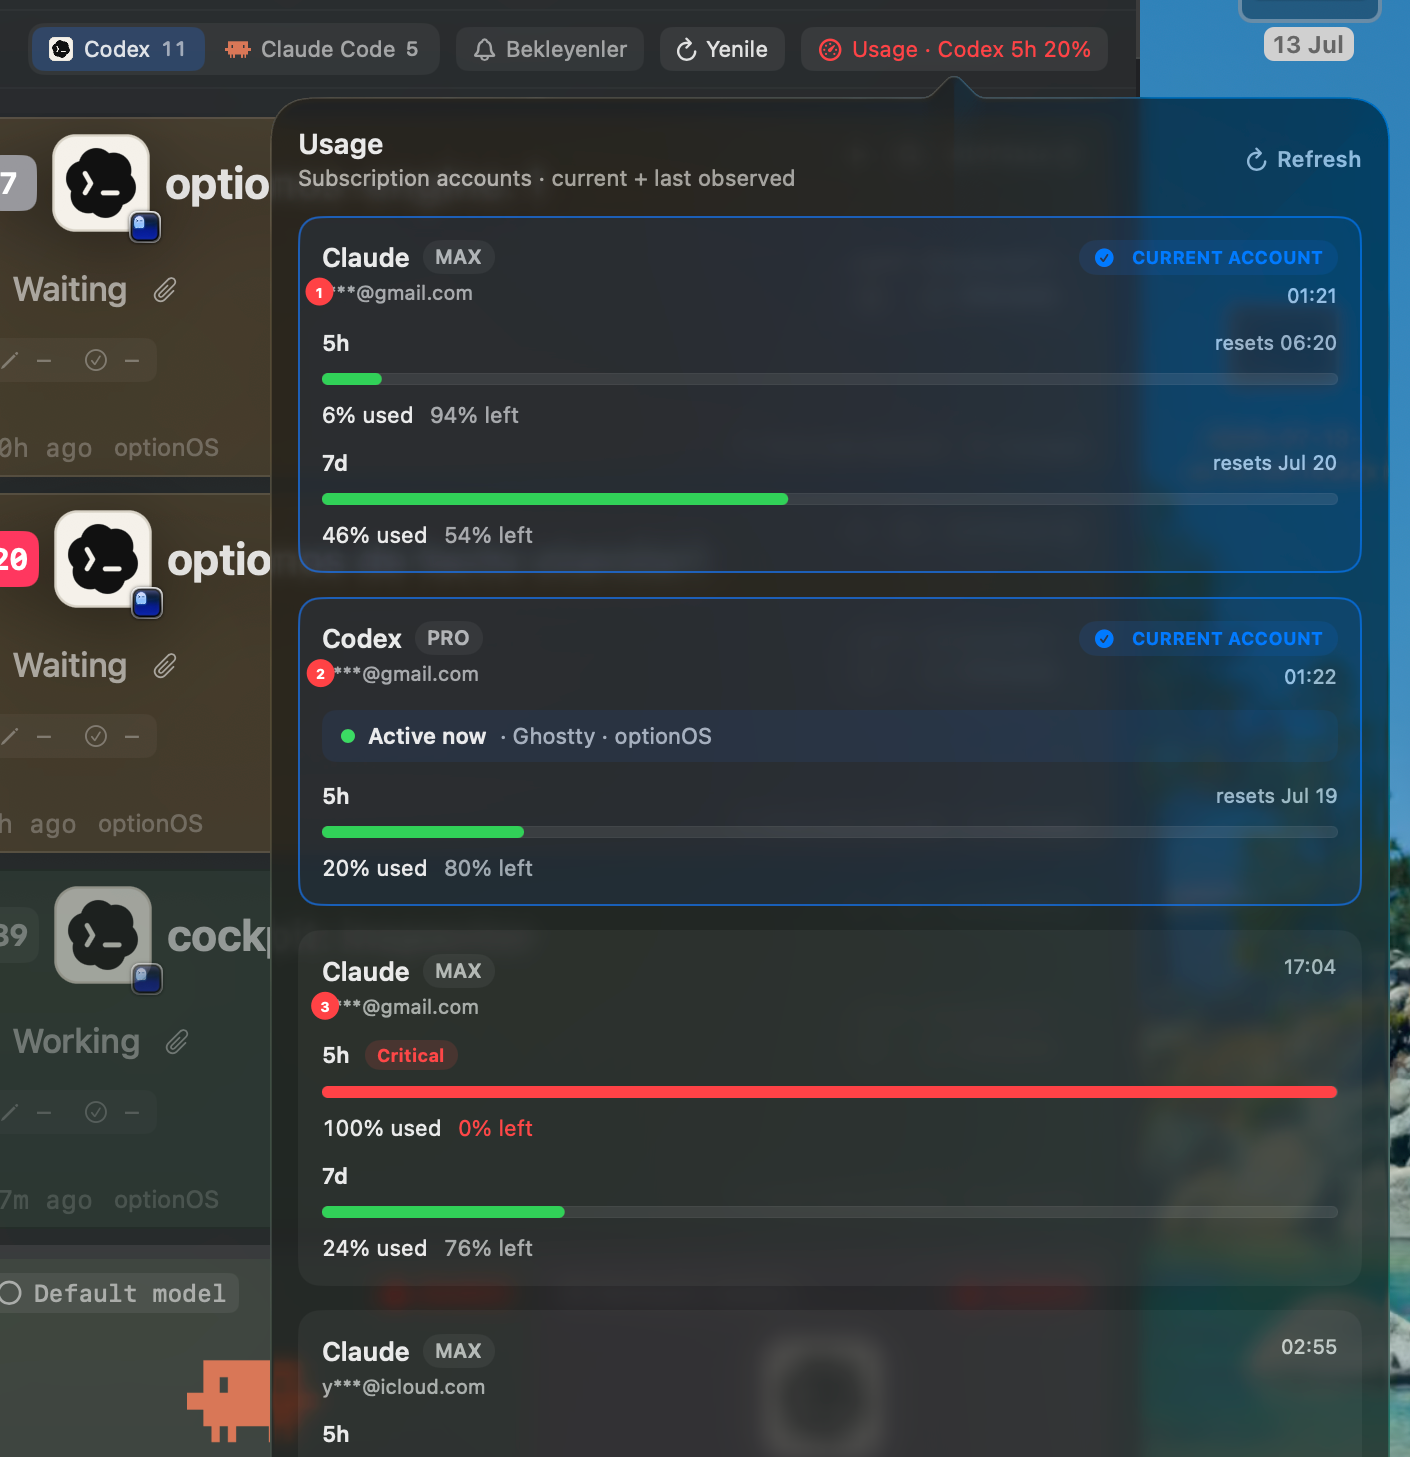
Switching accounts no longer makes the previous usage view disappear. Cockpit remembers the Claude and Codex accounts observed on this computer and keeps their last-known 5h/7d usage together in one panel.
Current and previously seen accounts share one usage panel

Open the Usage chip to see the current + last observed list. CURRENT ACCOUNT distinguishes the active account; accounts previously used on this Mac remain listed with their last observation time and available 5h / 7d usage.

An account only needs to have been signed in once on this Mac to appear here.

The Cockpit Usage panel showing 5h and 7d usage for active Claude and Codex accounts plus a previously observed Claude account
Last-known usage for active and previously observed accounts remains together in the same Usage panel.
  1. 1Active Claude account
  2. 2Active Codex account
  3. 3Previously observed Claude account with its retained last-known usage
Mac

Cockpit cards now have a stable number, a color tag, and two transcript-copy scopes

Cockpit cards now make it easier to find an agent session again and choose exactly which transcript scope should travel with you.
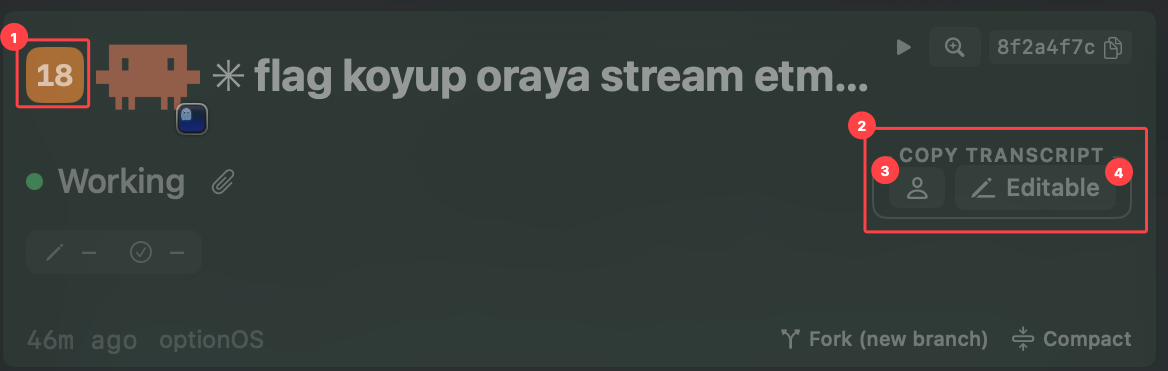
Number and color identify the card; two controls separate the copy scope

Each agent session receives a stable number the first time it appears. Right-click a card to choose, replace, or clear a color; give cards you consider related the same color to carry your own visual meaning.

Under Copy Transcript, the left person button copies only your prompts. The right Editable button copies the human and agent messages plus edit headlines for paths changed by the agent; raw patch bodies are left out.

A Cockpit agent card with a colored stable number and User Only and Editable transcript-copy controls
Card identity and color support visual memory, while two transcript controls separate the copy scope.
  1. 1Stable card identity — the system-assigned number and user-selected color
  2. 2Copy Transcript — the shared group for both copy scopes
  3. 3User only — copies only human prompts
  4. 4Editable — copies human and agent messages plus edited-file paths
Mac

Cockpit shows usage limits and stable Ghostty cards

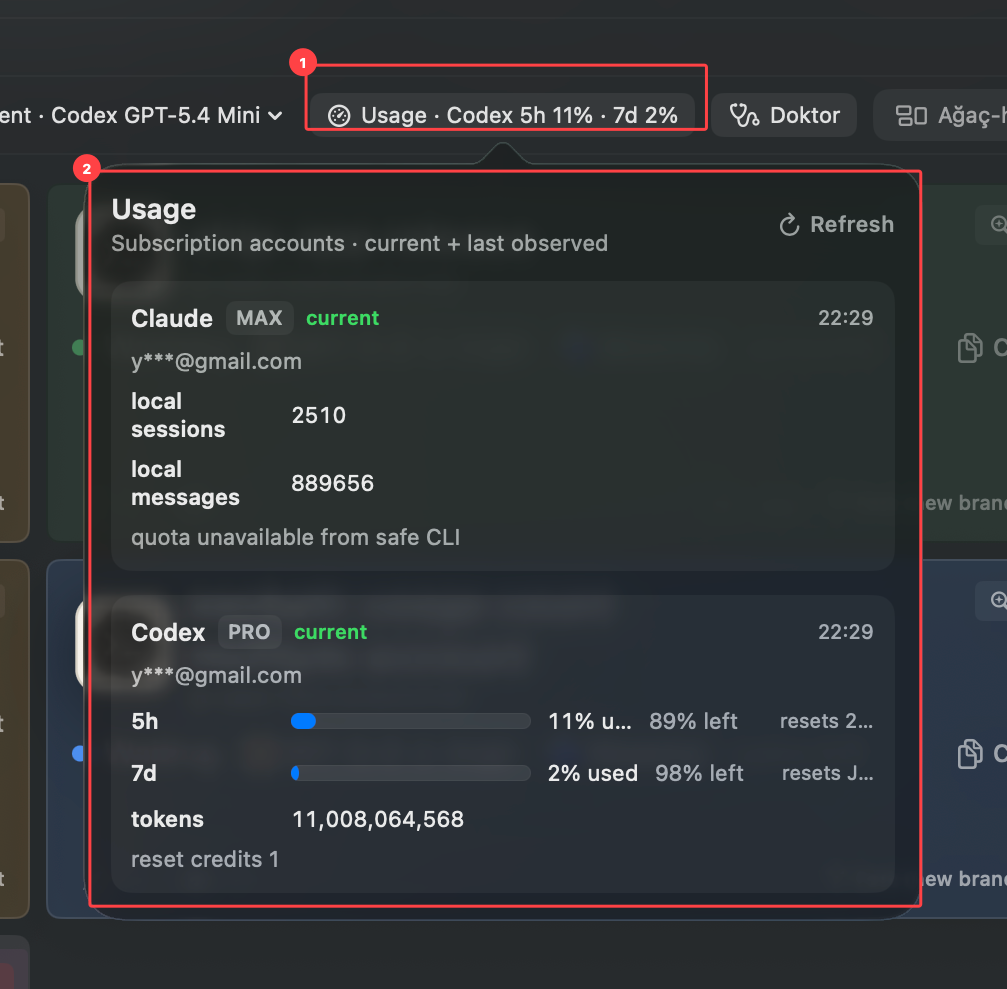
The Mac Cockpit grid now shows Codex 5h/7d usage percentages in the Usage chip. Opening it keeps the currently available Claude and Codex subscription account details on one surface. Card state changes now have animated feedback, and the Ghostty chip/card flow works reliably.

Usage limits and active accounts

The Usage chip summarizes the limit state in the toolbar. Open it to see active Claude and Codex accounts and any quota details that can be read safely from the CLI on the same panel.

The Mac Cockpit toolbar Usage chip and the Usage panel showing Claude/Codex account limits Usage chip in the toolbarAccount and limit panel
·

Usage chip in the toolbar
The Usage panel keeps active Claude and Codex subscription accounts together with limit details.

Ghostty card flow

Cockpit cards coming from Ghostty now appear in the grid with the correct runtime chip. You can track the terminal-side agent session on the same surface as the rest of your Cockpit cards.

A Cockpit Mac grid agent card with a Ghostty chip
The Ghostty chip shows which runtime surface the terminal-side agent card came from.
  1. 1Ghostty runtime chip
Mac

Cockpit cards show an agent session as individual data-flow points

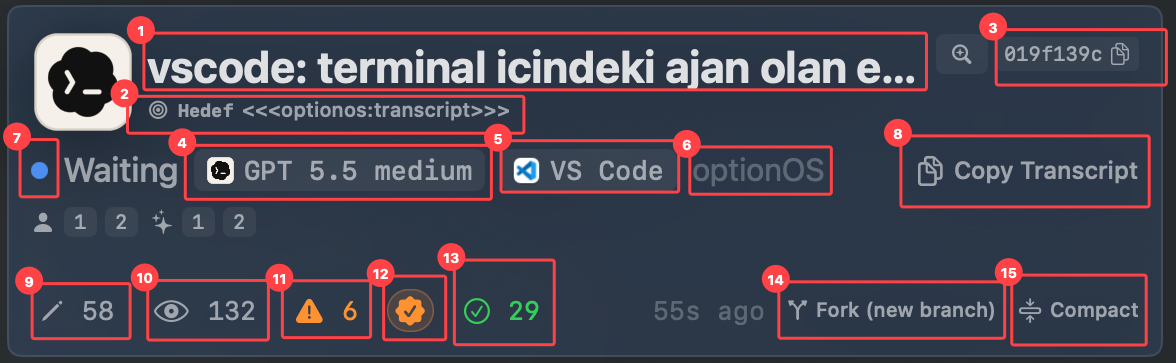
A Cockpit card now shows an agent session as separate readable data points instead of only a one-line summary. The title, target, session identity, model, host app, state, transcript action, file counters, commit flow, and fork/compact actions are visible on the same card.

The 15 data points in an agent card

Each marked area on the card carries its own decision signal: what the session is working on, where it is running, what it saw, what it changed, and how you can continue the agent from the same surface. The Compact action does not immediately run the prompt; it opens the terminal with the prompt ready, then the user starts it with Enter.

A Cockpit Mac card showing the title, target, session, model, host, state, file and action data points of an agent session Title — shows what the session belongs toTarget — the target context attached to the conversation or transcriptSession ID — the session identifier and copy actionAgent/provider identity — shows which agent surface the card came fromAgent model — the model and working levelHost app — where the session is running, such as VS Code or GhosttyAgent state — waiting, running, or the relevant live state signalCopy Transcript — copies the in-process transcriptEdited files — the number of files the agent changedSeen files — the number of files the agent viewed or readUncommitted files — changes that have not entered a commit yetAuto-commit action — a quick action for the commit flowCommitted changes — completed commit/change countFork — opens a terminal in VS Code or a fork terminal in Ghostty to split the sessionCompact — places the transcript/prompt into a new agent terminal ready to run; the terminal opens and the user starts it with Enter
·
Title

shows what the session belongs to

Title — shows what the session belongs to
One Cockpit card keeps the tracking and continuation points for an agent session on the same surface.

v0.5.0

Mac

v0.5: The system behind speech is now visible

Recording, transcription, capture, paste, storage and agent flows used to run mostly in the background; only the person building the system could see what it was doing. v0.5 brings states, choices, errors, usage and history onto surfaces that everyone can read and control.

This single release brings together every visible change completed between 7 and 11 July 2026.

The Notch surface is beta in this release. It is experimental and may lag on some machines. If you want the stable path, use HUD; HUD can already be dragged to the part of the screen where it stays out of your way.

There is also a Promise area where we say what we will build: on the Promises page you can see the work we plan, and later you will be able to vote on it. The voting structure is not built in this release; for now it is a promise.

Speech, settings and capture share one workspace

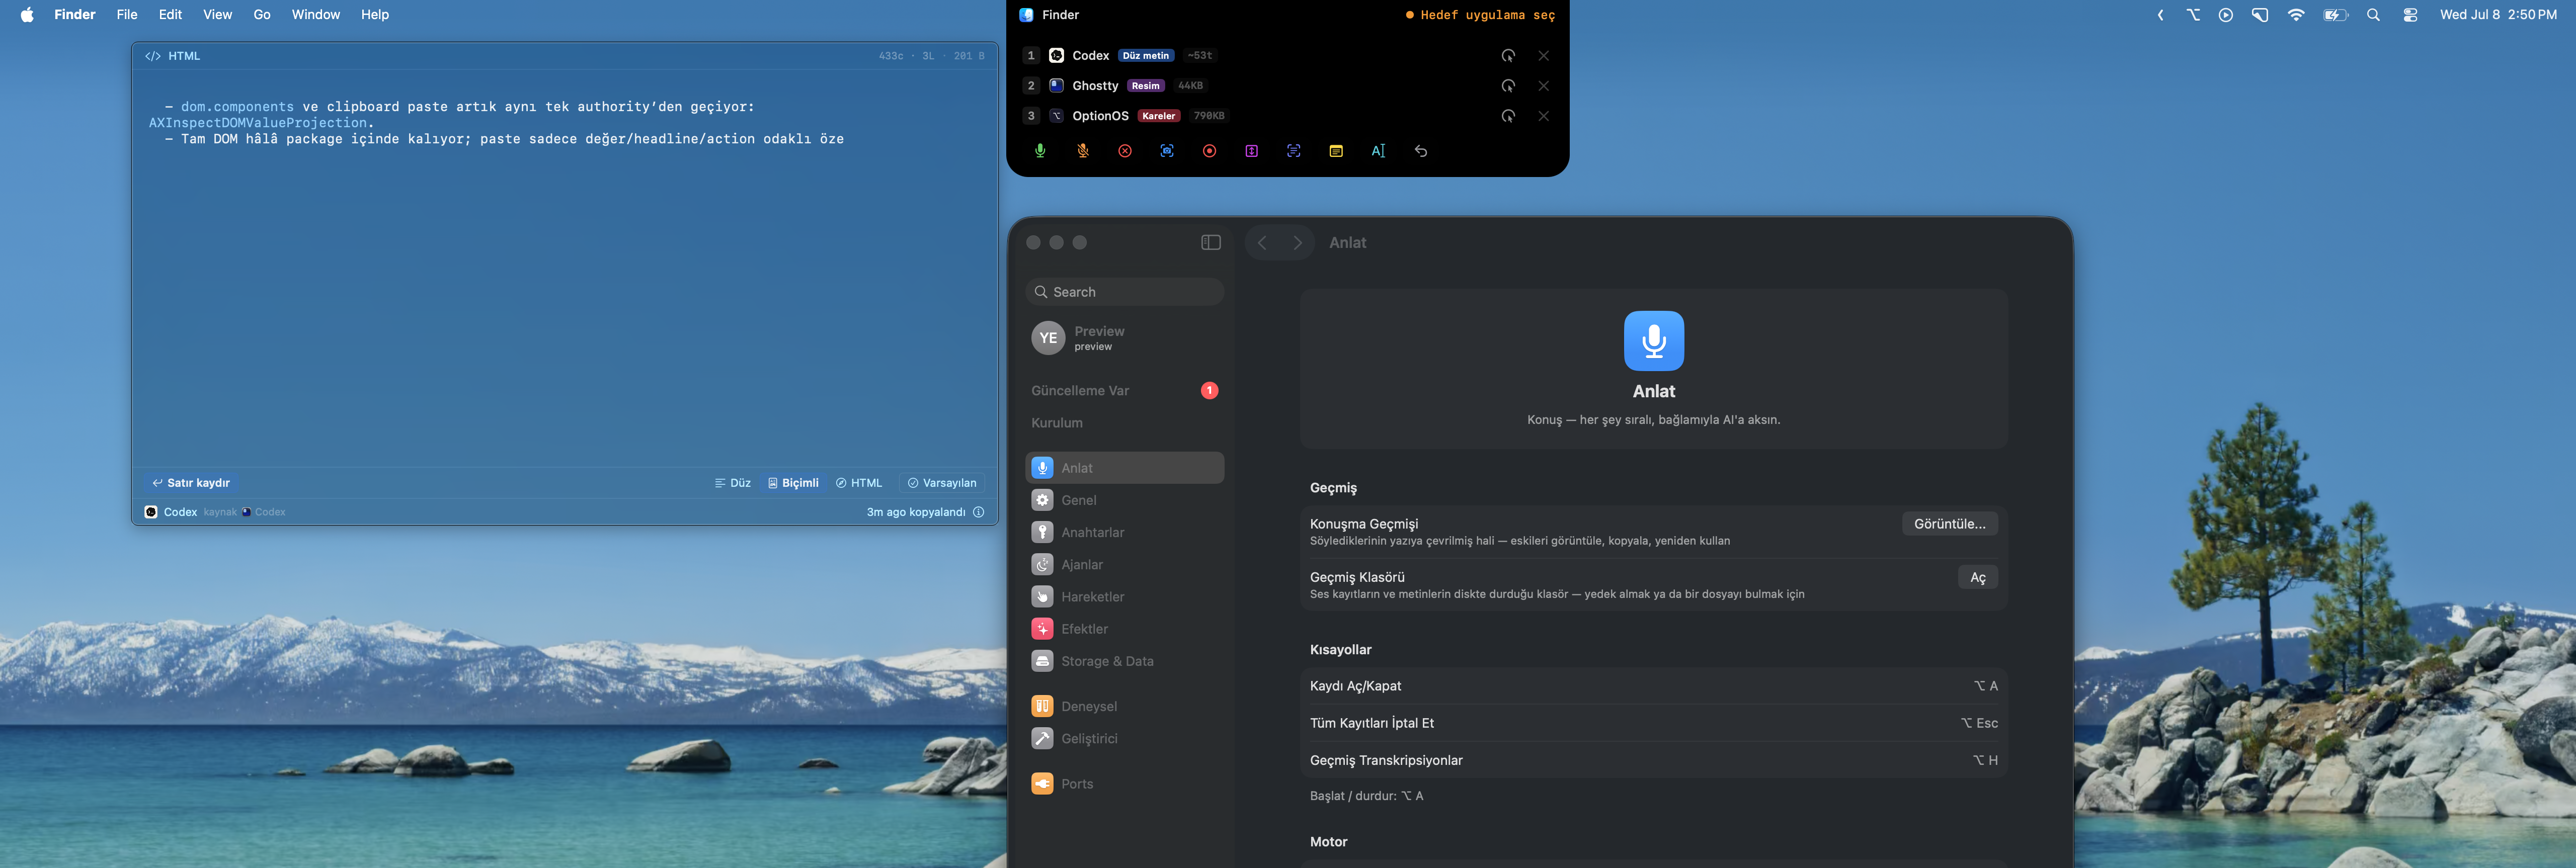
The Settings panel, target-app selector and capture queue can be visible at the same time. You choose where your speech goes, while settings, history and captured items stay in the same flow.

optionOS Settings panel, target app selector and capture queue on the same Mac screen
The v0.5 workspace keeps speech, target app, settings and the capture queue together.
  1. 1Target app selector
  2. 2New Settings panel
  3. 3Captured item queue

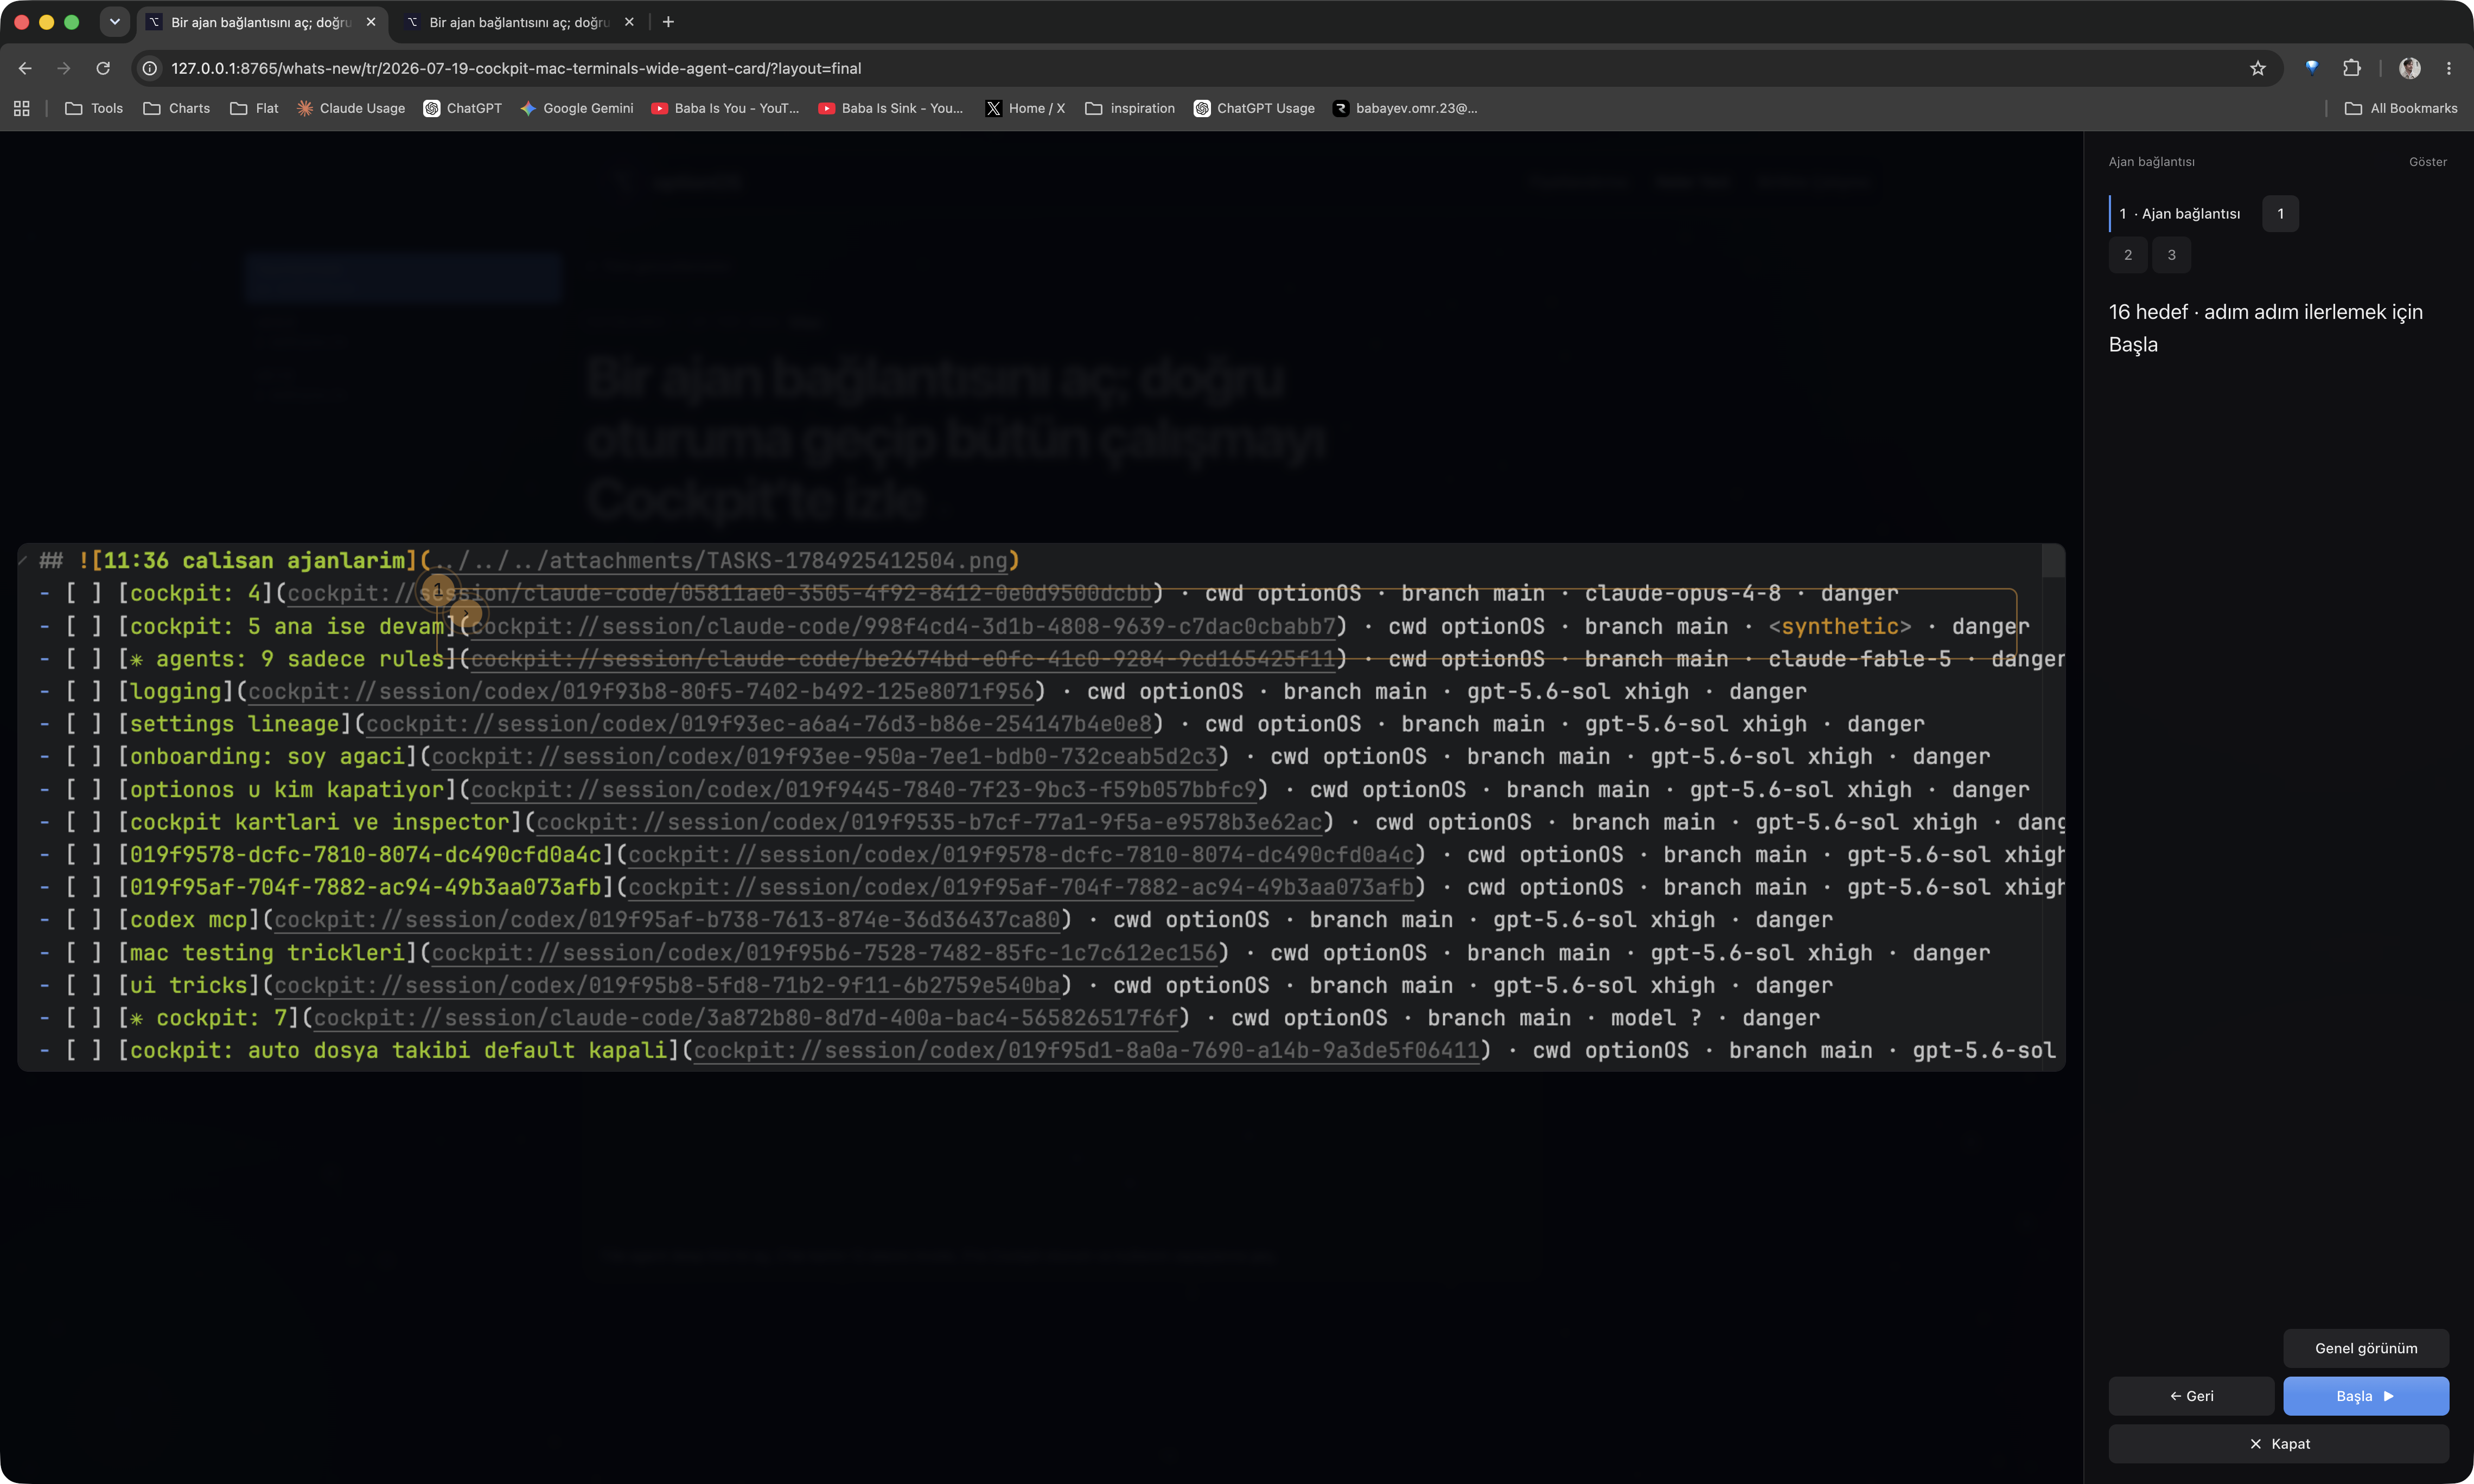
This What's New page was made by talking to optionOS

The text and visual decisions on this page were collected while talking to optionOS. Speech, on-screen marks, copied content and preview stayed in one flow; the release story you are reading came directly from that conversation.

Speech, capture actions and a content list while preparing the optionOS What's New page Capture actionsContent list feeding this pageSpeech and target app
·

Capture actions
Speech, capture actions and the content list feeding this page share one working surface.

First launch now shows the next action

The onboarding screen explains one-key dictation: which shortcut starts speech, whether the engine is ready and which permissions come next. Setup becomes a guided path instead of a hidden checklist.

optionOS onboarding screen showing the Compose shortcut, engine readiness and next setup steps
The first onboarding card makes the speech shortcut and required permissions visible.
  1. 1Compose shortcut
  2. 2Engine readiness state
  3. 3Next setup steps

Long speech is saved continuously so it does not disappear

Losing a 20-minute explanation is terrible. Speech is now saved as continuously as possible. If the app crashes, the computer shuts down, or you have to force quit because something got stuck, the audio recording is preserved.

optionOS recording with a visible Saving timer and capture list
The saving state stays visible while recording, protecting long speech sessions.

Retry from a past conversation

In the dictation screen, click a past conversation and use the context menu to try again. If something unexpected happened in a long speech session, you can find the same recording in history and put it back into the flow.

The optionOS conversation history context menu with Retry and Copy actions
The past-conversation menu gives direct retry and copy actions.
  1. 1Past conversation row
  2. 2Retry action

Capture actions stay visible while you talk

Recording, screenshot capture, GIF, scrolling capture, notes, automatic copy and clipboard undo/redo live on one surface. You can see what is available by hotkey or by button. The panel also shows which app the conversation started in and which content landed in the capture list.

In a browser it behaves like a browser flow; in a local app it behaves like a local app flow. Option+Shift+Z and Option+Shift+Y move the last clipboard action backward and forward, with animated feedback.

You can hold the bottom panel and drag it left or right — carry it to any side of the screen. If you have been copying things, moving it somewhere is more useful than closing it.

The optionOS capture actions menu, target app and captured content queue Capture actions menuTarget app where the conversation startedAutomatic smart paste modeCaptured content list
·

Capture actions menu
The capture menu keeps hotkeys, target app and captured items on the same working surface.

Capture, mark up and attach it to what you say

Onboarding now teaches the capture-and-markup flow too. Capture the screen, mark the important area and optionOS adds that visual context to your speech.

optionOS onboarding screen showing the Mark Up by Editing card and Option Shift S shortcut
The Mark Up by Editing card explains the capture-and-markup flow with its shortcut.
  1. 1Capture and markup shortcut
  2. 2Active onboarding card
  3. 3Engine readiness during setup

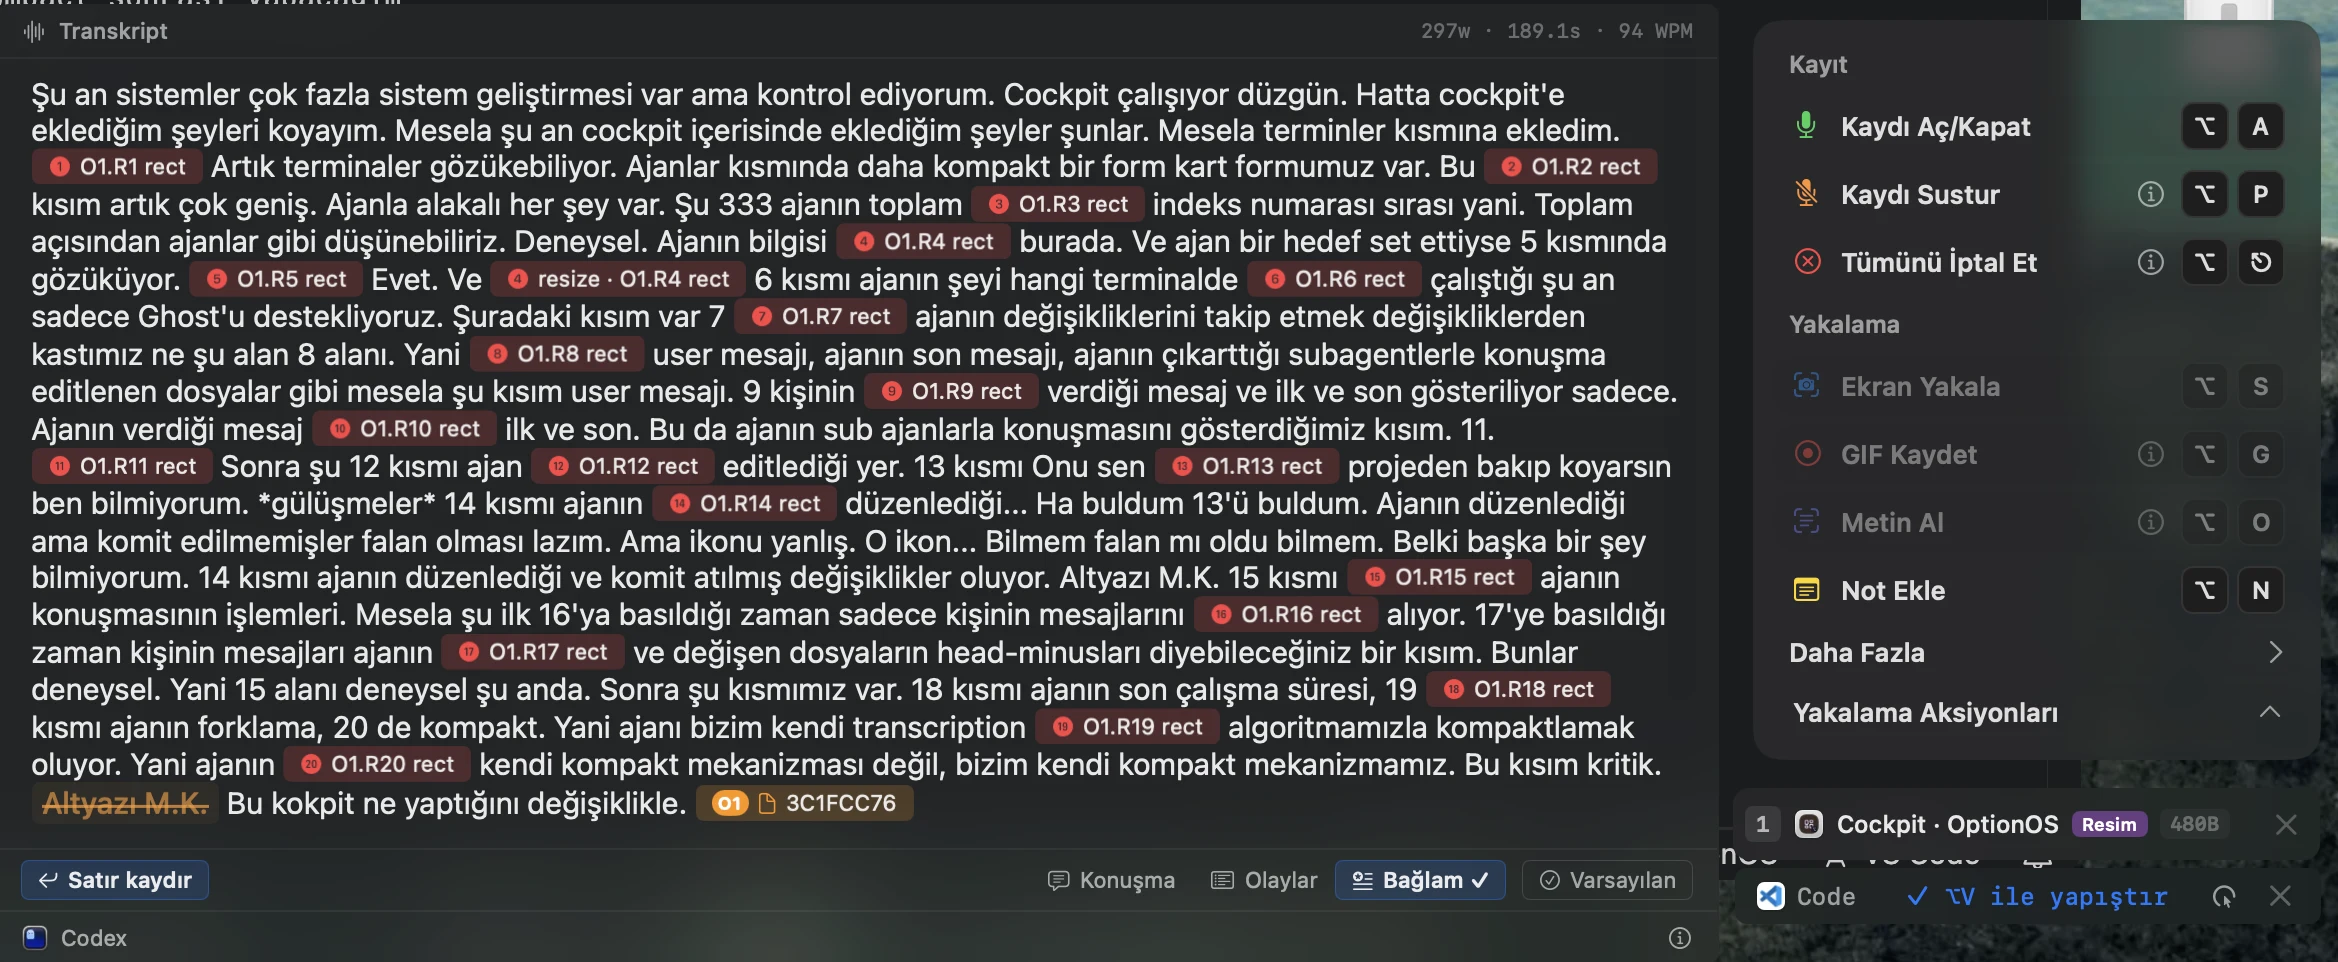
Your speech and rectangles stay in sync

For motion, use GIF. For long web pages, use scrolling capture. You can annotate a GIF, but most of the time marking the first frame is enough to show the agent where to look.

When you draw a rectangle while speaking, the label time is attached to the transcript. You do not have to say “one, two, three”; saying it can help, but optionOS already knows when the drawing happened. You stay in the flow and the agent sees the change immediately.

An optionOS transcript showing screenshots, rectangle labels and visual references in sync
Speech, screenshots and drawn labels are readable on the same timeline.
  1. 1The relevant speech moment
  2. 2Visual reference
  3. 3Drawn rectangle label

Conversation history and feedback share the same archive

Past conversations inside the app can be shown like transcripts, with tags and badges. If you think of something later, you can click an old image and add a label on top of it; the speech flow stays intact and the agent can understand it.

Issue reporting follows the same idea: send the problem with voice, screenshots and annotations from inside the app. The feedback arrives with the context needed to improve the app together.

An optionOS transcript panel with past speech, file references and a capture list Captured conversation transcriptImage/file references inside the speechInline reference markers
·

Captured conversation transcript
Past conversations, references and captured items can be found again in the same archive.

The usage card opens speech history

Pressing the Dictation total card now opens an experimental Usage view. The heatmap, weekly totals and selected-day app breakdown stay in one window, so you can inspect speech history by time and app.

Experimental usage and speech-history view opened from the optionOS Dictation total-usage card
The usage card opens speech history with a calendar and app breakdown.
  1. 1Total-usage card
  2. 2Usage and speech-history detail

You can share the Dictation usage total

The total-usage card in the Dictation archive now has a share action. Use the share button on that card to turn total time and usage breakdown into a visual share card.

Share button on the total-usage card in the optionOS Dictation archive
The share button starts the flow that turns usage totals into a visual card.
  1. 1Usage total share action

The stats card exports as PNG

The share action creates an optionOS-branded PNG. It shows total speaking time, word count and the top app breakdown, so you can share the usage stat as one image.

Shareable PNG card showing optionOS usage statistics
The share card keeps total speaking time, word count and app breakdown in one image.

HUD actions are visible with their hotkeys

Record, mute, cancel, screenshot, GIF, scrolling capture, OCR and note all live in the HUD. The same surface shows the target app and what has entered the capture queue.

optionOS HUD showing record, capture, GIF, scrolling capture, OCR and note actions
The HUD shows the actions and shortcuts you can use while speaking.
  1. 1Recording actions
  2. 2Capture actions
  3. 3Clipboard, developer and diagnostics groups
  4. 4Target app and capture queue

Move the indicator where you want and choose its surface

In Settings → Indicator, you can choose the recording indicator surface and its position on screen. You can also press and drag the small panel directly, so the indicator adapts to your workspace.

optionOS Indicator settings with surface and recording-panel position options Recording-panel positionIndicator surface
·

Recording-panel position
Indicator settings keep the surface and recording-panel position controls together.

The Notch surface gives you a quieter indicator

Choose the Notch surface when you want a more modern indicator that takes up less space. Recording state stays at the top edge of the display without covering the content you are working on.

The optionOS Notch indicator at the top edge of a Mac display
The Notch surface keeps speech state visible in a compact top-edge indicator.

Control sounds and visual feedback separately

Turn visual motion and sound on or off together, then choose individual sounds for ready to paste, pasted, recording cancelled, transcription error, clipboard captured and screenshot captured states.

optionOS Effects settings with visual-motion and dictation-sound controls
The Effects panel shows which state will produce sound or visual feedback.

Trackpad gestures can replace keyboard shortcuts

Use a three-finger tap to start or stop dictation, then map corner clicks to paste, open history or cancel dictation. Each result stays visible beside the gesture and can be tried in the preview above. Because this surface is experimental, unsupported choices remain visibly unassigned.

optionOS Gestures settings with three-finger tap and corner-click actions Gesture preview and action list
·

Gesture preview and action list
The Gestures panel shows which job each trackpad gesture triggers.

Use GIF when you need to show motion

Instead of over-prompting an animation, movement or panel behavior, press Option+G and record a GIF. The GIF carries the changing behavior from start to finish in one recording.

GIF recording that shows the optionOS HUD panel moving on screen
Use one GIF for motion: behavior such as dragging a panel stays visible from start to finish in the same recording.

Component Copy captures what is behind the UI

Component Copy in the capture menu copies the selected UI piece with its component/source tree, not only as a screenshot. The agent can now see which source files, descendants and routes sit behind the thing on screen.

This currently works for optionOS. When the SDK is published, a developer building their own Mac app will be able to add the SDK and describe their own app this way: precise context, with the relevant source code, modes and pieces in the packet.

The optionOS capture menu showing Component Copy and an output panel with a component/source tree
Component Copy carries the selected UI piece together with its component tree and source routes.
  1. 1Component Copy in the capture menu
  2. 2The copied component output
  3. 3The descendants/source tree

The menu bar is reserved for fast actions

The menu bar now holds frequent actions: setup, model selection, transcripts, history folder, settings, issue report, start at login and copy log command. Bigger decisions moved into Settings, so the menu stays compact.

optionOS menu bar with Setup, Model, Transcripts, Settings and Report Issue actions
The menu bar keeps everyday optionOS actions in a compact list.
  1. 1Setup and shortcut replay
  2. 2Model selection
  3. 3Transcripts and history folder
  4. 4Settings and issue reporting
  5. 5Start at login, copy log command and restart

Settings has been rebuilt from top to bottom

Transcription, Configuration, Indicator, History, General, Keys, Agents, Gestures, Effects, Cursor Follower, Storage & Data and experimental choices now live in one window, separated by the job they affect. Each choice explains what it changes beside the control.

The optionOS settings window showing Transcription, language and transcription-engine choices Transcription sectionLanguage and transcription choices
·

Transcription section
The rebuilt Settings panel separates speech and app decisions into readable sections.

Settings is split by job

Settings is no longer one crowded surface. Motor, Language, Configuration, Display, Quota and History carry the speech workflow; General, Keys, Agents, Gestures, Effects, Storage & Data, Experimental, Developer and Ports keep their own decisions separate.

optionOS Settings sidebar with Motor, Language, Configuration, Display, Quota, History and system panes
The Settings sidebar separates speech settings from system-level decisions.
  1. 1Separate Settings panes

Settings search opens the right section

When you want to change a setting, search for it in the settings bar. Click the suggestion and the matching settings detail opens, without hunting through menus.

The optionOS settings search showing an ElevenLabs engine query, suggestion and detail panel
Settings search opens the matching setting and its detail panel in one flow.
  1. 1Settings search field
  2. 2Suggestion result
  3. 3Opened setting detail

Whisper settings now live in their own section

Choose the Whisper model, processing mode and output behavior in one place. Incorrect outputs such as closing phrases produced during silence have their own list; use the built-in entries or add your own example.

optionOS Whisper settings with model, processing mode, output and incorrect-output rows Model, processing mode and output settingsIncorrect-output list
·

Model, processing mode and output settings
Whisper-specific decisions and incorrect-output handling share one detail surface.

See your ElevenLabs account and remaining usage

When you use ElevenLabs, your account plan, used and remaining character allowance, and renewal date are visible in one place. Refresh the account details without removing and adding the account again.

ElevenLabs account card in optionOS showing the plan, character usage and renewal date Account plan and character usage
·

Account plan and character usage
The ElevenLabs account card keeps plan and remaining-usage details inside transcription settings.

Storage & Data shows what takes space

See the data kept by the app and the space it uses at a glance. Dictation, Clipboard Capture, Screen Record, Component Capture, Backups and other data are measured separately; open a category to inspect its footprint.

optionOS Storage & Data settings with a usage bar and data categories Storage & Data sectionTotal usage and category breakdown
·

Storage & Data section
Storage & Data makes optionOS data visible by category and size.

Advanced configuration choices are visible

Microphone, silence duration, noise cleanup, paste formatting, page-decoration cleanup and image-text cleanup now have explicit controls. Experimental choices remain visible too, so you decide whether to use a behavior that is not fully reliable yet.

optionOS Configuration settings with microphone, silence, cleanup and paste options
Configuration separates how speech is captured from how text is delivered.

Capture settings are grouped

Everything is no longer shown at once. Clipboard/Copying, Developer and Diagnostics groups open and close, so the menu looks compact and less confusing.

The optionOS capture menu with Clipboard/Copying, Developer and Diagnostics groups
The capture menu groups frequently used actions instead of showing every detail at once.

Screen recording permission now opens with a guide card

When Screen & System Audio Recording permission is needed, optionOS opens a card next to System Settings that shows what to do. Copy the app path, use + in the System Settings list, paste the path, choose OptionOS.app and turn the permission on.

macOS Screen & System Audio Recording settings with the optionOS permission guide card
The permission guide keeps the app path and the next System Settings steps on the same surface.
  1. 1optionOS permission guide card

Turn the cursor follower off whenever you want

Enable or disable the follower that shows recording or writing state beside the pointer from one setting. Separately choose whether it should appear in screenshots and screen recordings.

optionOS Cursor Follower settings for the follower and its visibility in screenshots Cursor Follower section
·

Cursor Follower section
Cursor Follower leaves the pointer-side recording indicator under your control.

The menu bar is simpler: fast actions here, settings in the panel

The visual minibar structure is gone. The menu bar now keeps fast actions such as setup, model, transcriptions, history folder, settings and issue reporting. Bigger decisions moved into the new settings panel.

The optionOS menu bar with Setup, Model, Transcriptions, Settings and Report Issue actions
The menu bar is reserved for quick actions; settings and feedback open from here.

Keep your Mac awake during long agent jobs

Turn on Agent Safe Work to prevent the Mac from sleeping while background agents continue after a long prompt. You can still let the display sleep, measure the state again or release the assertion with one action.

optionOS Agents settings showing Mac sleep, display, network and agent states Agents section
·

Agents section
Agent Safe Work keeps wakefulness during long tasks visible and controllable.

Send SVG as SVG or PNG

When you copy an SVG, optionOS keeps it in the capture list. You can send it to AI as SVG, or turn it into a PNG image. The code form and the visual form stay connected instead of becoming two separate flows.

An optionOS capture panel with SVG code, an SVG preview and SVG/PNG send controls SVG copy action on the web pageSVG content in the capture listSVG preview panelSend as SVG or PNG
·

SVG copy action on the web page
SVG content can be read as code or converted into a PNG image before it is sent.

The optionOS ecosystem in one working surface

optionOS now reads less like separate tools and more like members of the same AI work ecosystem: Dictation carries speech and capture, Clipboard/Pano manages visuals and paste flow, and Cockpit watches agents on Mac and in VS Code.

Dictation, Clipboard and VS Code Cockpit together

In one working screen you can see Dictation capture actions, Clipboard/Pano content and the VS Code Cockpit panel at the same time. This layout keeps “what did I say, what did I copy, which agent is waiting?” in one context.

optionOS ecosystem with Dictation capture actions, the Clipboard/Pano window and the VS Code Cockpit panel on the same screen
Dictation, Clipboard/Pano and VS Code Cockpit complement each other on the same working screen.
  1. 1Dictation and capture actions
  2. 2VS Code Cockpit panel
  3. 3Clipboard/Pano working surface

Mac Cockpit and VS Code Cockpit show the same agent family

The Mac Cockpit grid gives a wide view of all agent cards; VS Code Cockpit keeps the selected workspace's session, memory, agents and chat inside the editor. Dictation and the capture list supply speech and visual context to both surfaces.

optionOS ecosystem with a Dictation capture list, the Mac Cockpit agent grid and the VS Code Cockpit panel on the same screen
The Mac Cockpit grid and VS Code Cockpit panel show the same agent family in two working surfaces.
  1. 1Dictation capture list
  2. 2VS Code Cockpit panel
  3. 3Mac Cockpit agent grid

v0.1.0

Open a guide on its own page; switch language or share the exact step

Website v0.1 is live. Every guide now has a directly accessible page in Turkish and English. The language control moves to the sibling page for the same guide.

Use a guide's contents to move from the scene to a numbered step. You do not have to send the entire guide: copy the link for the open scene or selected step and the person you share it with lands in the same place.

Standalone pages let you open the guide you need directly and allow search and AI systems to discover each guide individually.

Switch language and stay with the same guide

The TR and EN controls open independent sibling pages for the same guide. The page keeps its own title, tags, permanent link, and content instead of mixing both languages into one reading surface.

The English optionOS Guide page with EN selected, its own title, tags, permanent link, and English content
Select EN to open the same guide as a clean, independent English page.

Select a numbered area; let the visual focus and open its explanation beside it

A single Guide visual now turns the areas marked during a spoken explanation into clickable steps. Each step focuses the right region and opens its explanation beside it, so you can follow how a feature works on one visual instead of reading a long block of text.

You are not locked into the sequence: select any dimmed target, move backward or forward with and , and return to the overview after the final step. The page moves closer to the selected area while keeping markers and controls readable.

The content is created through speech too: we mark an area while explaining it, and the website connects the words and the visual in the same step. This lets us explain a new feature with one focused visual instead of a separate wall of text.

Select a number to see the relevant area and explanation together

Move between the numbered areas to shift focus to the right place and open that step's explanation beside it. You see both what the explanation refers to and what to do without leaving the screen; follow the sequence or jump directly to another target.

A visual opening in the optionOS Guide and the explanation on the right changing as numbered areas are selected
Select a number to focus the relevant area and open that step's explanation beside it.

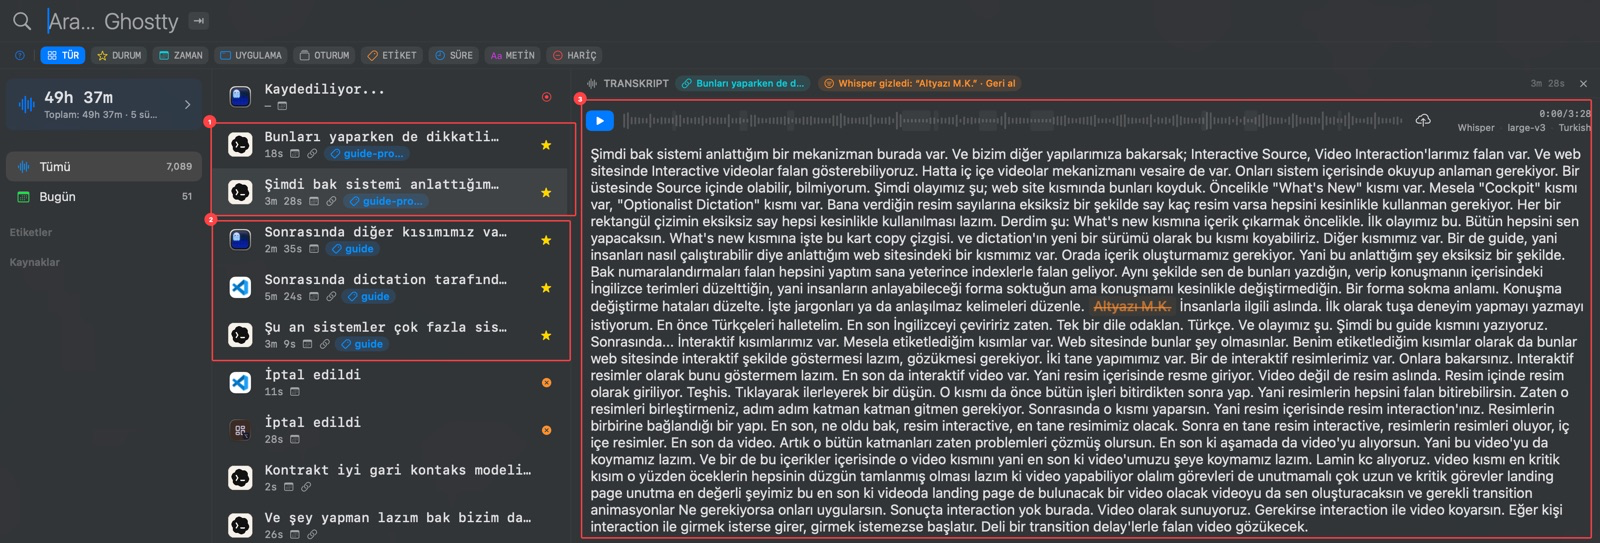
One conversation, the complete guide

A real spoken session of about 12 minutes became one guide with its transcript, captured visuals, drawn marks, GIF, and file references intact. Open it to see not only the result, but also the evidence that shaped each part of the explanation.

The Turkish walkthrough exposes its marked areas as interactive targets; the English companion page carries the same lesson with static cards.

A roughly 12-minute optionOS voice-session transcript with visual, annotation, and file references attached to the conversation
A real session became a guide while its speech, visuals, and marks remained on the same timeline.

Nothing here yet.