
v0.5: The system behind speech is now visible
Recording, transcription, capture, paste, storage and agent flows used to run mostly in the background; only the person building the system could see what it was doing. v0.5 brings states, choices, errors, usage and h…
Recording, transcription, capture, paste, storage and agent flows used to run mostly in the background; only the person building the system could see what it was doing. v0.5 brings states, choices, errors, usage and history onto surfaces that everyone can read and control.
This single release brings together every visible change completed between 7 and 11 July 2026.
The Notch surface is beta in this release. It is experimental and may lag on some machines. If you want the stable path, use HUD; HUD can already be dragged to the part of the screen where it stays out of your way.
There is also a Promise area where we say what we will build: on the Promises page you can see the work we plan, and later you will be able to vote on it. The voting structure is not built in this release; for now it is a promise.
Speech, settings and capture share one workspace
The Settings panel, target-app selector and capture queue can be visible at the same time. You choose where your speech goes, while settings, history and captured items stay in the same flow.
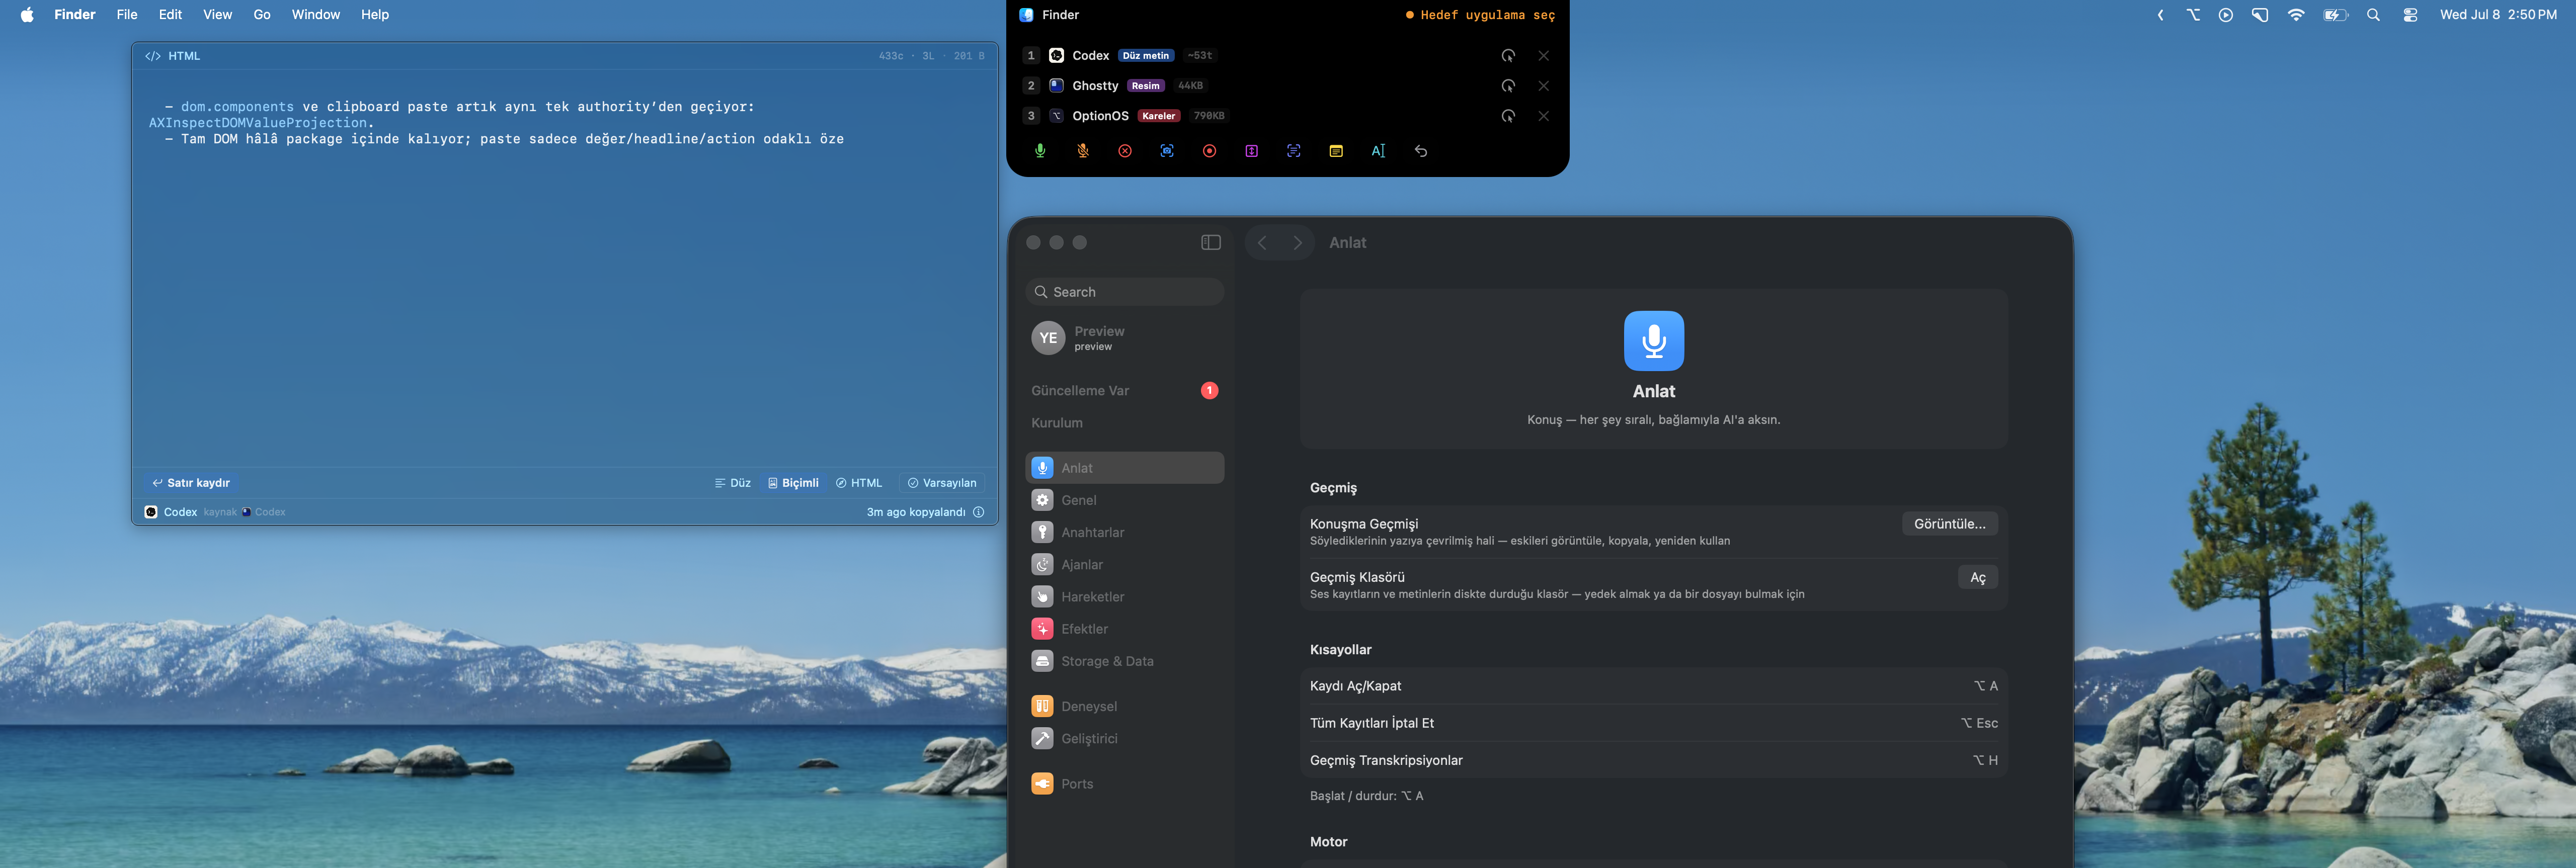
- 1Target app selector
- 2New Settings panel
- 3Captured item queue
This What's New page was made by talking to optionOS
The text and visual decisions on this page were collected while talking to optionOS. Speech, on-screen marks, copied content and preview stayed in one flow; the release story you are reading came directly from that conversation.
First launch now shows the next action
The onboarding screen explains one-key dictation: which shortcut starts speech, whether the engine is ready and which permissions come next. Setup becomes a guided path instead of a hidden checklist.
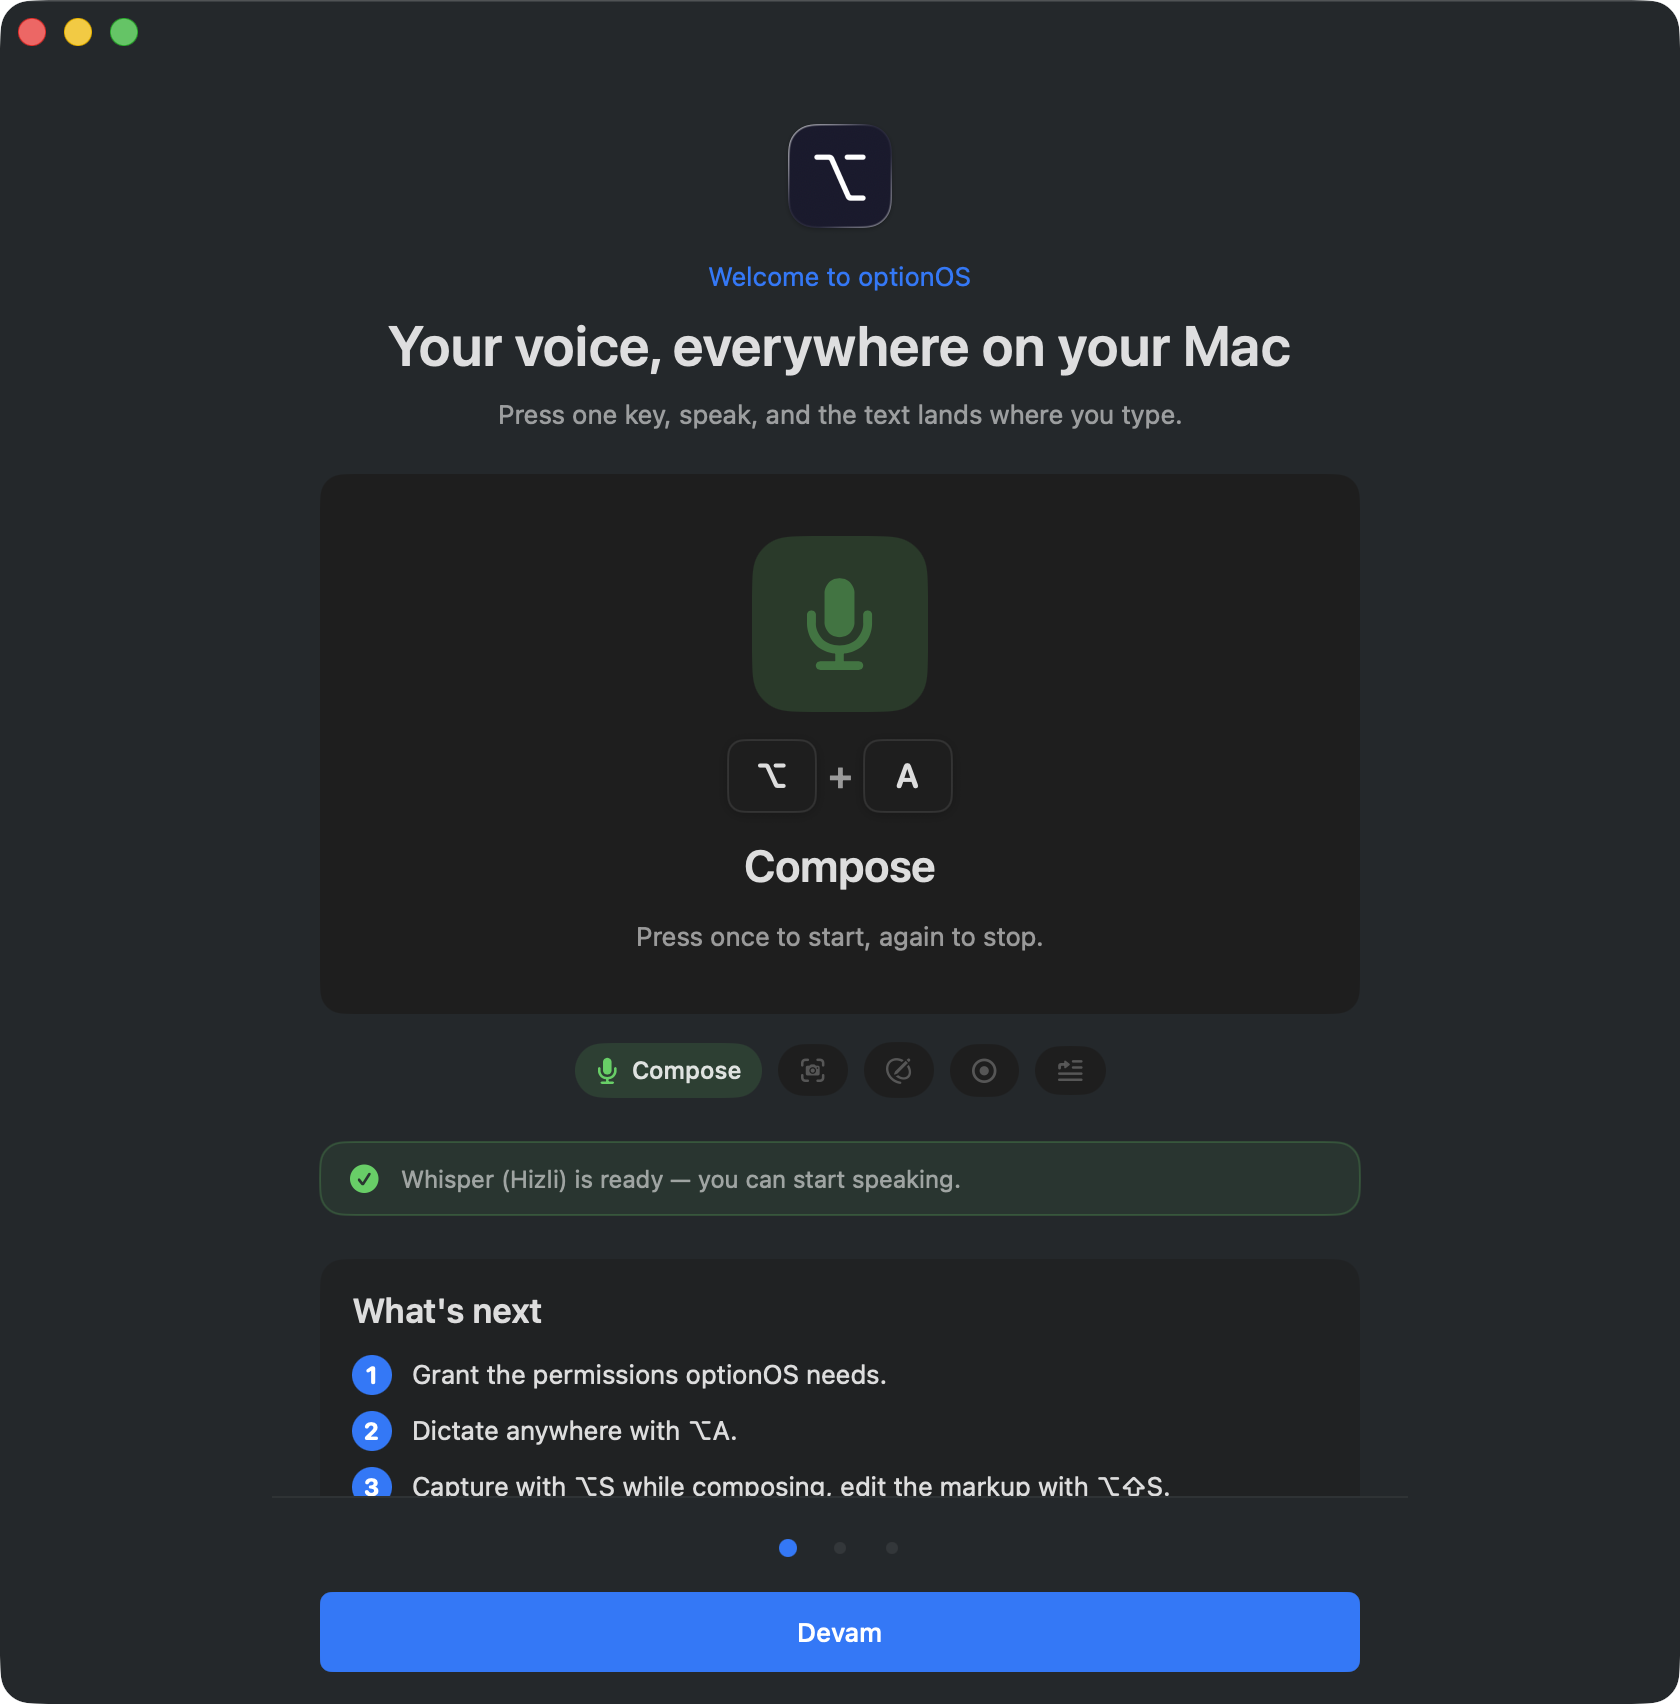
- 1Compose shortcut
- 2Engine readiness state
- 3Next setup steps
Long speech is saved continuously so it does not disappear
Losing a 20-minute explanation is terrible. Speech is now saved as continuously as possible. If the app crashes, the computer shuts down, or you have to force quit because something got stuck, the audio recording is preserved.
Retry from a past conversation
In the dictation screen, click a past conversation and use the context menu to try again. If something unexpected happened in a long speech session, you can find the same recording in history and put it back into the flow.
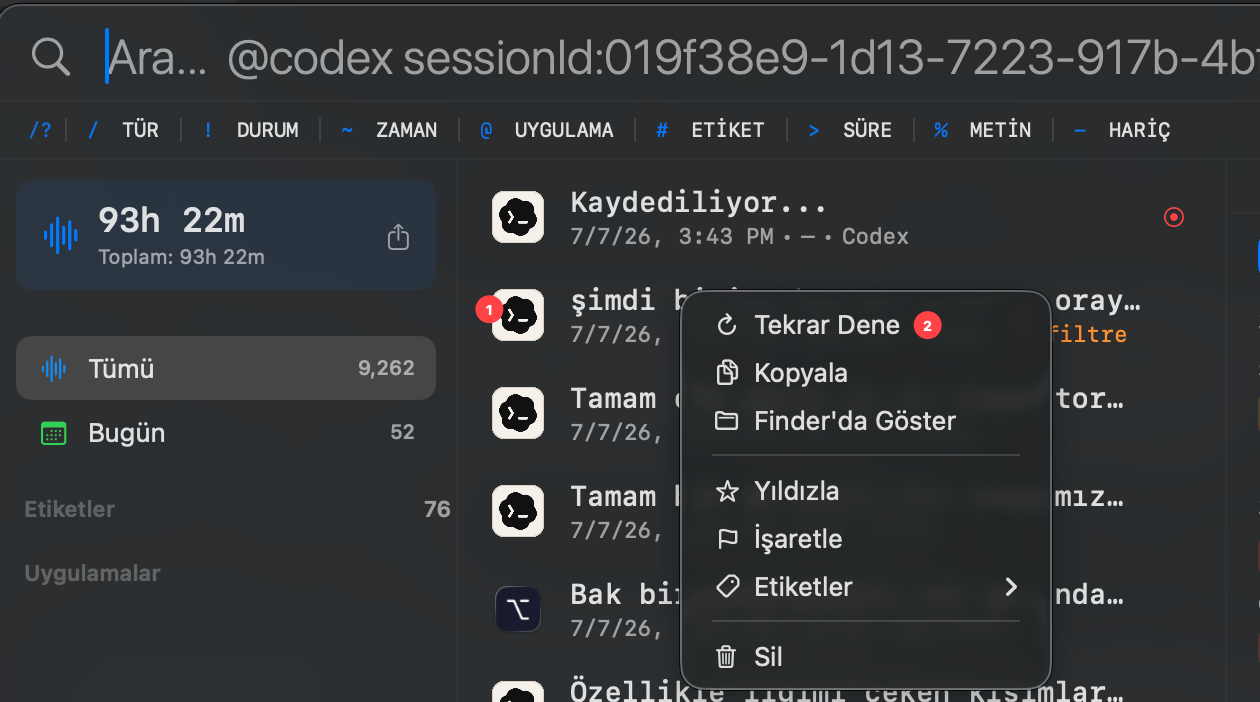
- 1Past conversation row
- 2Retry action
Capture actions stay visible while you talk
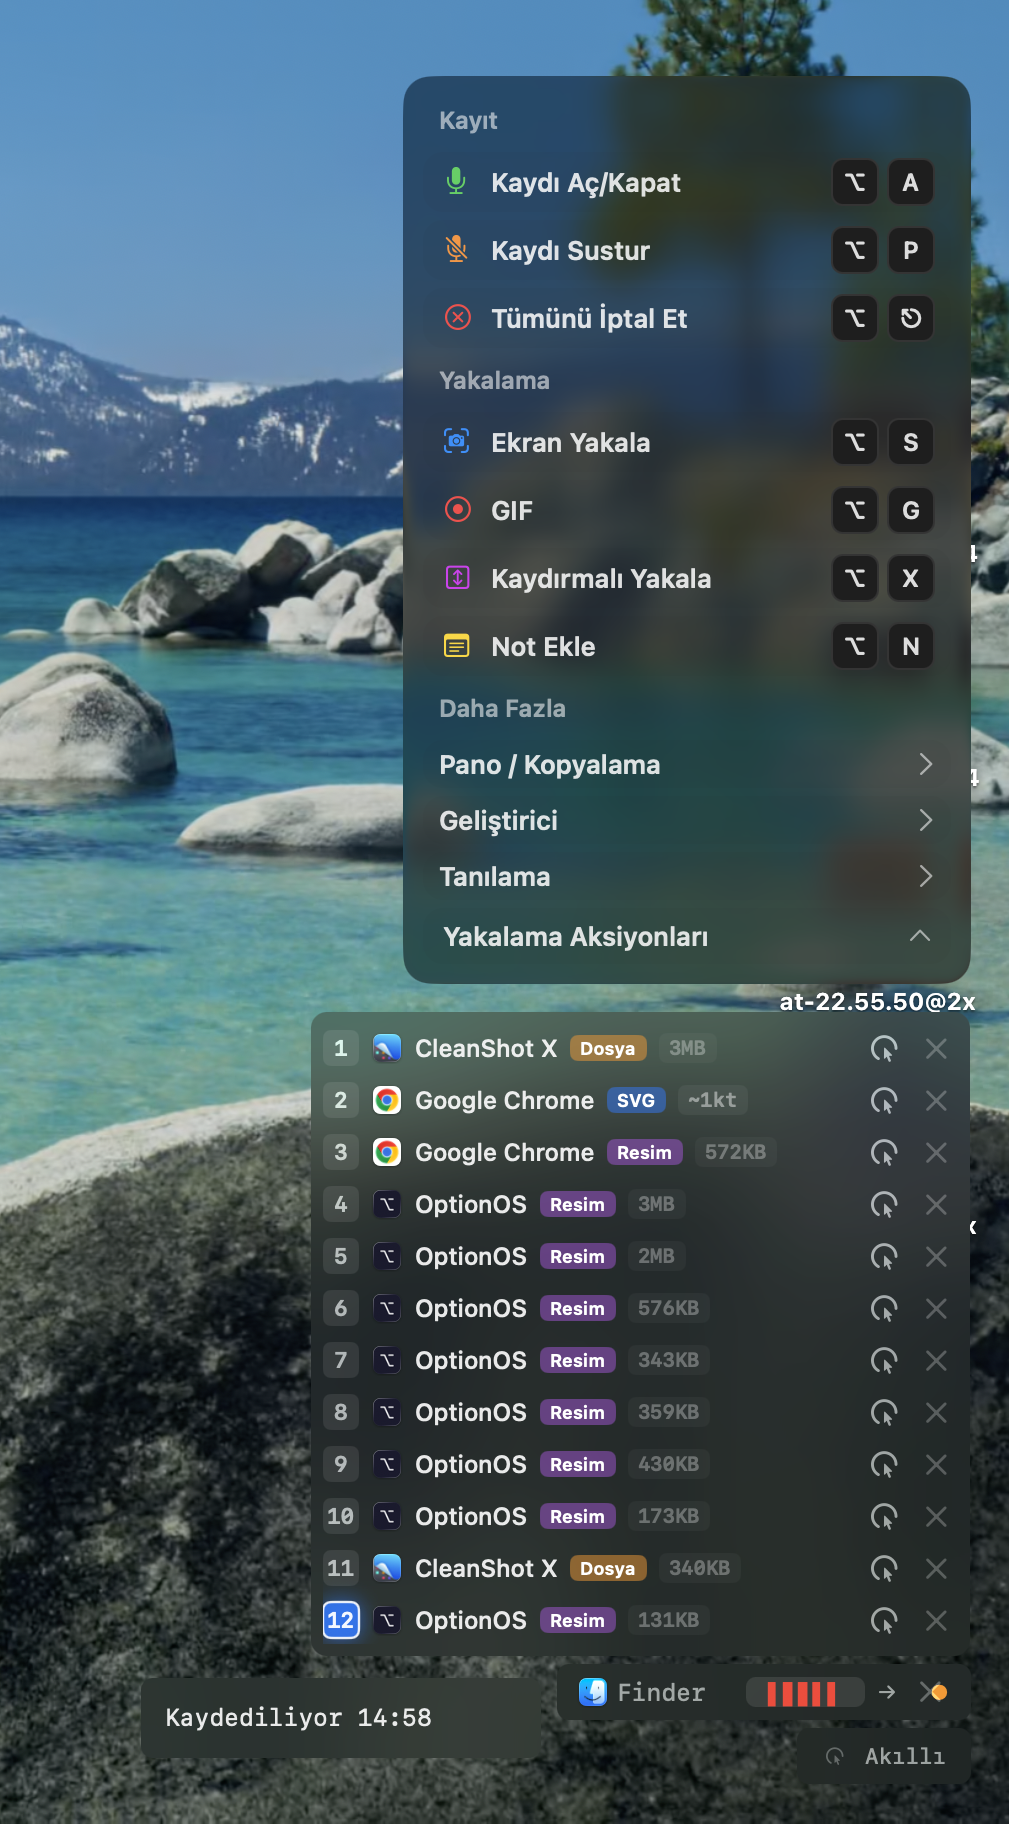
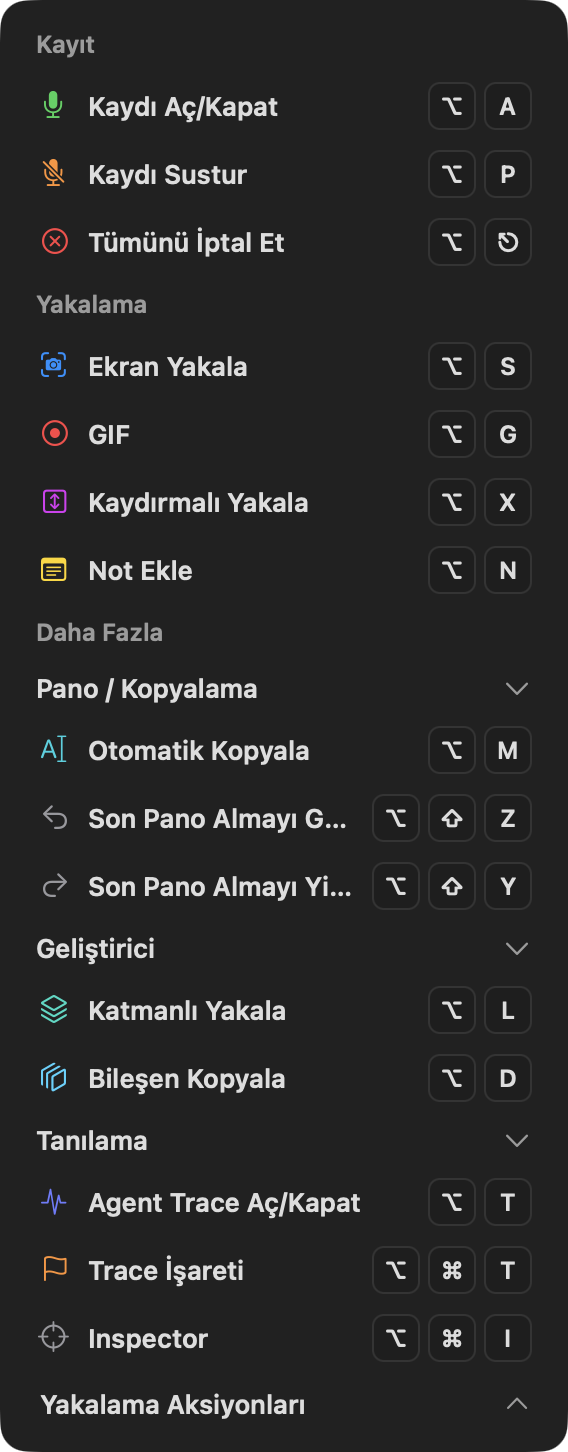
Recording, screenshot capture, GIF, scrolling capture, notes, automatic copy and clipboard undo/redo live on one surface. You can see what is available by hotkey or by button. The panel also shows which app the conversation started in and which content landed in the capture list.
In a browser it behaves like a browser flow; in a local app it behaves like a local app flow. Option+Shift+Z and Option+Shift+Y move the last clipboard action backward and forward, with animated feedback.
You can hold the bottom panel and drag it left or right — carry it to any side of the screen. If you have been copying things, moving it somewhere is more useful than closing it.
Capture, mark up and attach it to what you say
Onboarding now teaches the capture-and-markup flow too. Capture the screen, mark the important area and optionOS adds that visual context to your speech.
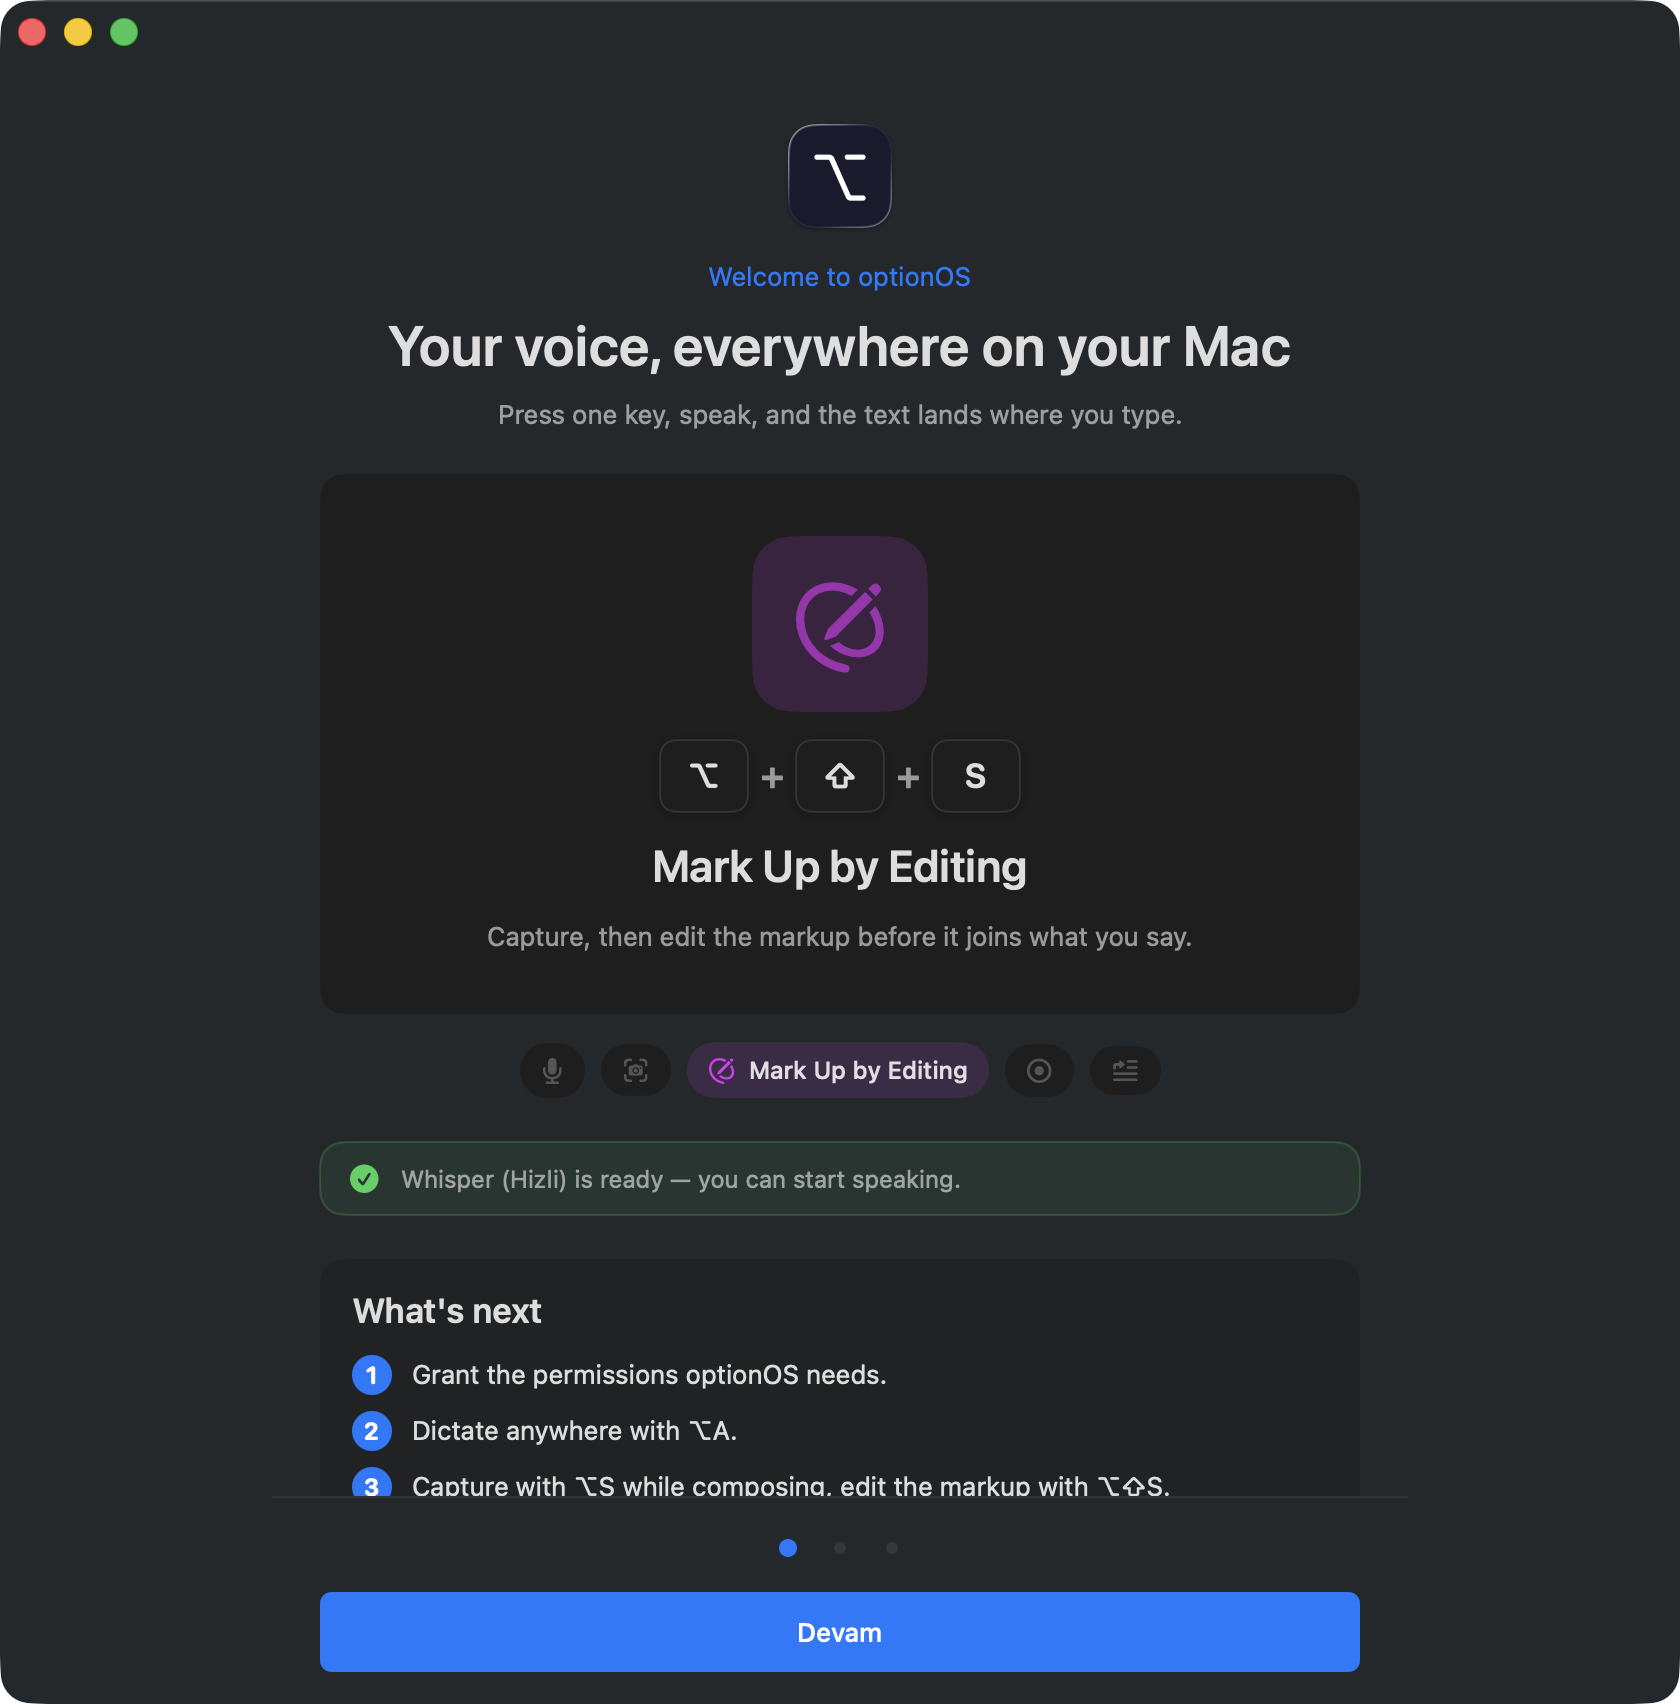
- 1Capture and markup shortcut
- 2Active onboarding card
- 3Engine readiness during setup
Your speech and rectangles stay in sync
For motion, use GIF. For long web pages, use scrolling capture. You can annotate a GIF, but most of the time marking the first frame is enough to show the agent where to look.
When you draw a rectangle while speaking, the label time is attached to the transcript. You do not have to say “one, two, three”; saying it can help, but optionOS already knows when the drawing happened. You stay in the flow and the agent sees the change immediately.

- 1The relevant speech moment
- 2Visual reference
- 3Drawn rectangle label
Conversation history and feedback share the same archive
Past conversations inside the app can be shown like transcripts, with tags and badges. If you think of something later, you can click an old image and add a label on top of it; the speech flow stays intact and the agent can understand it.
Issue reporting follows the same idea: send the problem with voice, screenshots and annotations from inside the app. The feedback arrives with the context needed to improve the app together.
The usage card opens speech history
Pressing the Dictation total card now opens an experimental Usage view. The heatmap, weekly totals and selected-day app breakdown stay in one window, so you can inspect speech history by time and app.
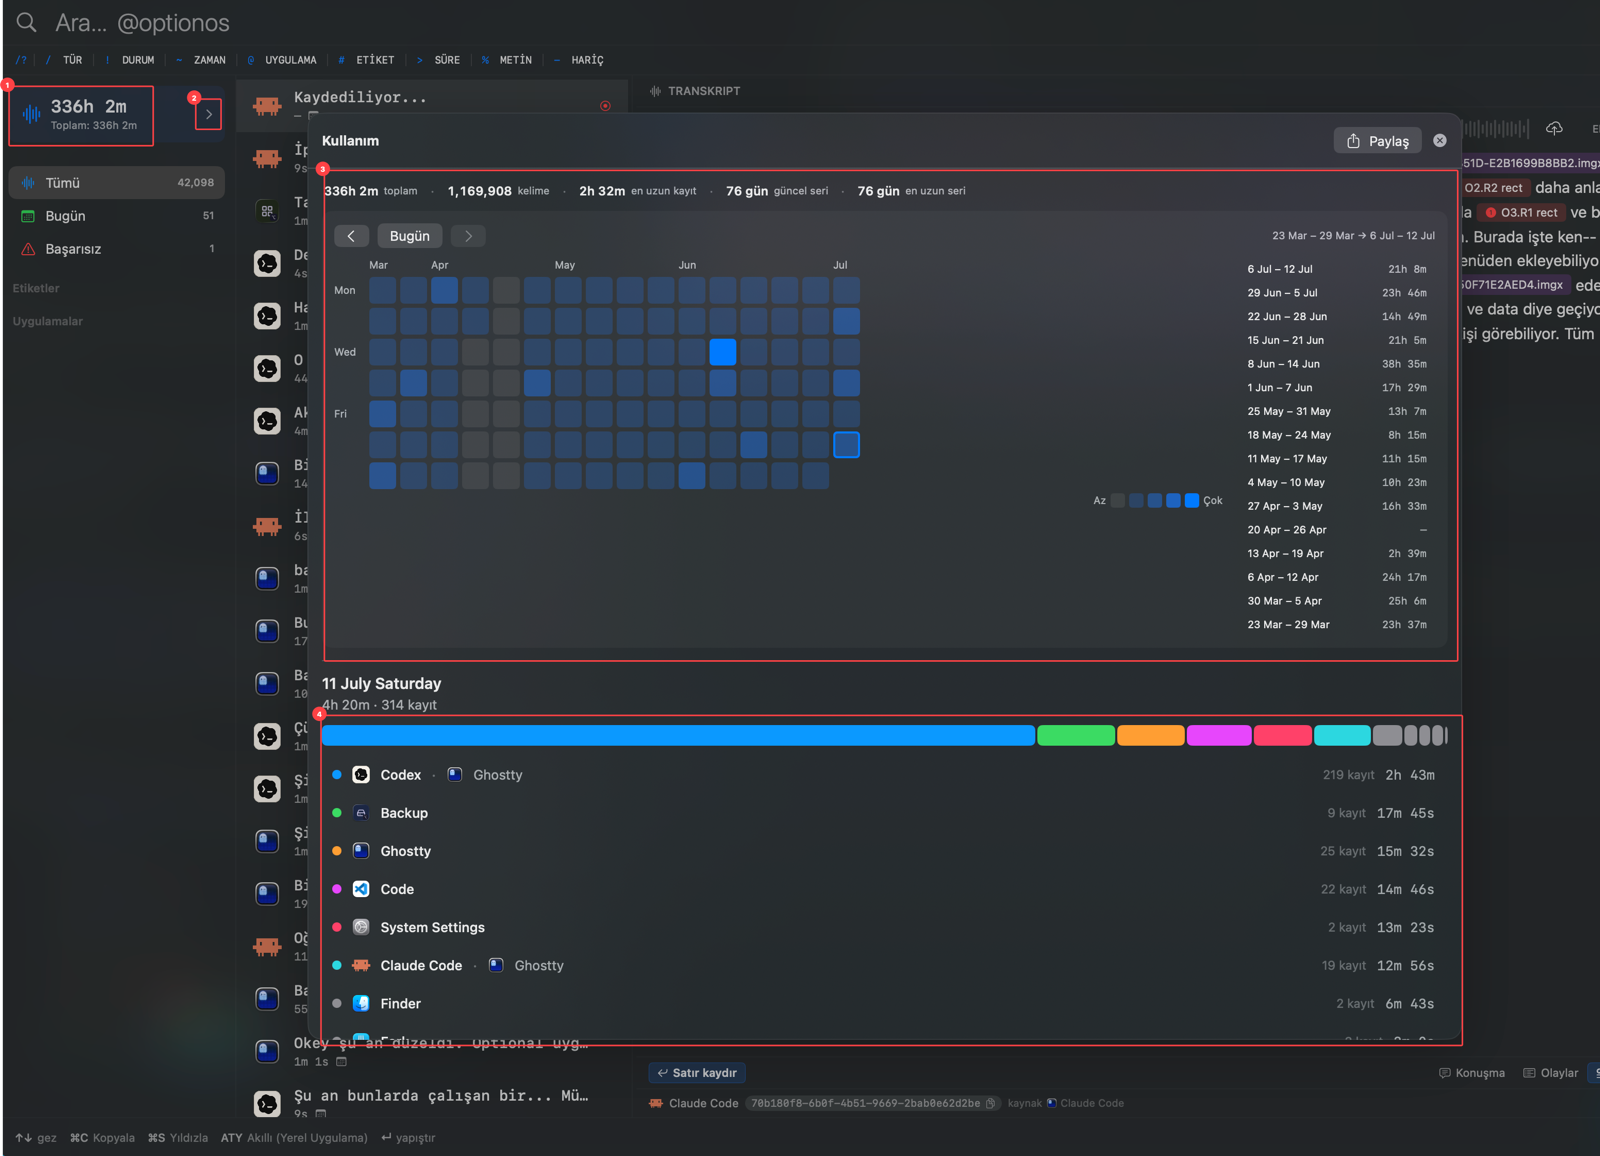
- 1Total-usage card
- 2Usage and speech-history detail
You can share the Dictation usage total
The total-usage card in the Dictation archive now has a share action. Use the share button on that card to turn total time and usage breakdown into a visual share card.
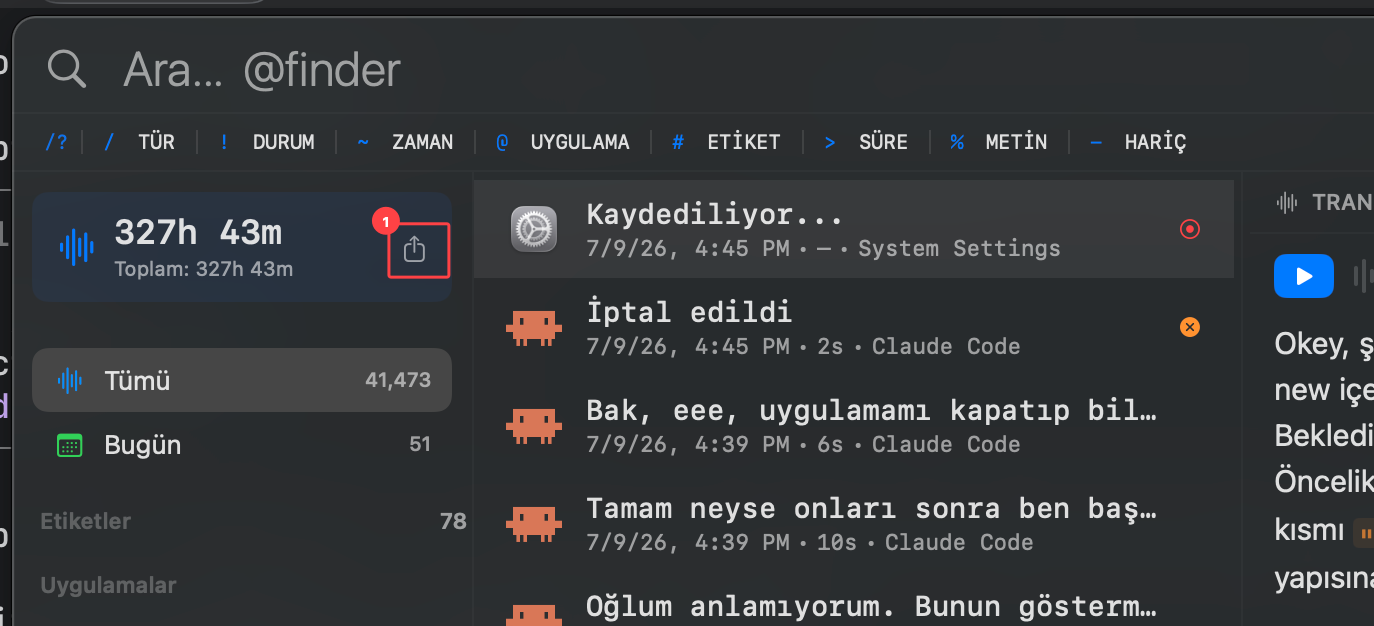
- 1Usage total share action
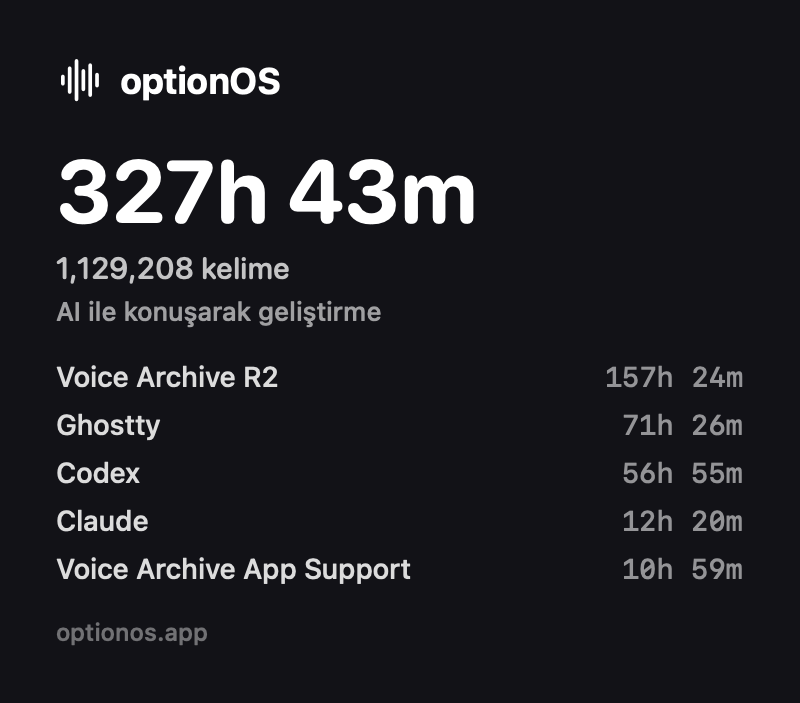
The stats card exports as PNG
The share action creates an optionOS-branded PNG. It shows total speaking time, word count and the top app breakdown, so you can share the usage stat as one image.
HUD actions are visible with their hotkeys
Record, mute, cancel, screenshot, GIF, scrolling capture, OCR and note all live in the HUD. The same surface shows the target app and what has entered the capture queue.
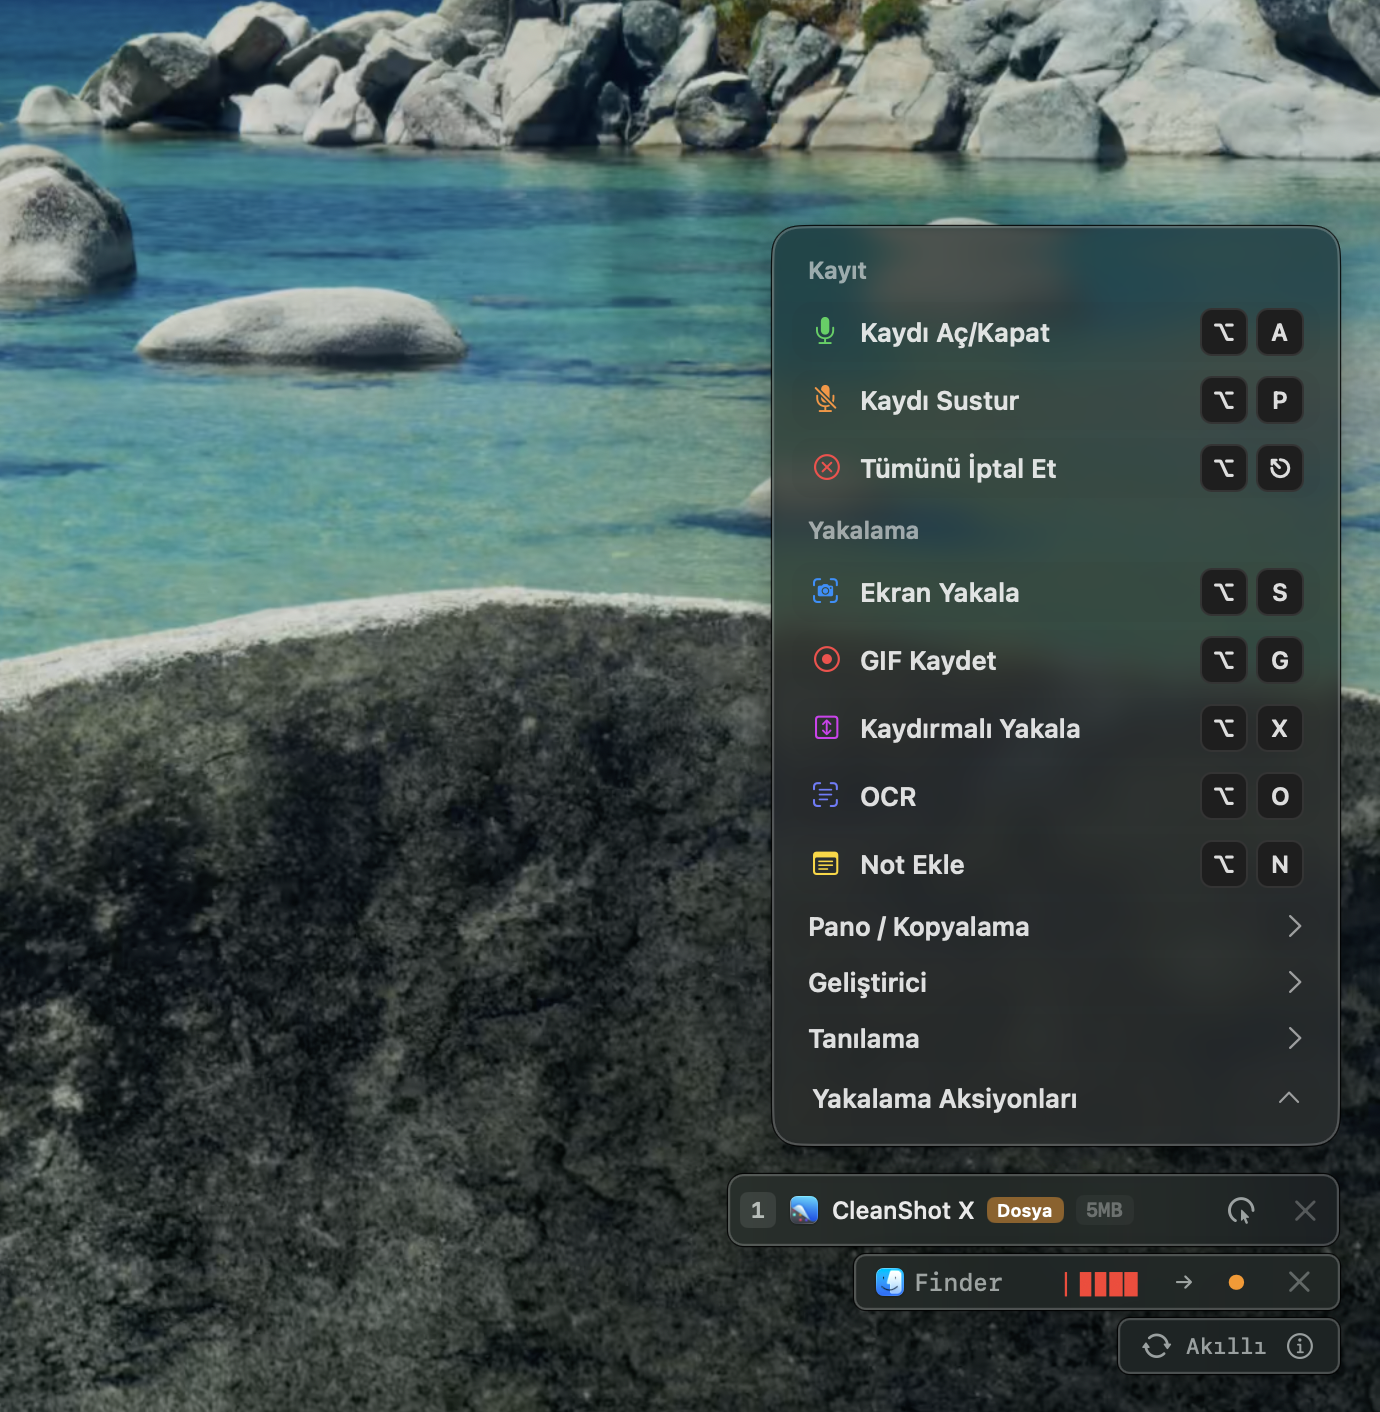
- 1Recording actions
- 2Capture actions
- 3Clipboard, developer and diagnostics groups
- 4Target app and capture queue
Move the indicator where you want and choose its surface
In Settings → Indicator, you can choose the recording indicator surface and its position on screen. You can also press and drag the small panel directly, so the indicator adapts to your workspace.
The Notch surface gives you a quieter indicator
Choose the Notch surface when you want a more modern indicator that takes up less space. Recording state stays at the top edge of the display without covering the content you are working on.

Control sounds and visual feedback separately
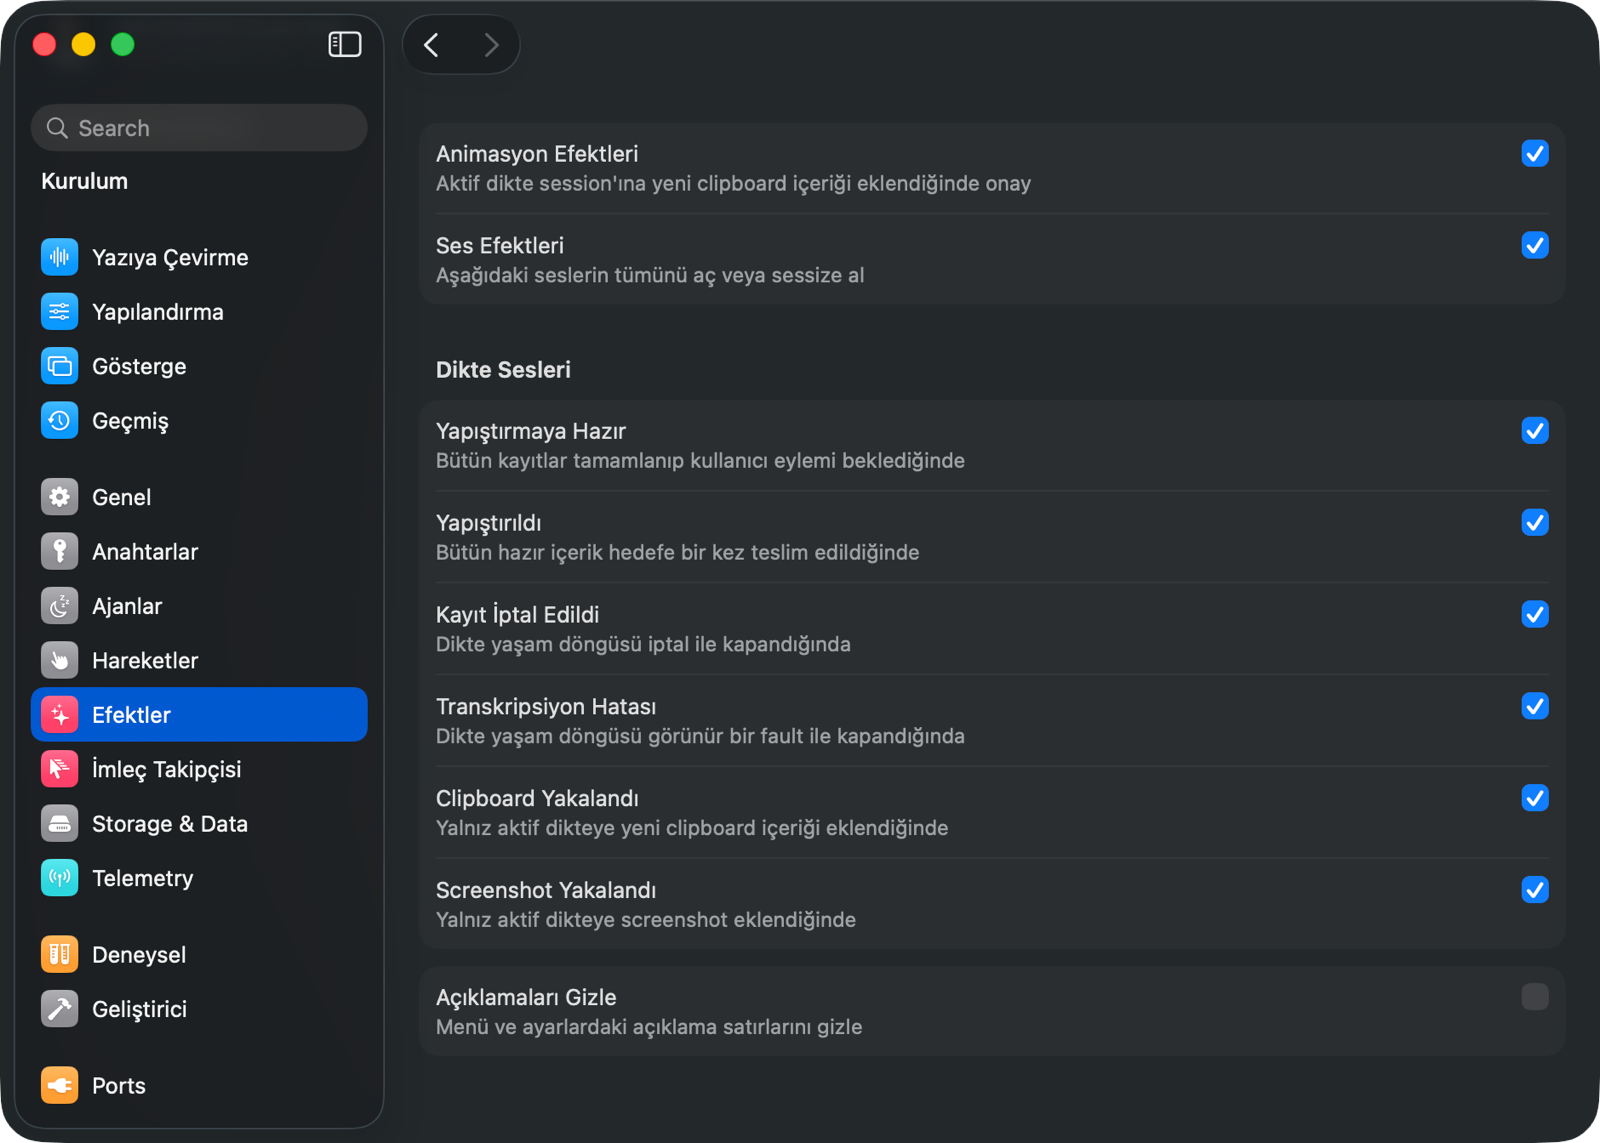
Turn visual motion and sound on or off together, then choose individual sounds for ready to paste, pasted, recording cancelled, transcription error, clipboard captured and screenshot captured states.
Trackpad gestures can replace keyboard shortcuts
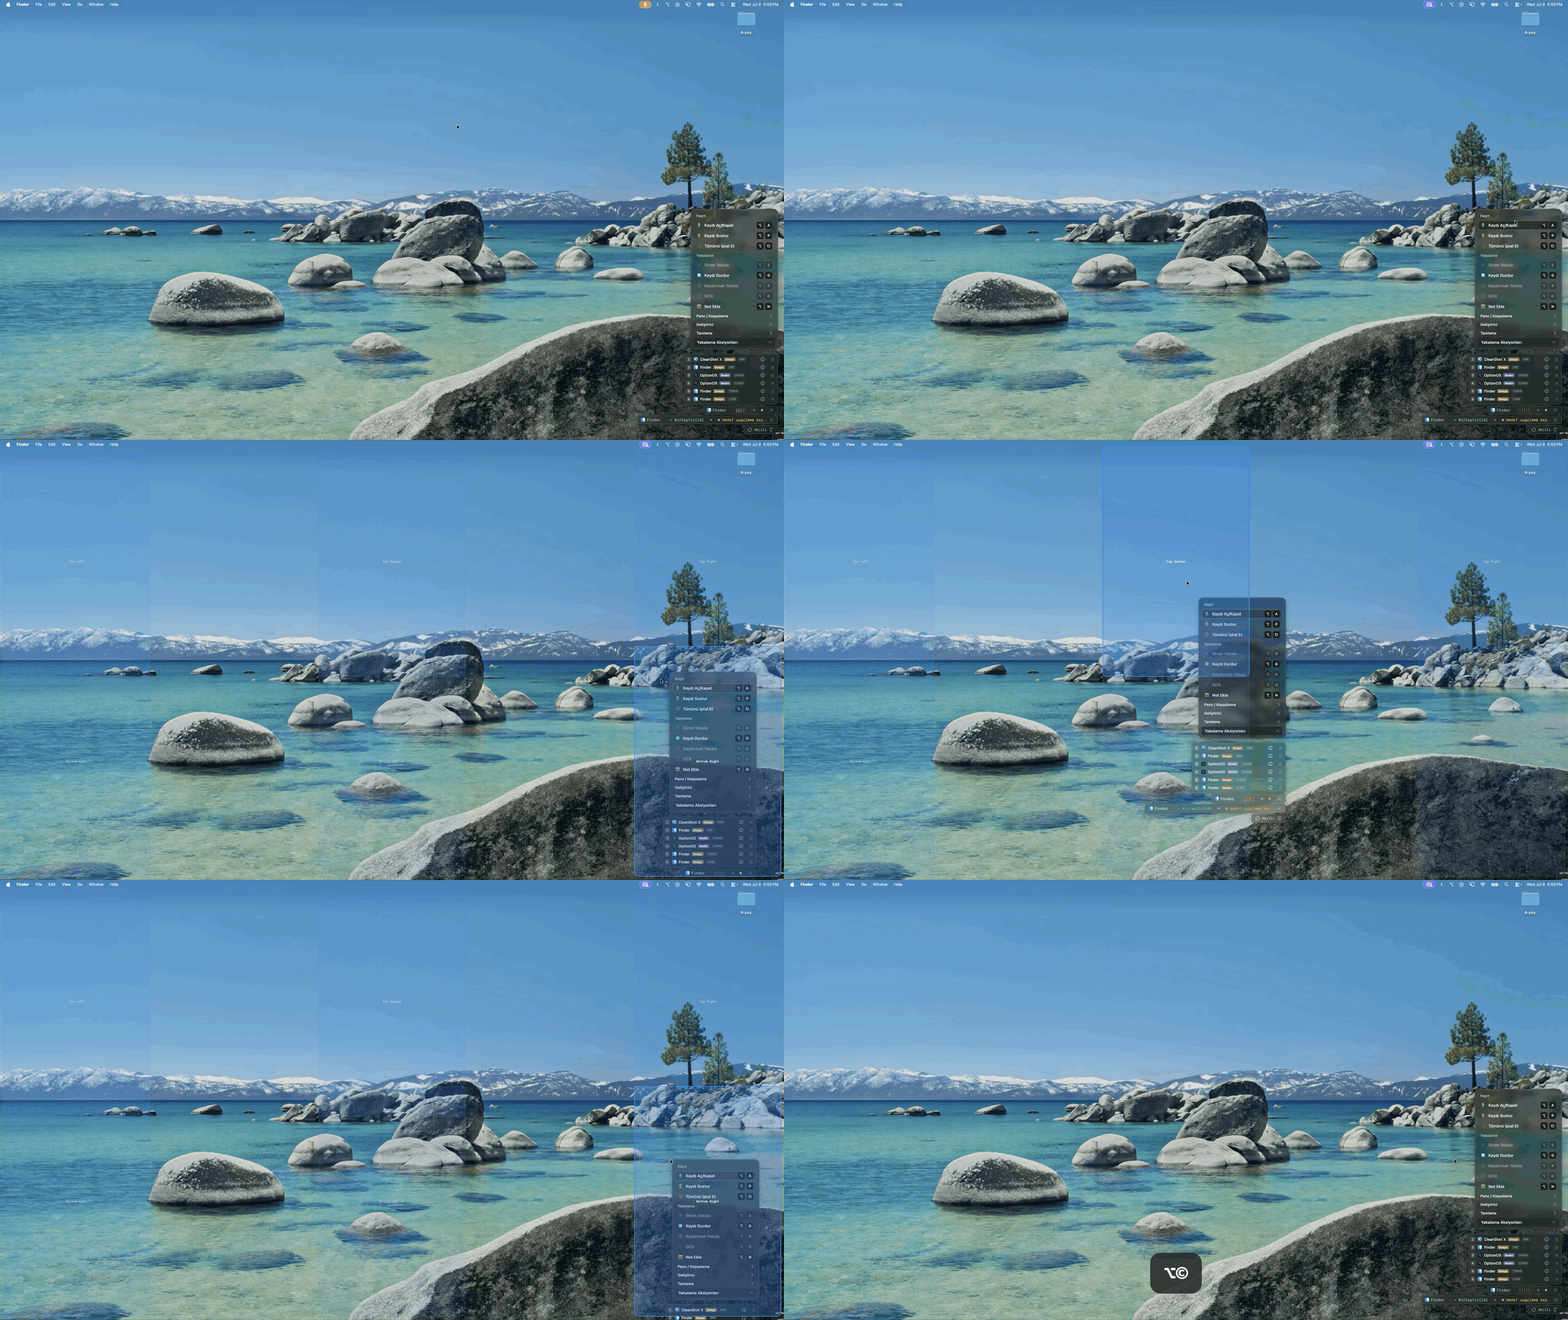
Use a three-finger tap to start or stop dictation, then map corner clicks to paste, open history or cancel dictation. Each result stays visible beside the gesture and can be tried in the preview above. Because this surface is experimental, unsupported choices remain visibly unassigned.
Use GIF when you need to show motion
Instead of over-prompting an animation, movement or panel behavior, press Option+G and record a GIF. The GIF carries the changing behavior from start to finish in one recording.
Component Copy captures what is behind the UI
Component Copy in the capture menu copies the selected UI piece with its component/source tree, not only as a screenshot. The agent can now see which source files, descendants and routes sit behind the thing on screen.
This currently works for optionOS. When the SDK is published, a developer building their own Mac app will be able to add the SDK and describe their own app this way: precise context, with the relevant source code, modes and pieces in the packet.
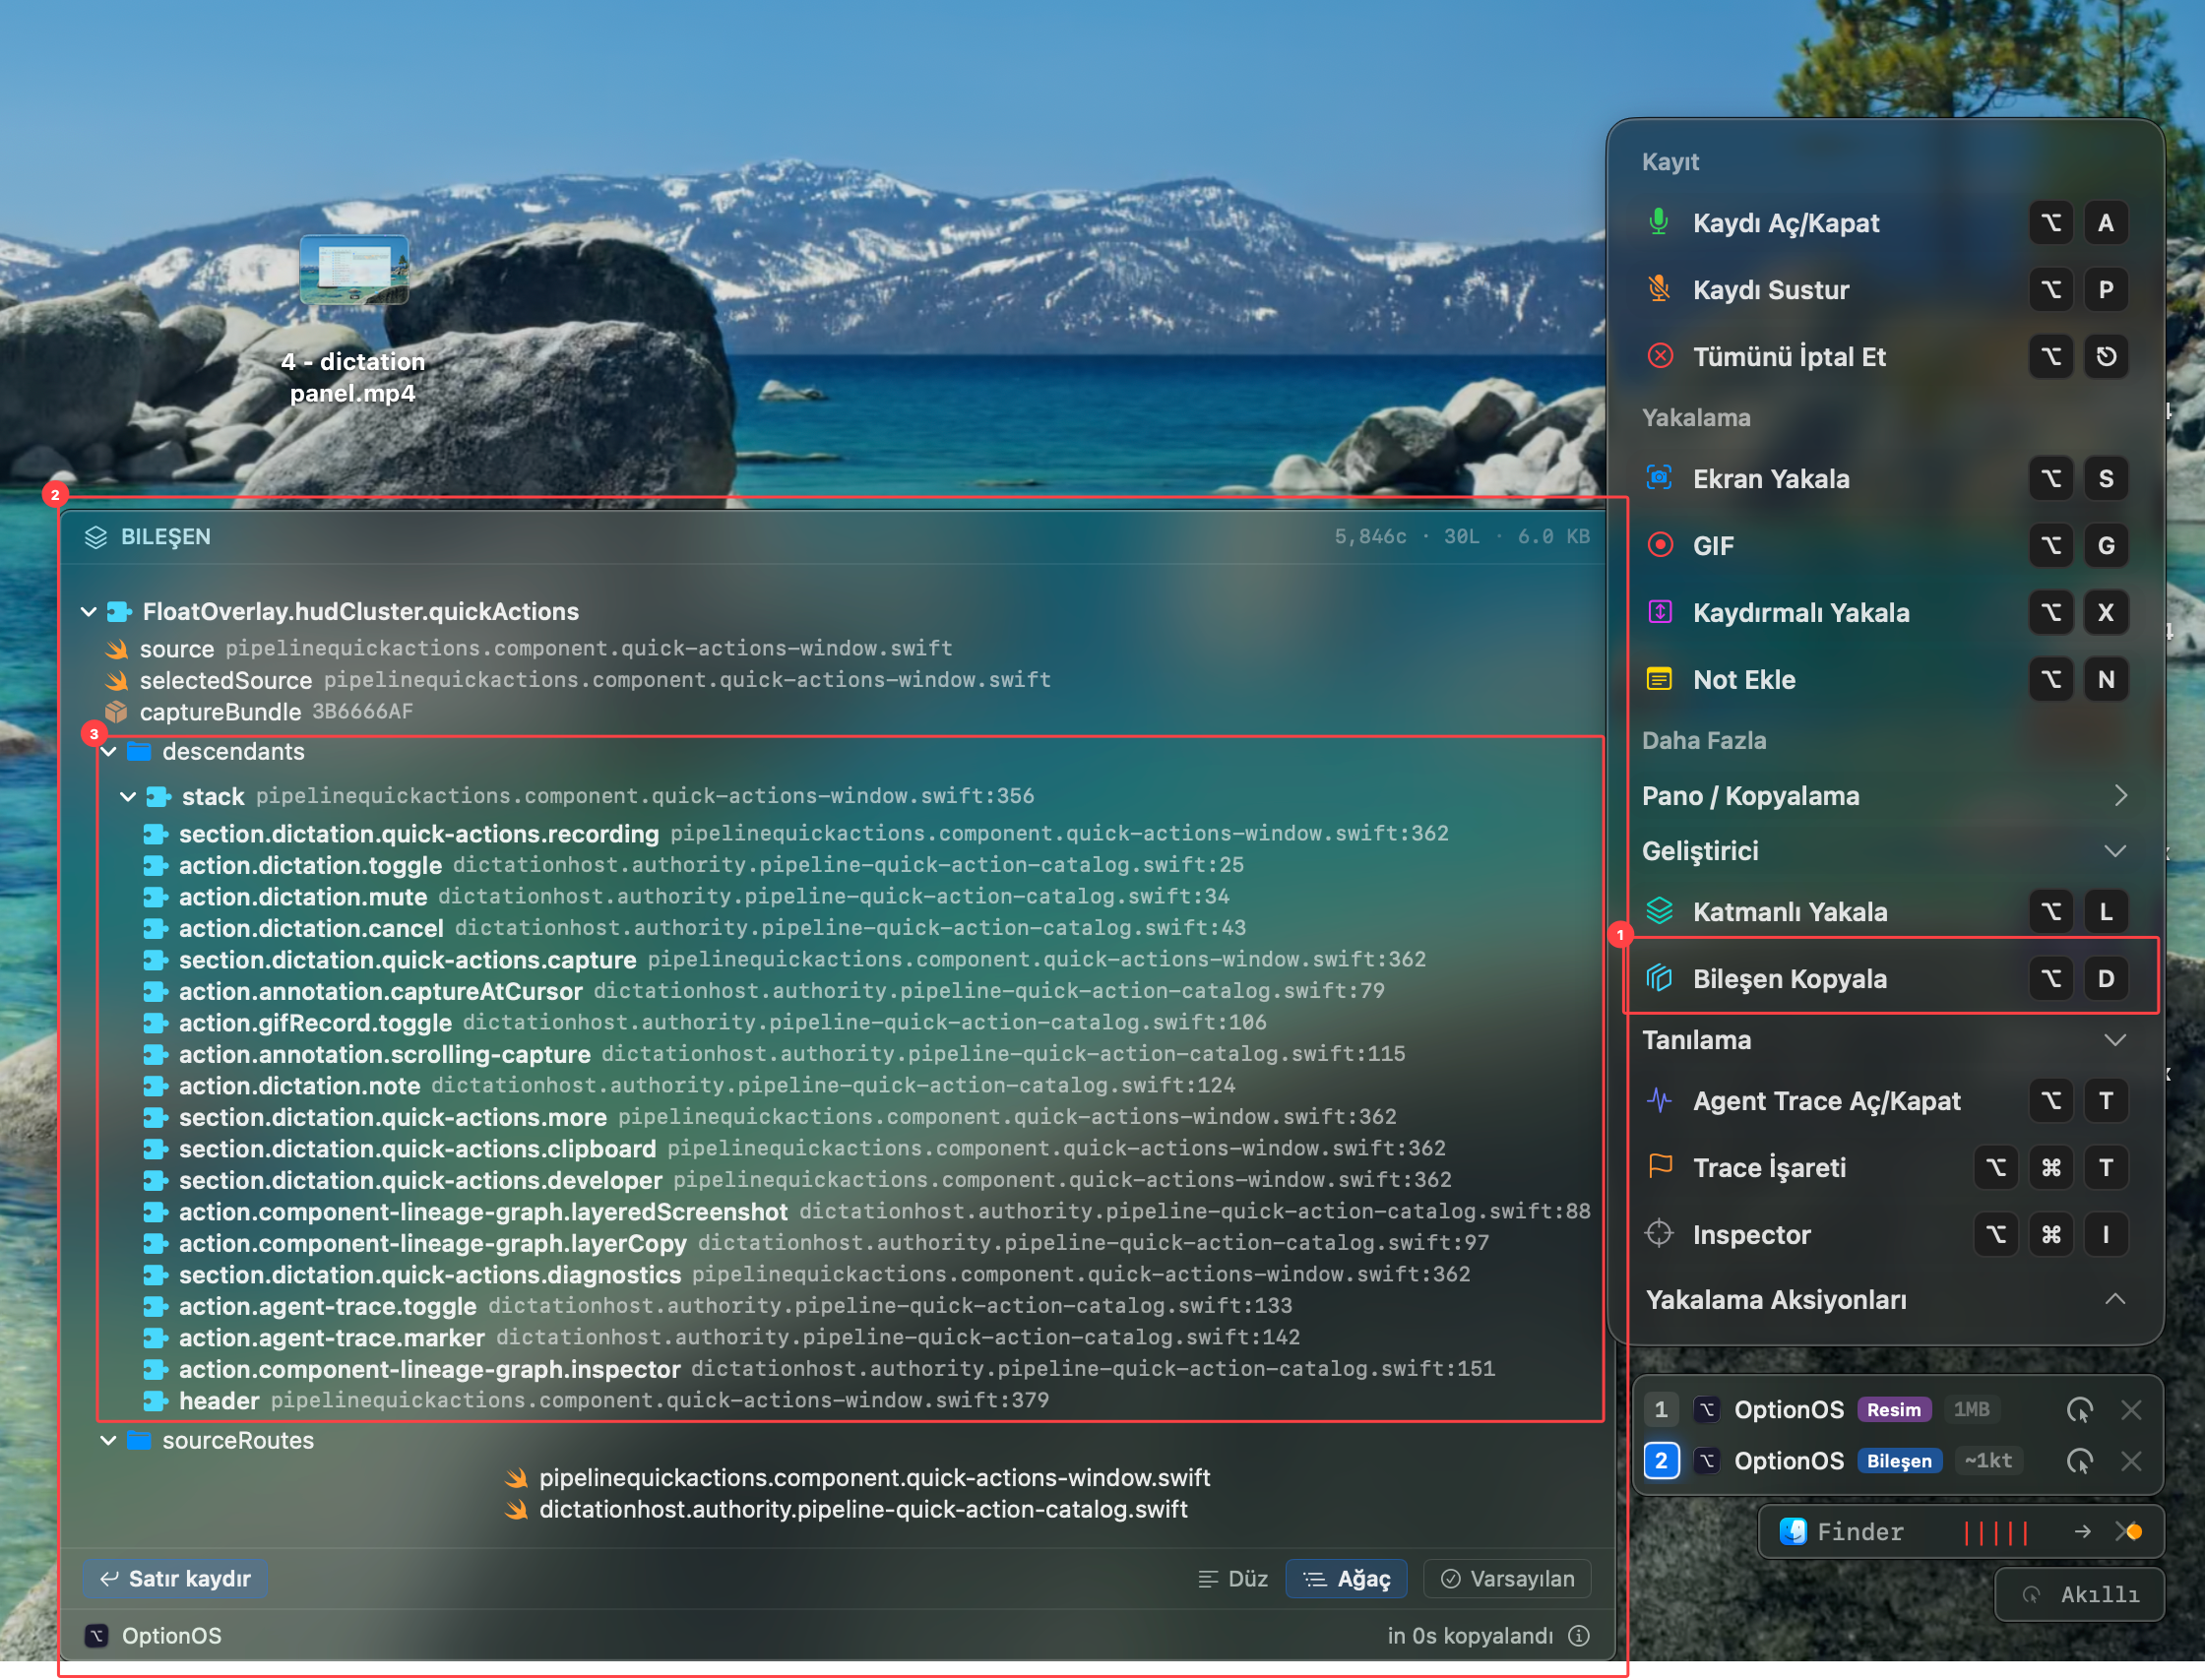
- 1Component Copy in the capture menu
- 2The copied component output
- 3The descendants/source tree
The menu bar is reserved for fast actions
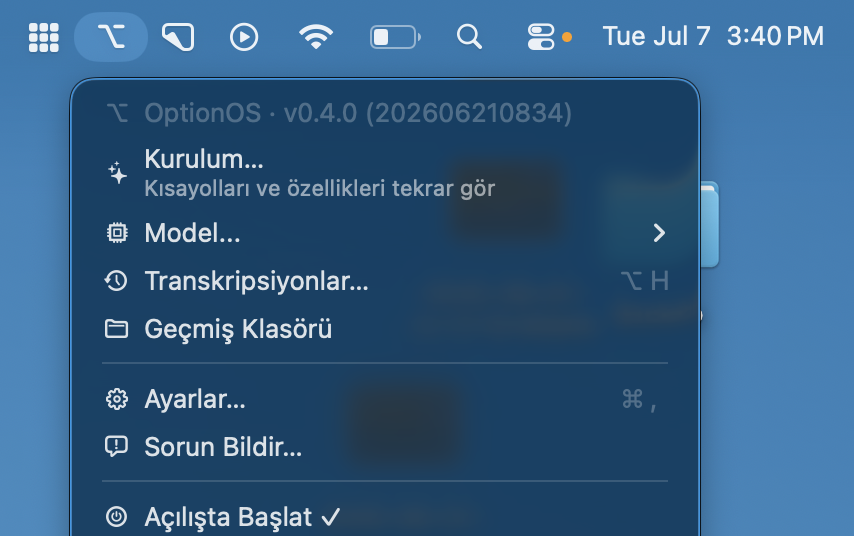
The menu bar now holds frequent actions: setup, model selection, transcripts, history folder, settings, issue report, start at login and copy log command. Bigger decisions moved into Settings, so the menu stays compact.
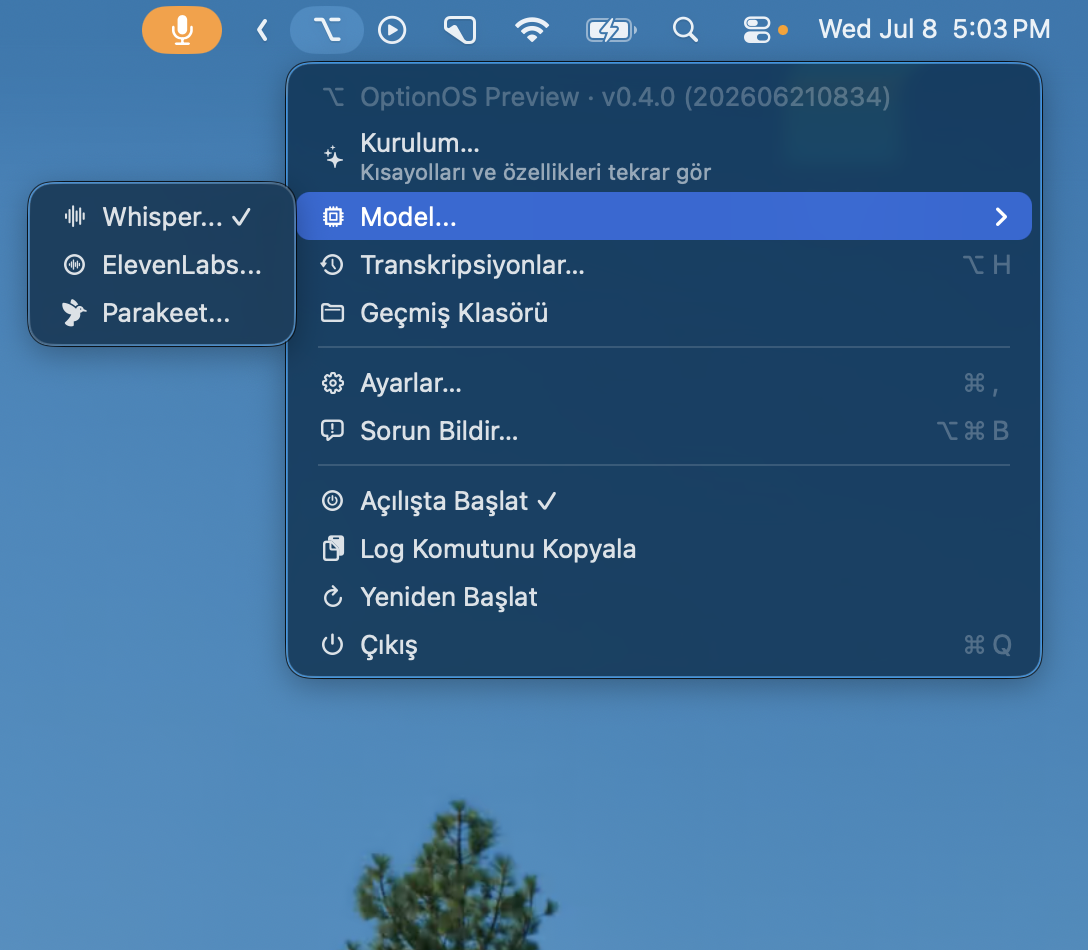
- 1Setup and shortcut replay
- 2Model selection
- 3Transcripts and history folder
- 4Settings and issue reporting
- 5Start at login, copy log command and restart
Settings has been rebuilt from top to bottom
Transcription, Configuration, Indicator, History, General, Keys, Agents, Gestures, Effects, Cursor Follower, Storage & Data and experimental choices now live in one window, separated by the job they affect. Each choice explains what it changes beside the control.
Settings is split by job
Settings is no longer one crowded surface. Motor, Language, Configuration, Display, Quota and History carry the speech workflow; General, Keys, Agents, Gestures, Effects, Storage & Data, Experimental, Developer and Ports keep their own decisions separate.
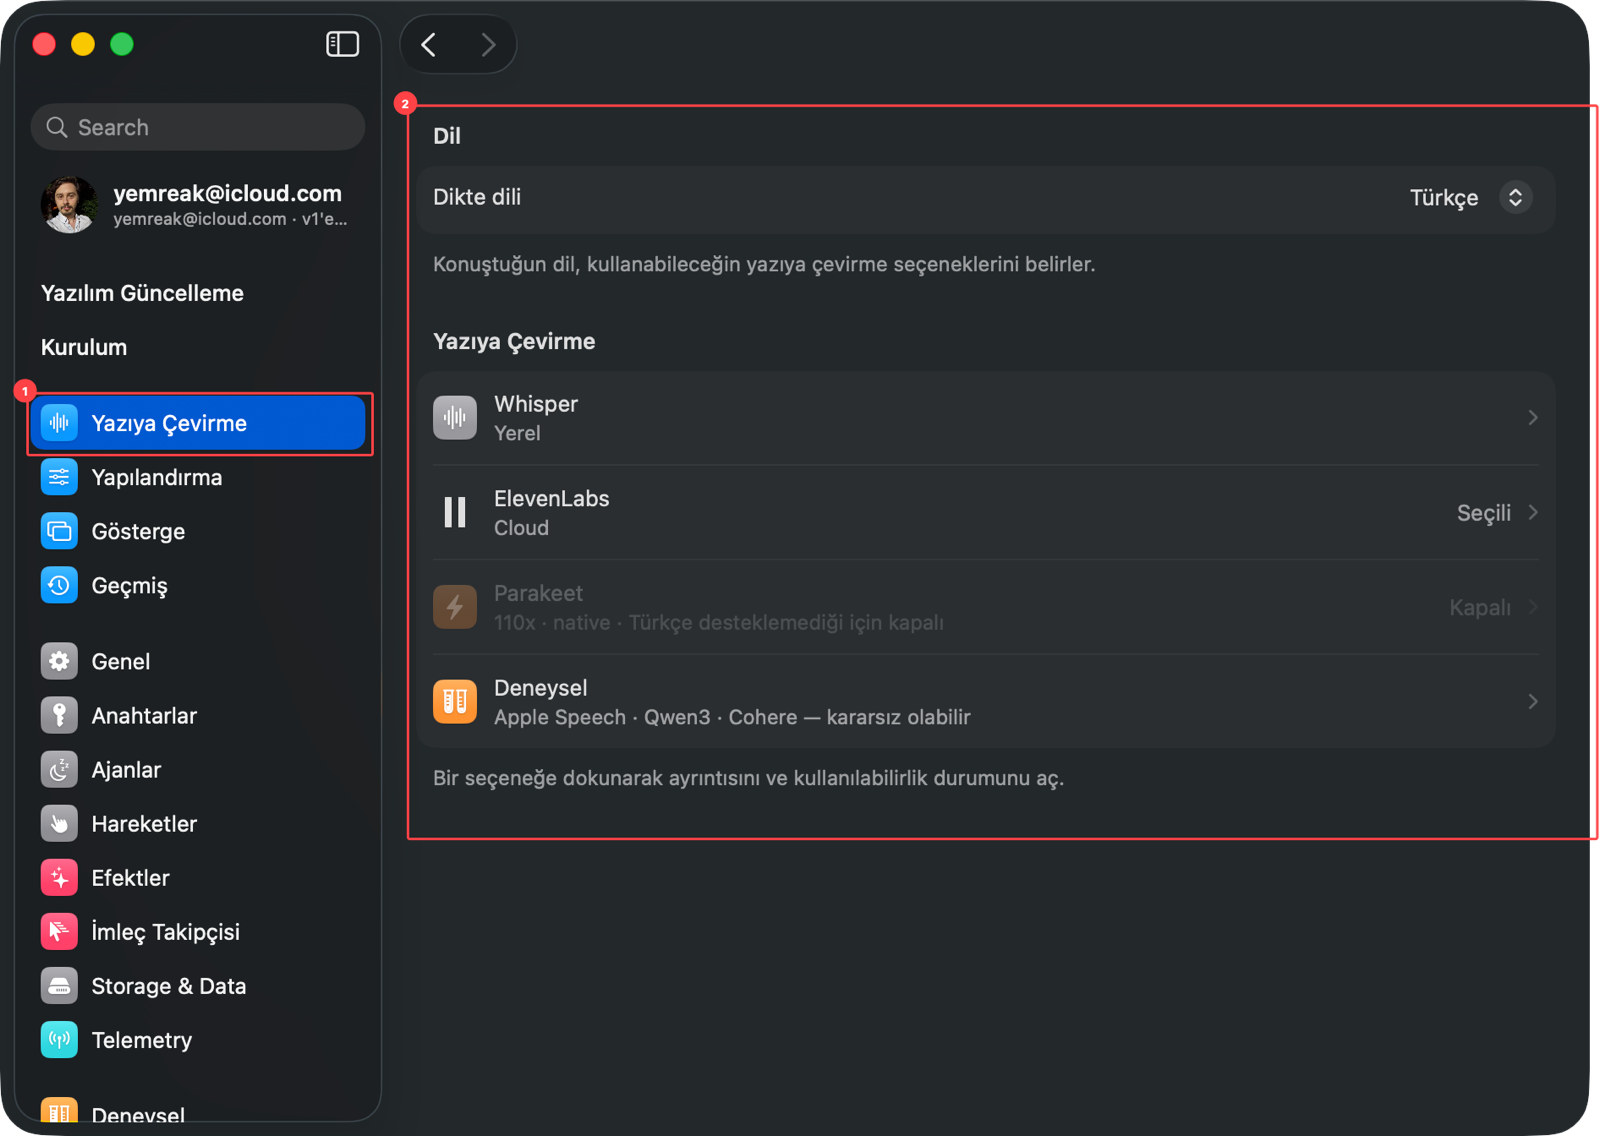
- 1Separate Settings panes
Settings search opens the right section
When you want to change a setting, search for it in the settings bar. Click the suggestion and the matching settings detail opens, without hunting through menus.
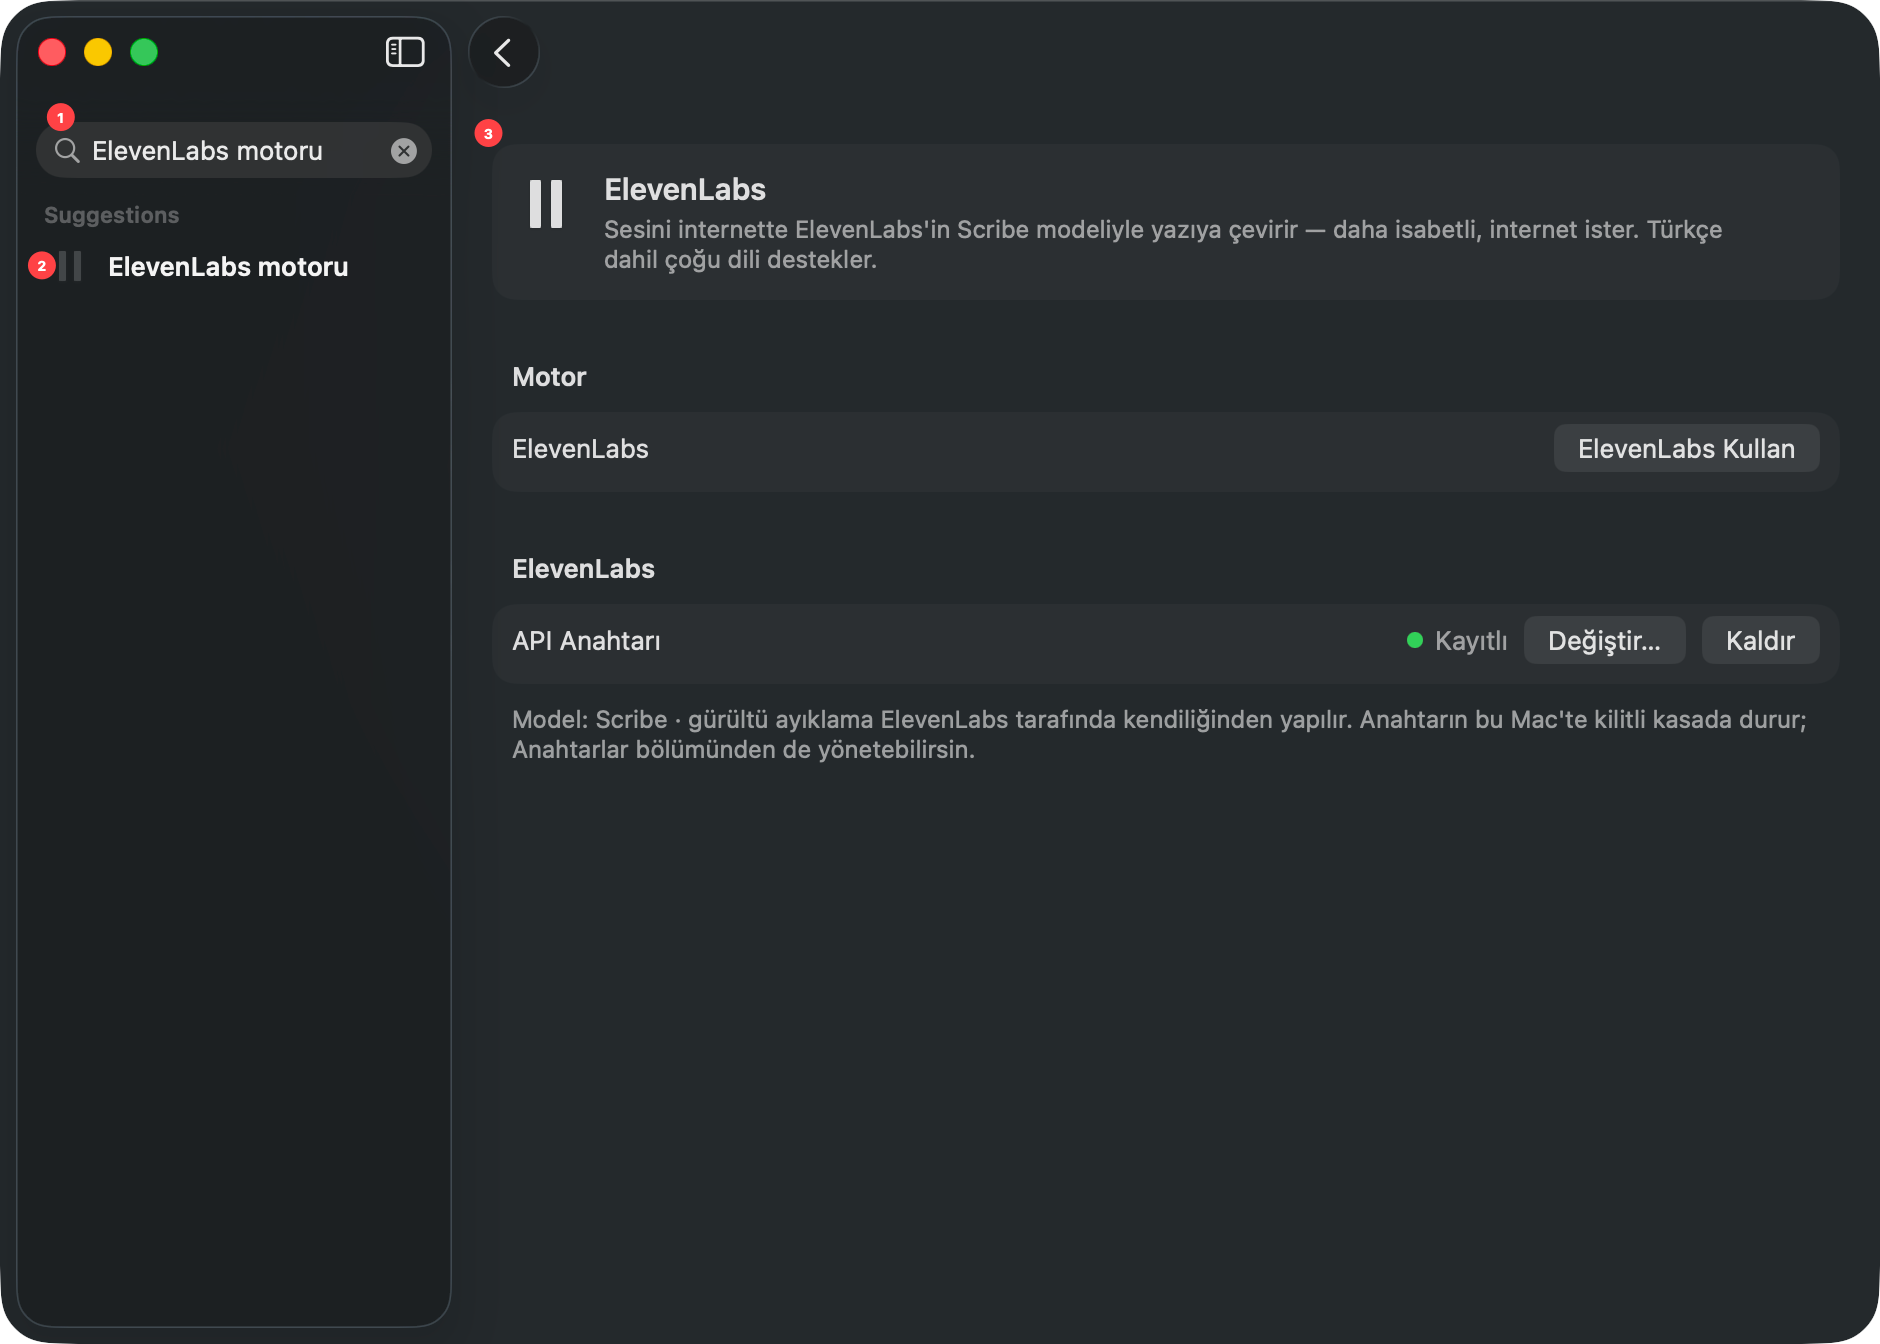
- 1Settings search field
- 2Suggestion result
- 3Opened setting detail
Whisper settings now live in their own section
Choose the Whisper model, processing mode and output behavior in one place. Incorrect outputs such as closing phrases produced during silence have their own list; use the built-in entries or add your own example.
See your ElevenLabs account and remaining usage
When you use ElevenLabs, your account plan, used and remaining character allowance, and renewal date are visible in one place. Refresh the account details without removing and adding the account again.
Storage & Data shows what takes space
See the data kept by the app and the space it uses at a glance. Dictation, Clipboard, Screen Record, Component Capture, Backups and other data are measured separately; open a category to inspect its footprint.
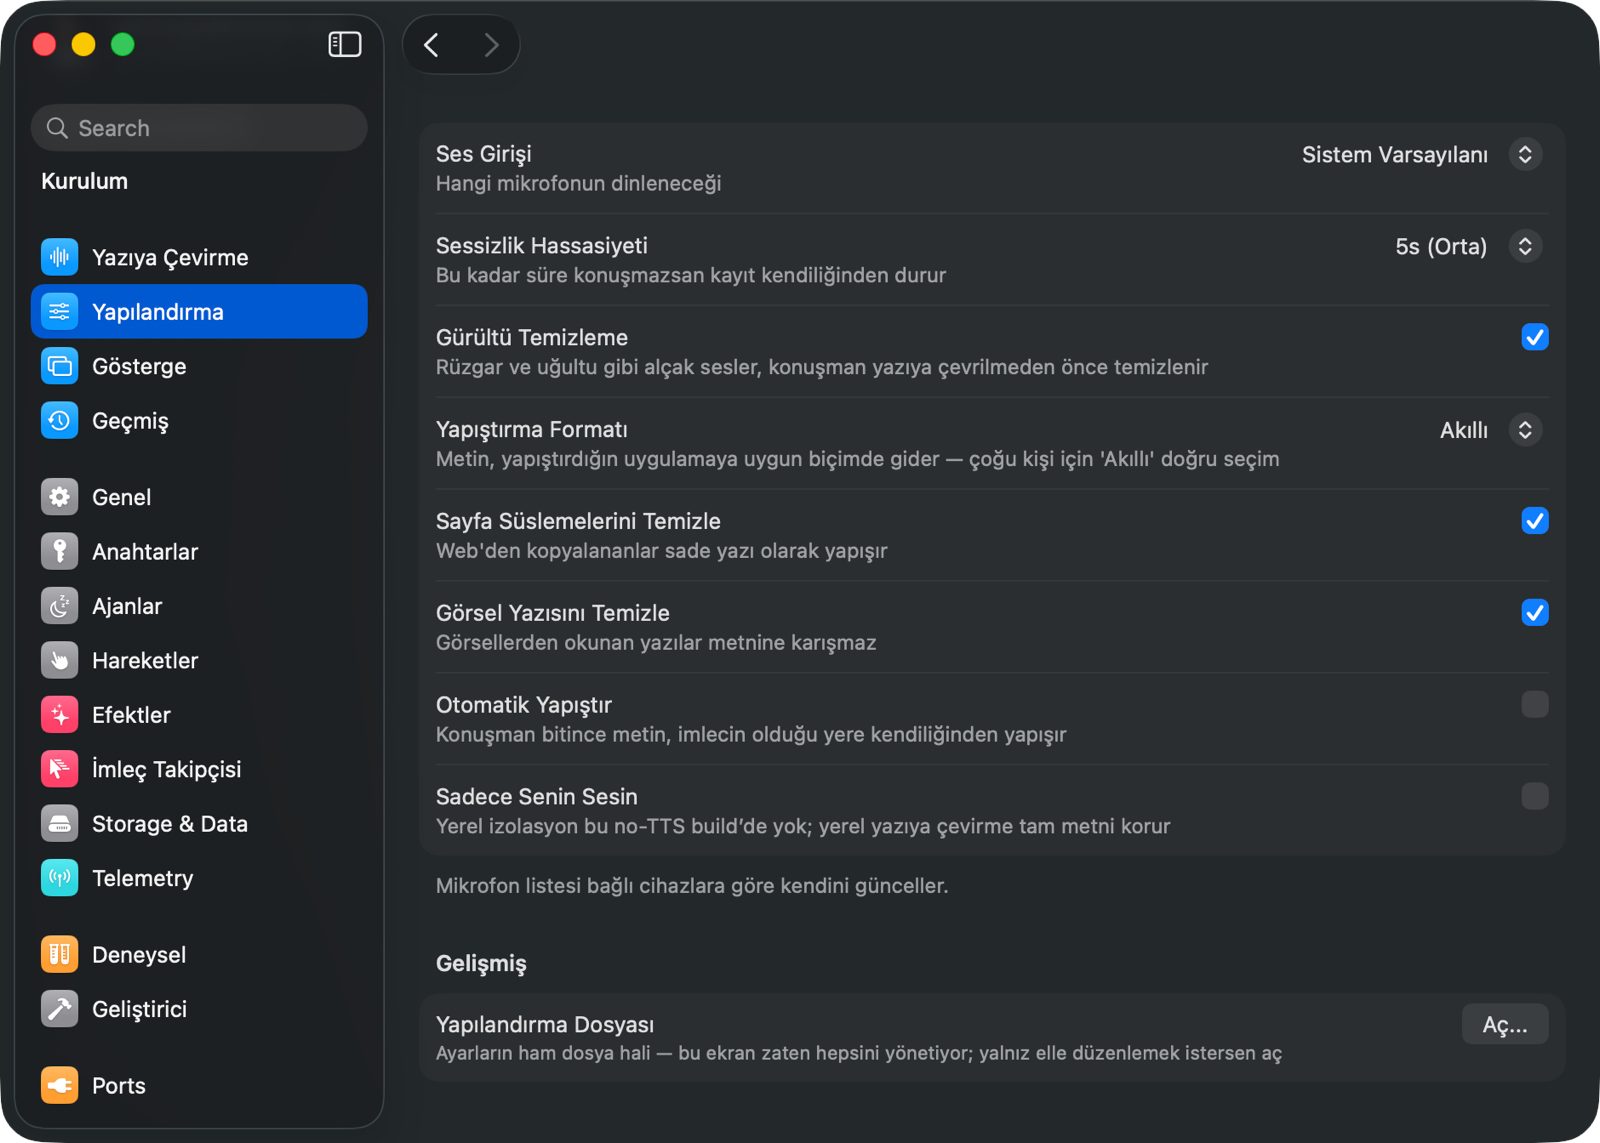
Advanced configuration choices are visible
Microphone, silence duration, noise cleanup, paste formatting, page-decoration cleanup and image-text cleanup now have explicit controls. Experimental choices remain visible too, so you decide whether to use a behavior that is not fully reliable yet.
Capture settings are grouped
Everything is no longer shown at once. Clipboard/Copying, Developer and Diagnostics groups open and close, so the menu looks compact and less confusing.
Screen recording permission now opens with a guide card
When Screen & System Audio Recording permission is needed, optionOS opens a card next to System Settings that shows what to do. Copy the app path, use + in the System Settings list, paste the path, choose OptionOS.app and turn the permission on.
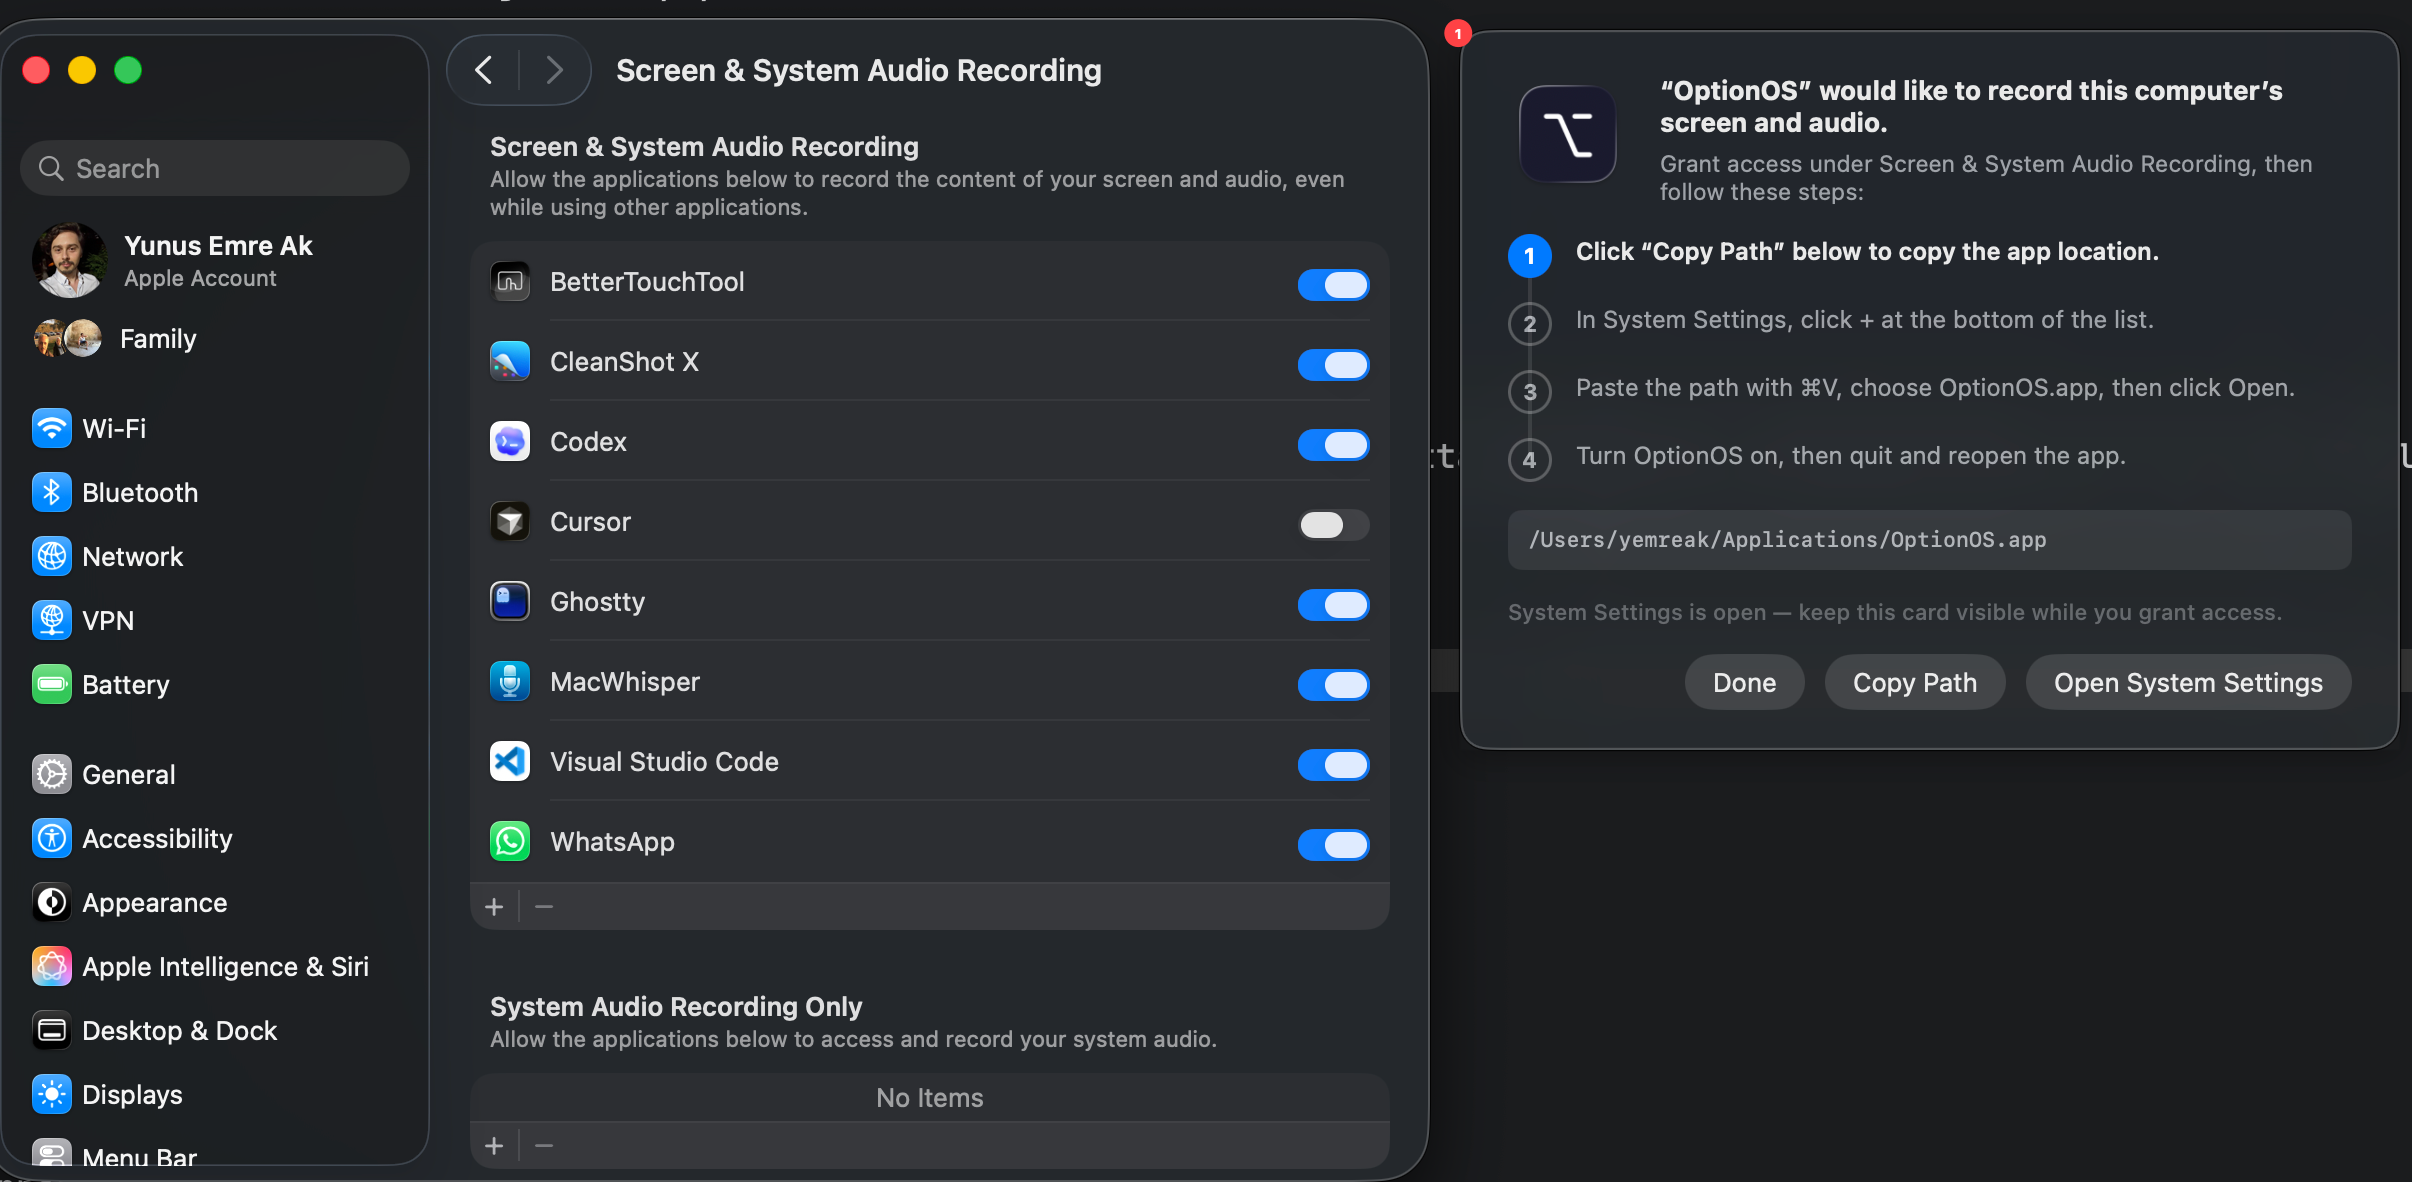
- 1optionOS permission guide card
Turn the cursor follower off whenever you want
Enable or disable the follower that shows recording or writing state beside the pointer from one setting. Separately choose whether it should appear in screenshots and screen recordings.
The menu bar is simpler: fast actions here, settings in the panel
The visual minibar structure is gone. The menu bar now keeps fast actions such as setup, model, transcriptions, history folder, settings and issue reporting. Bigger decisions moved into the new settings panel.
Keep your Mac awake during long agent jobs
Turn on Agent Safe Work to prevent the Mac from sleeping while background agents continue after a long prompt. You can still let the display sleep, measure the state again or release the assertion with one action.
Send SVG as SVG or PNG
When you copy an SVG, optionOS keeps it in the capture list. You can send it to AI as SVG, or turn it into a PNG image. The code form and the visual form stay connected instead of becoming two separate flows.